
Downloading the OKX (OKEx) iOS app on an iPhone and purchasing Bitcoin can be done by first creating an overseas Apple ID, logging into the App Store to download the official OKX application, completing the identity KYC verification, and then using the Quick Buy function inside the app to finish the purchase swiftly.
OKX is a top‑tier global cryptocurrency exchange. Because the iOS version can only be obtained with an overseas Apple ID, this guide walks you through the entire process: registering an overseas Apple ID, changing the account region, downloading the OKX app, and finally buying Bitcoin.

We have compiled a step‑by‑step checklist for iPhone users, from creating an overseas Apple ID to completing a Bitcoin purchase on the OKX iOS app. The guide emphasizes identity verification and the Quick Buy workflow, helping newcomers get started without trouble. Continue reading for the full procedure.

1. How to Register an Overseas Apple ID
What an Overseas Apple ID Is Used For
The App Store tailors its catalog based on the user’s registered region. By creating an overseas Apple ID you can access region‑locked apps and services—such as certain trading platforms, games, Apple Music, Apple TV, etc. A U.S. Apple ID gives you the largest selection of apps and the easiest way to redeem gift cards, while a Taiwan or Hong Kong Apple ID is sufficient if you only need to download trading platforms (e.g., Binance, OKX). Both regions support Traditional Chinese, making navigation comfortable for Mandarin speakers.
Important Considerations When Using an Overseas ID
- Register the account yourself rather than using a shared or borrowed login; this reduces the risk of privacy leaks, account suspension, or device lock‑out.
- Prefer logging in only to the App Store, not to iCloud or other system services, to lower the chance of Apple flagging the account.
- If you cannot pass the region‑verification step (for example, lacking a Taiwanese IP address or an overseas phone number), you can first create a domestic Apple ID and later change its region to the target country.
- Business accounts or users who already own an overseas mobile number tend to have a higher success rate during verification.
Materials You’ll Need for Registration
- Email address – QQ, 163, Gmail, 189, etc., are all acceptable. If the system returns an error, try a different email.
- Phone number – a working mobile number that can receive SMS verification codes. One phone number can be used to create multiple Apple IDs.
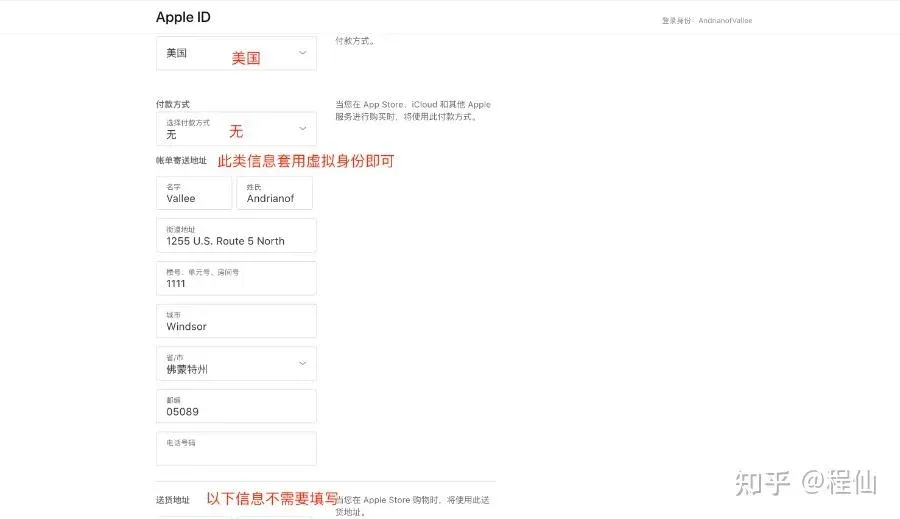
- Virtual address – generate a fictitious but plausible address using online tools such as shenfendaquan.com or meiguodizhi.com. Set the age to 18 + to satisfy the legal requirement.
Step‑by‑Step Tutorial for a Taiwan (or “Chinese Taipei”) Apple ID
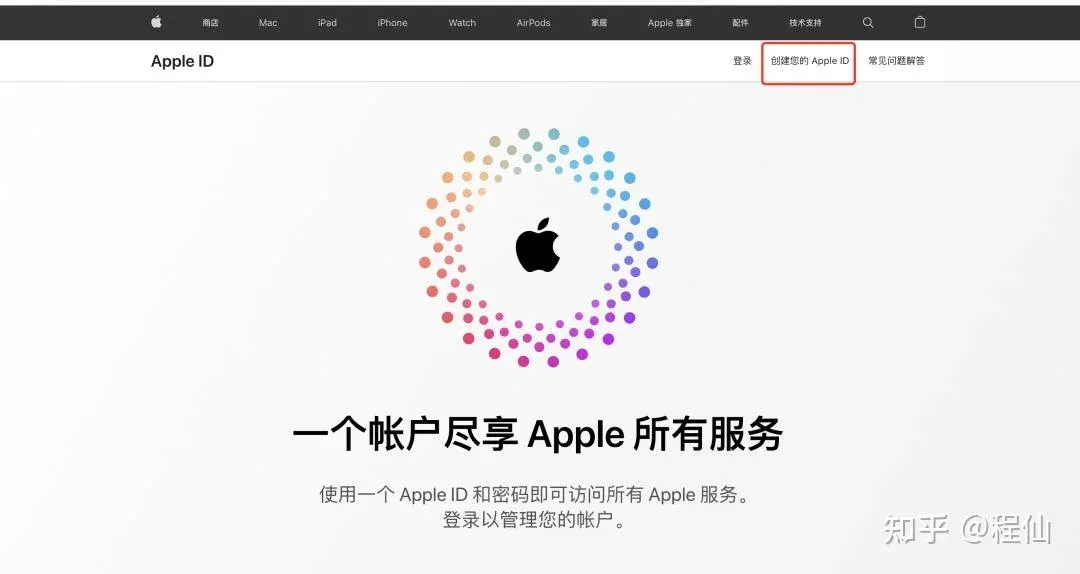
- Visit Apple’s official site appleid.apple.com and click “Create Apple ID”. (Using a computer is recommended.)
- Fill in the virtual personal information generated in the previous step into the corresponding input boxes.
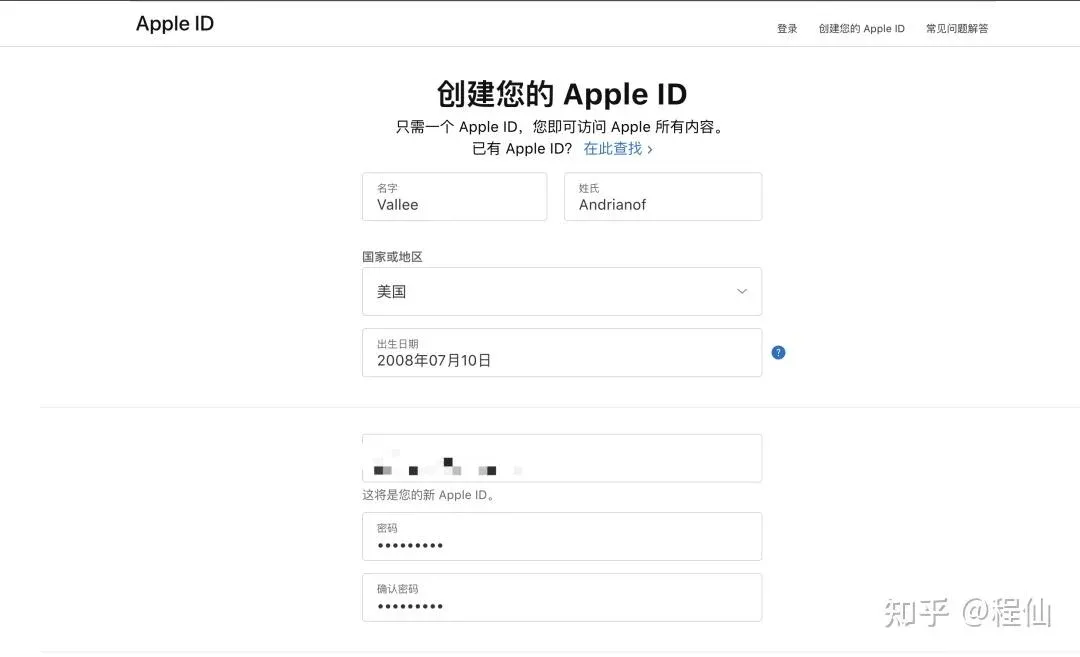
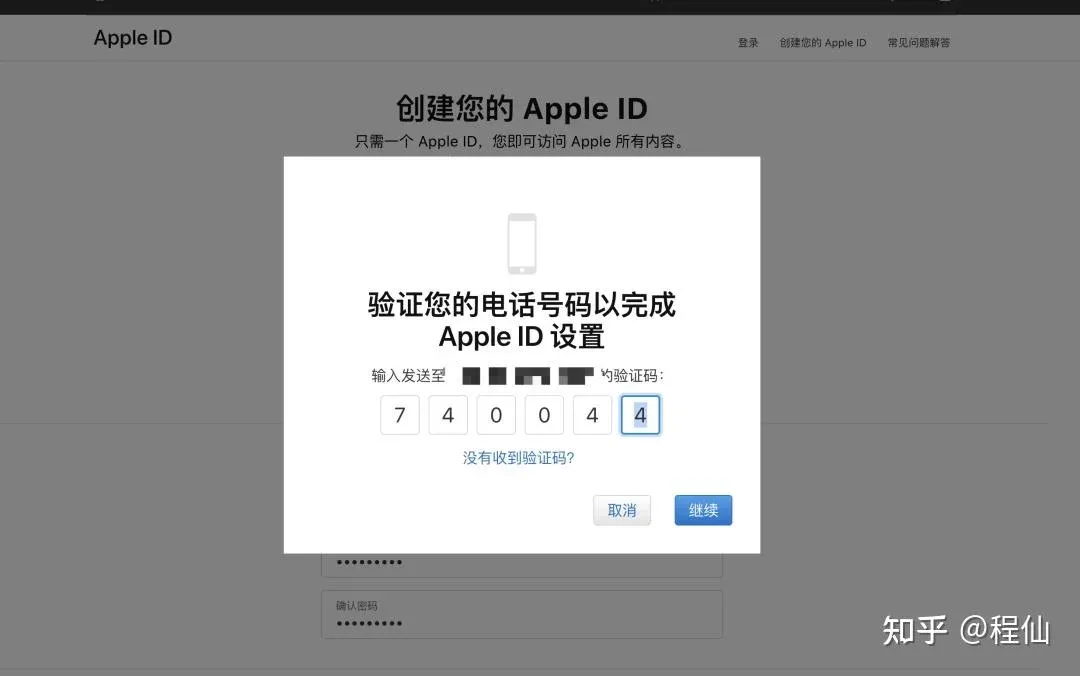
- Complete the graphic captcha, the email verification code, and the SMS verification code.
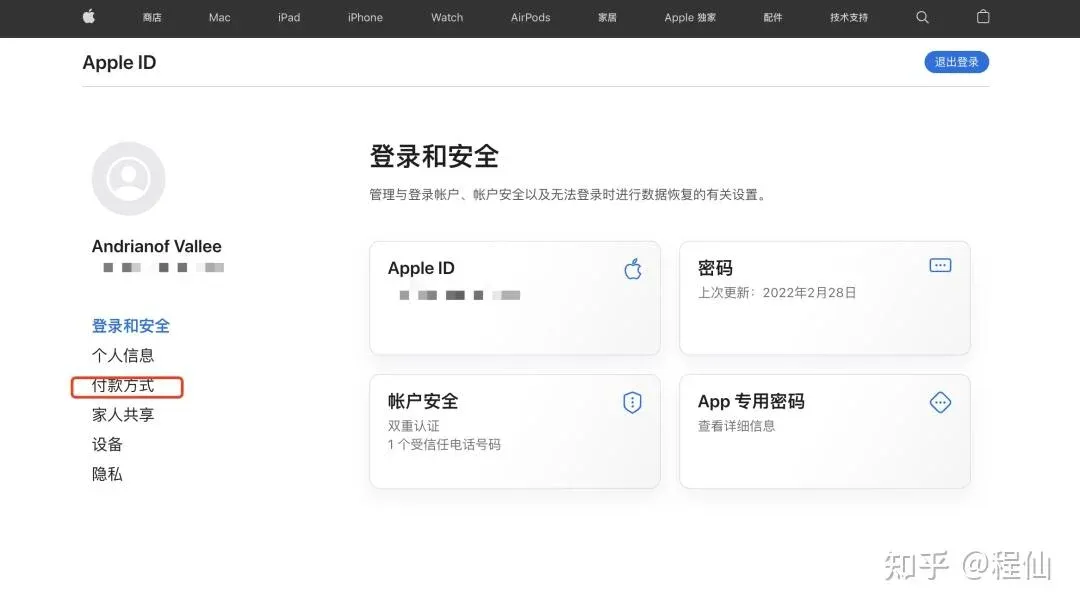
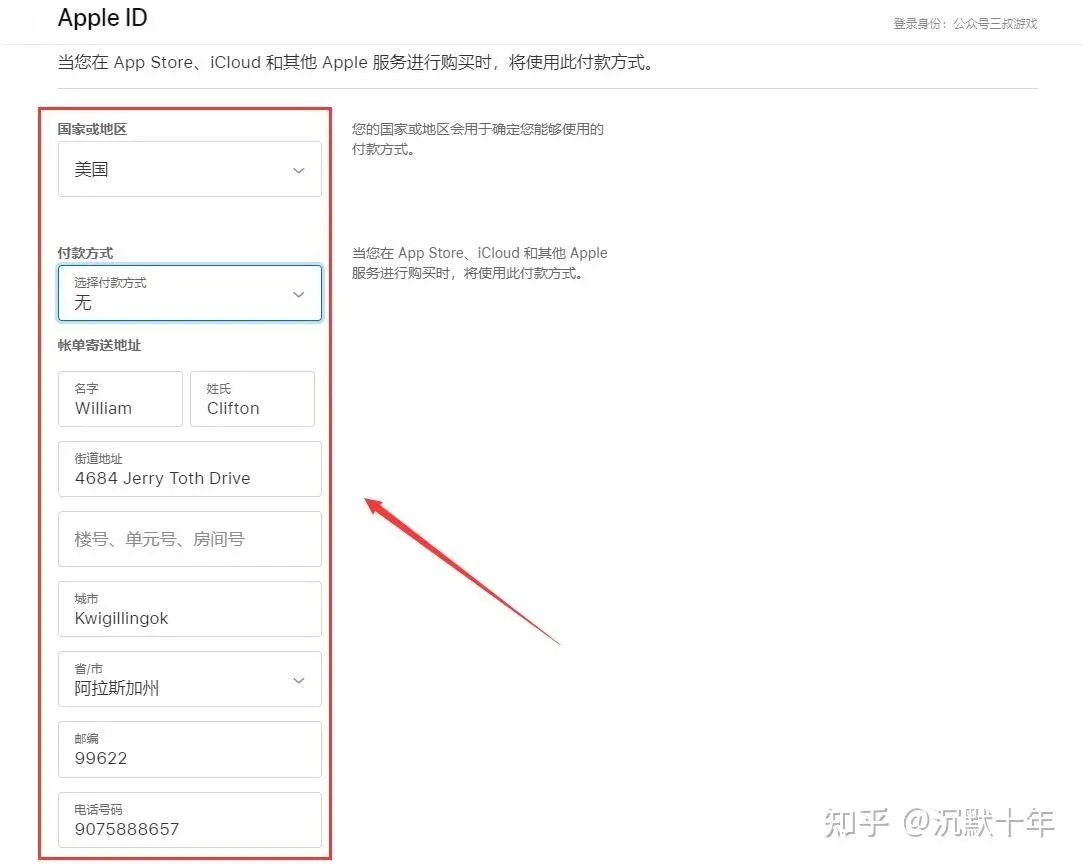
- After successful verification you will be taken to the “Payment Method” screen.
- Follow the prompts to input address details. If you are unfamiliar with U.S. state names, an online translator can help. It is advisable to choose a tax‑free state (e.g., Alaska, Delaware, Montana, New Hampshire, Oregon) because future App Store top‑up fees will be lower.
- Click “Update” to save the information. At this point the account creation is essentially finished; you only need to perform the first‑time app download check.
Changing the Apple ID Region to Complete Registration
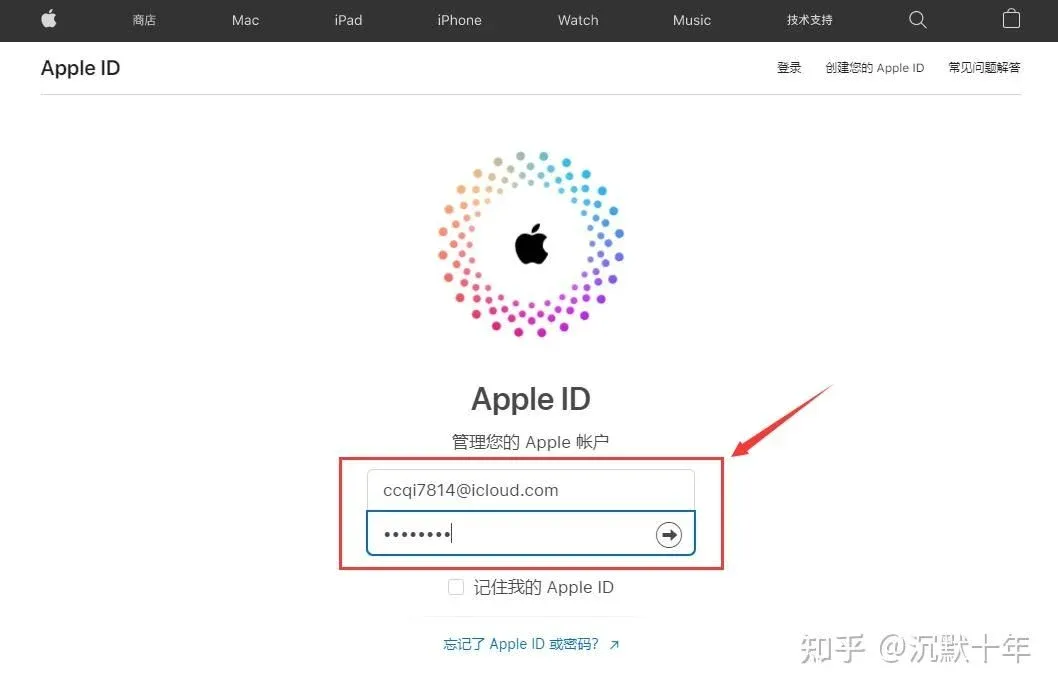
- Sign in to the Apple ID portal appleid.apple.com.

- Enter the domestic Apple ID you prepared earlier (preferably a newly created one) and log in.
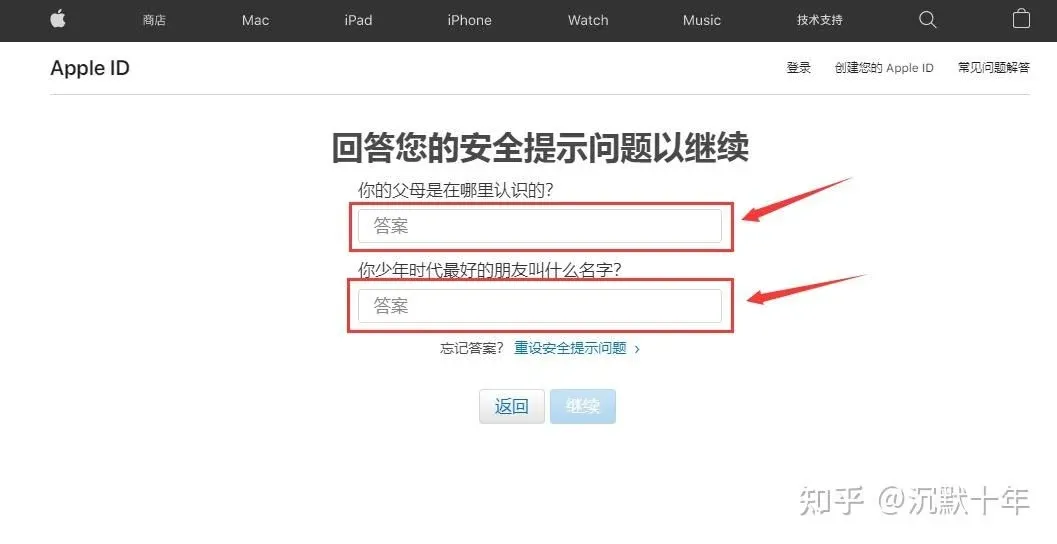
- Provide the correct answers to the security‑question prompts, then tap “Continue.”
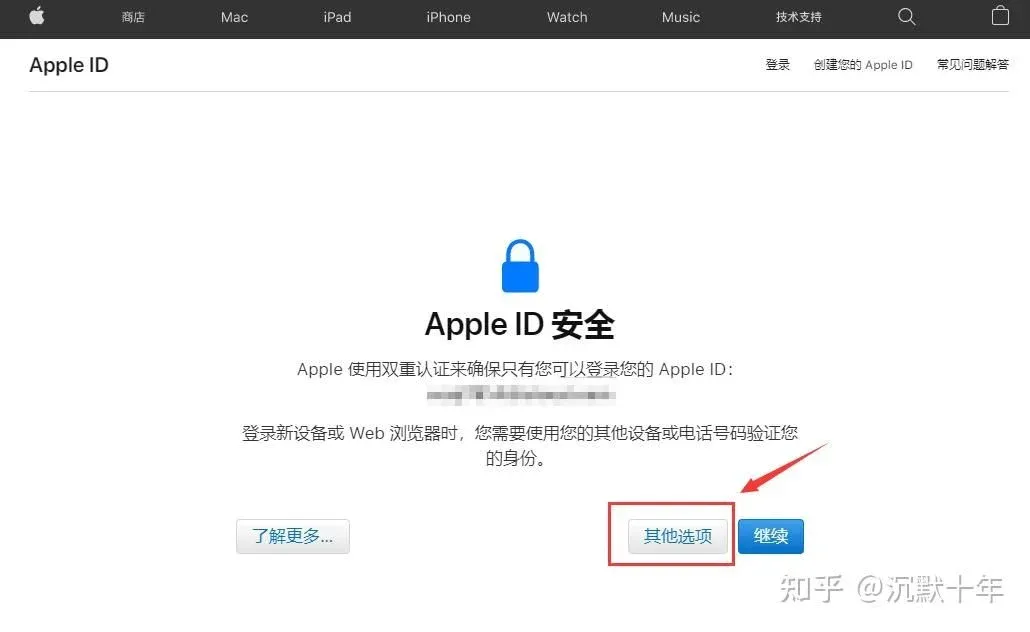
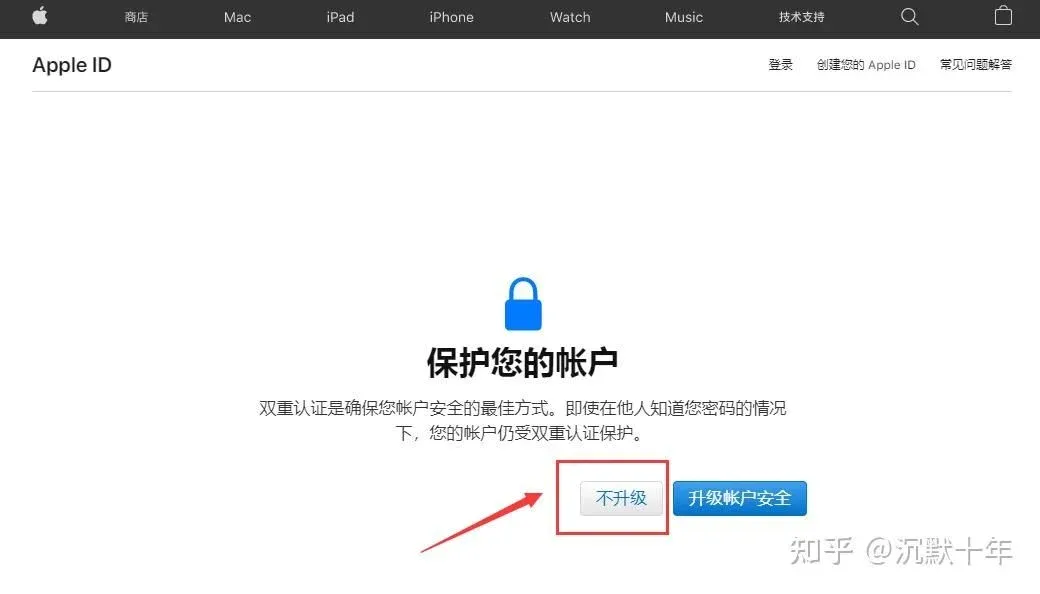
- Choose “Other Options.” If you originally signed up with a phone number, be sure to select “Other Options.”
- Pick “Do Not Upgrade.”
- Inside “Personal Information” tap “Country/Region.”
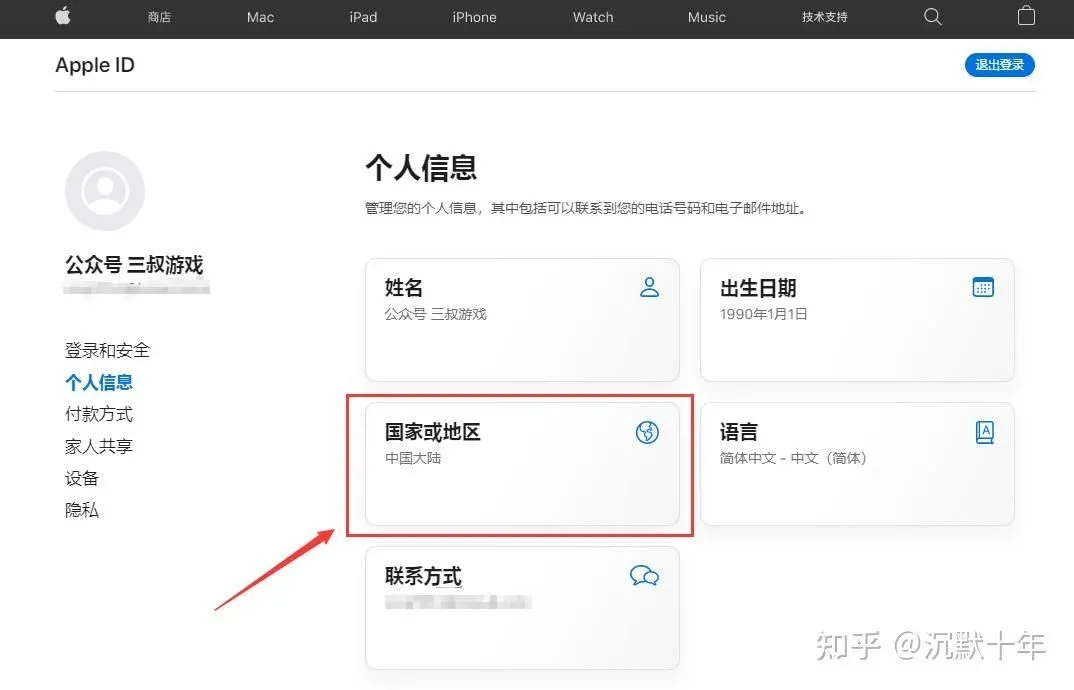
- Tap “Change Country or Region.”
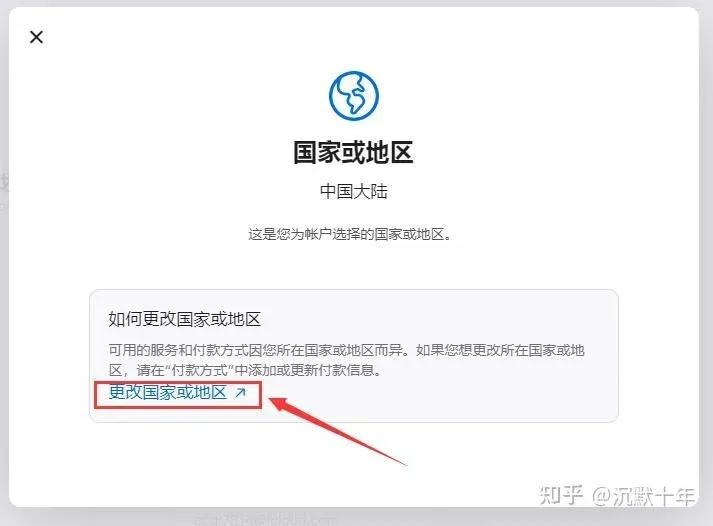
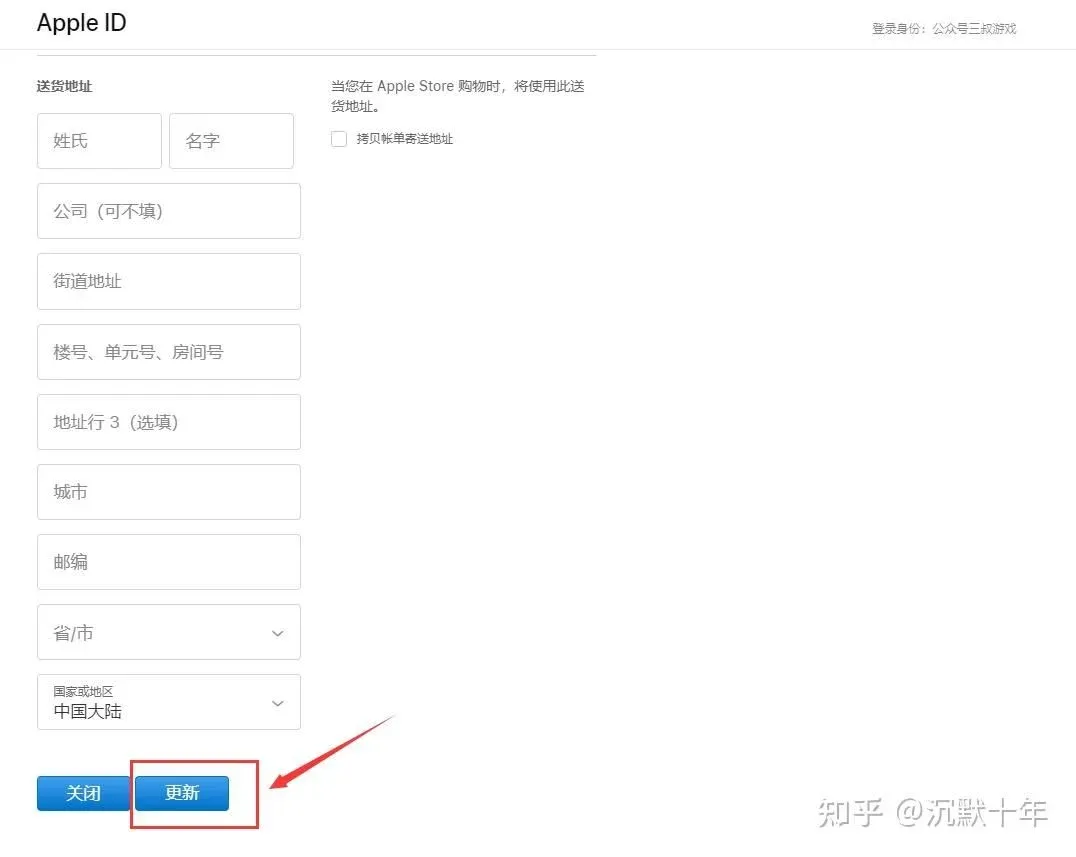
- In the pop‑up list select your target region (e.g., United States, Taiwan, etc.) and provide the virtual address you generated earlier.
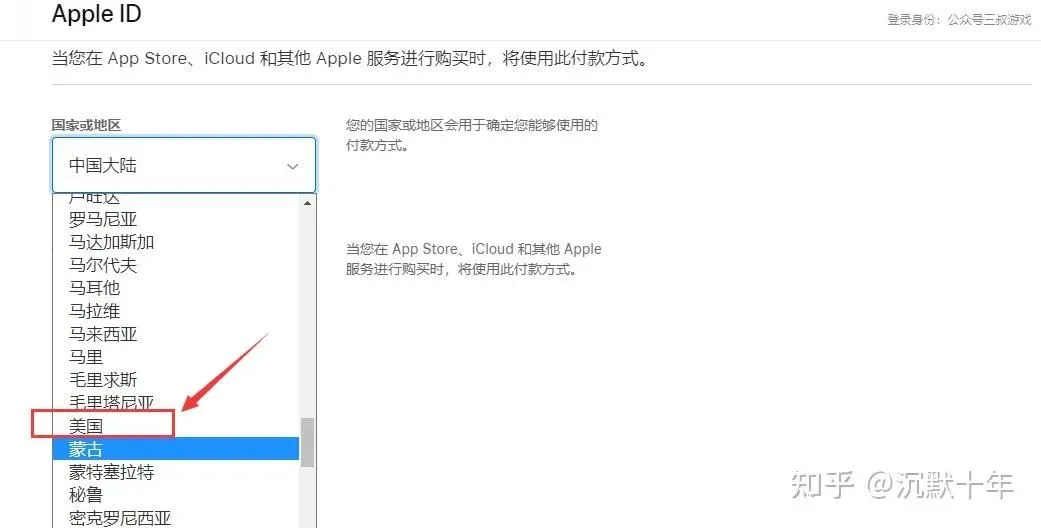
- For Payment Method choose “None.” The name, street, city, etc., can be arbitrary; set the state/province to Alaska, postal code to 99622, and fill the phone number as required.
- After all fields are populated, scroll to the bottom and click “Update.” (Shipping address can be left blank.)
- A confirmation toast “Your changes have been saved” will appear; close the window.
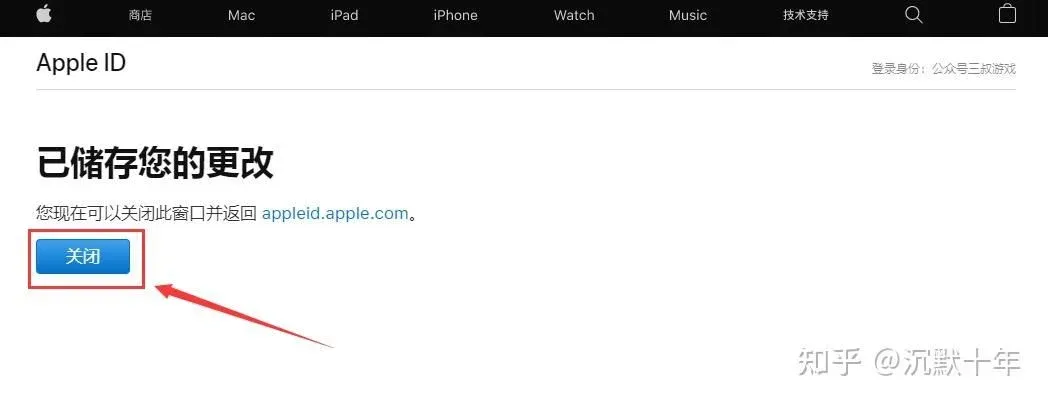
- The Country/Region field now displays the selected region, confirming that the Apple ID has been switched successfully.

Critical Note: When signing into the App Store, always use the freshly created overseas Apple ID only for the Store. Do not log in with the same credentials to iCloud, otherwise Apple may suspend the account or lock the device.
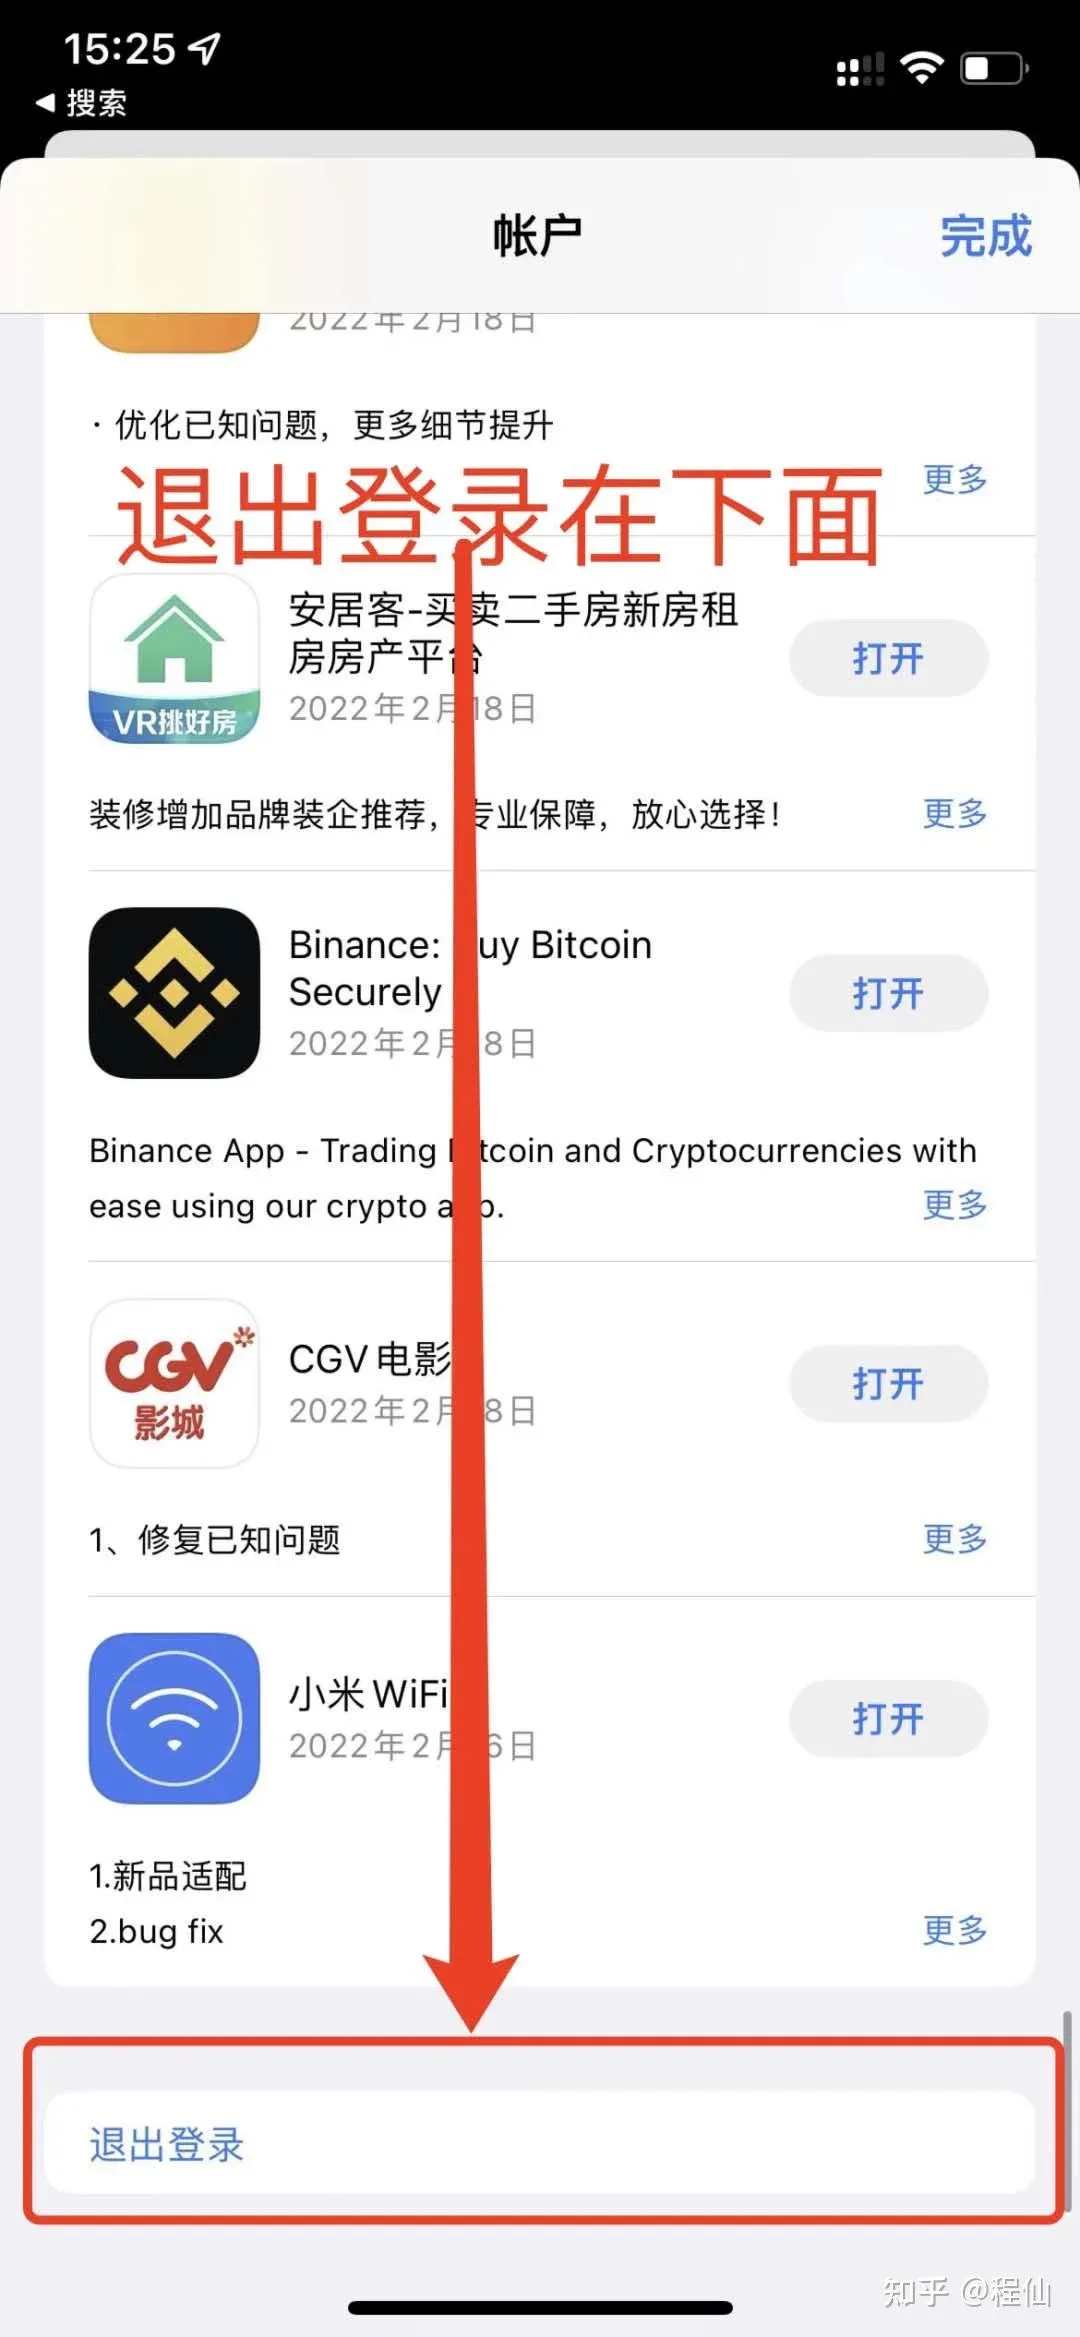
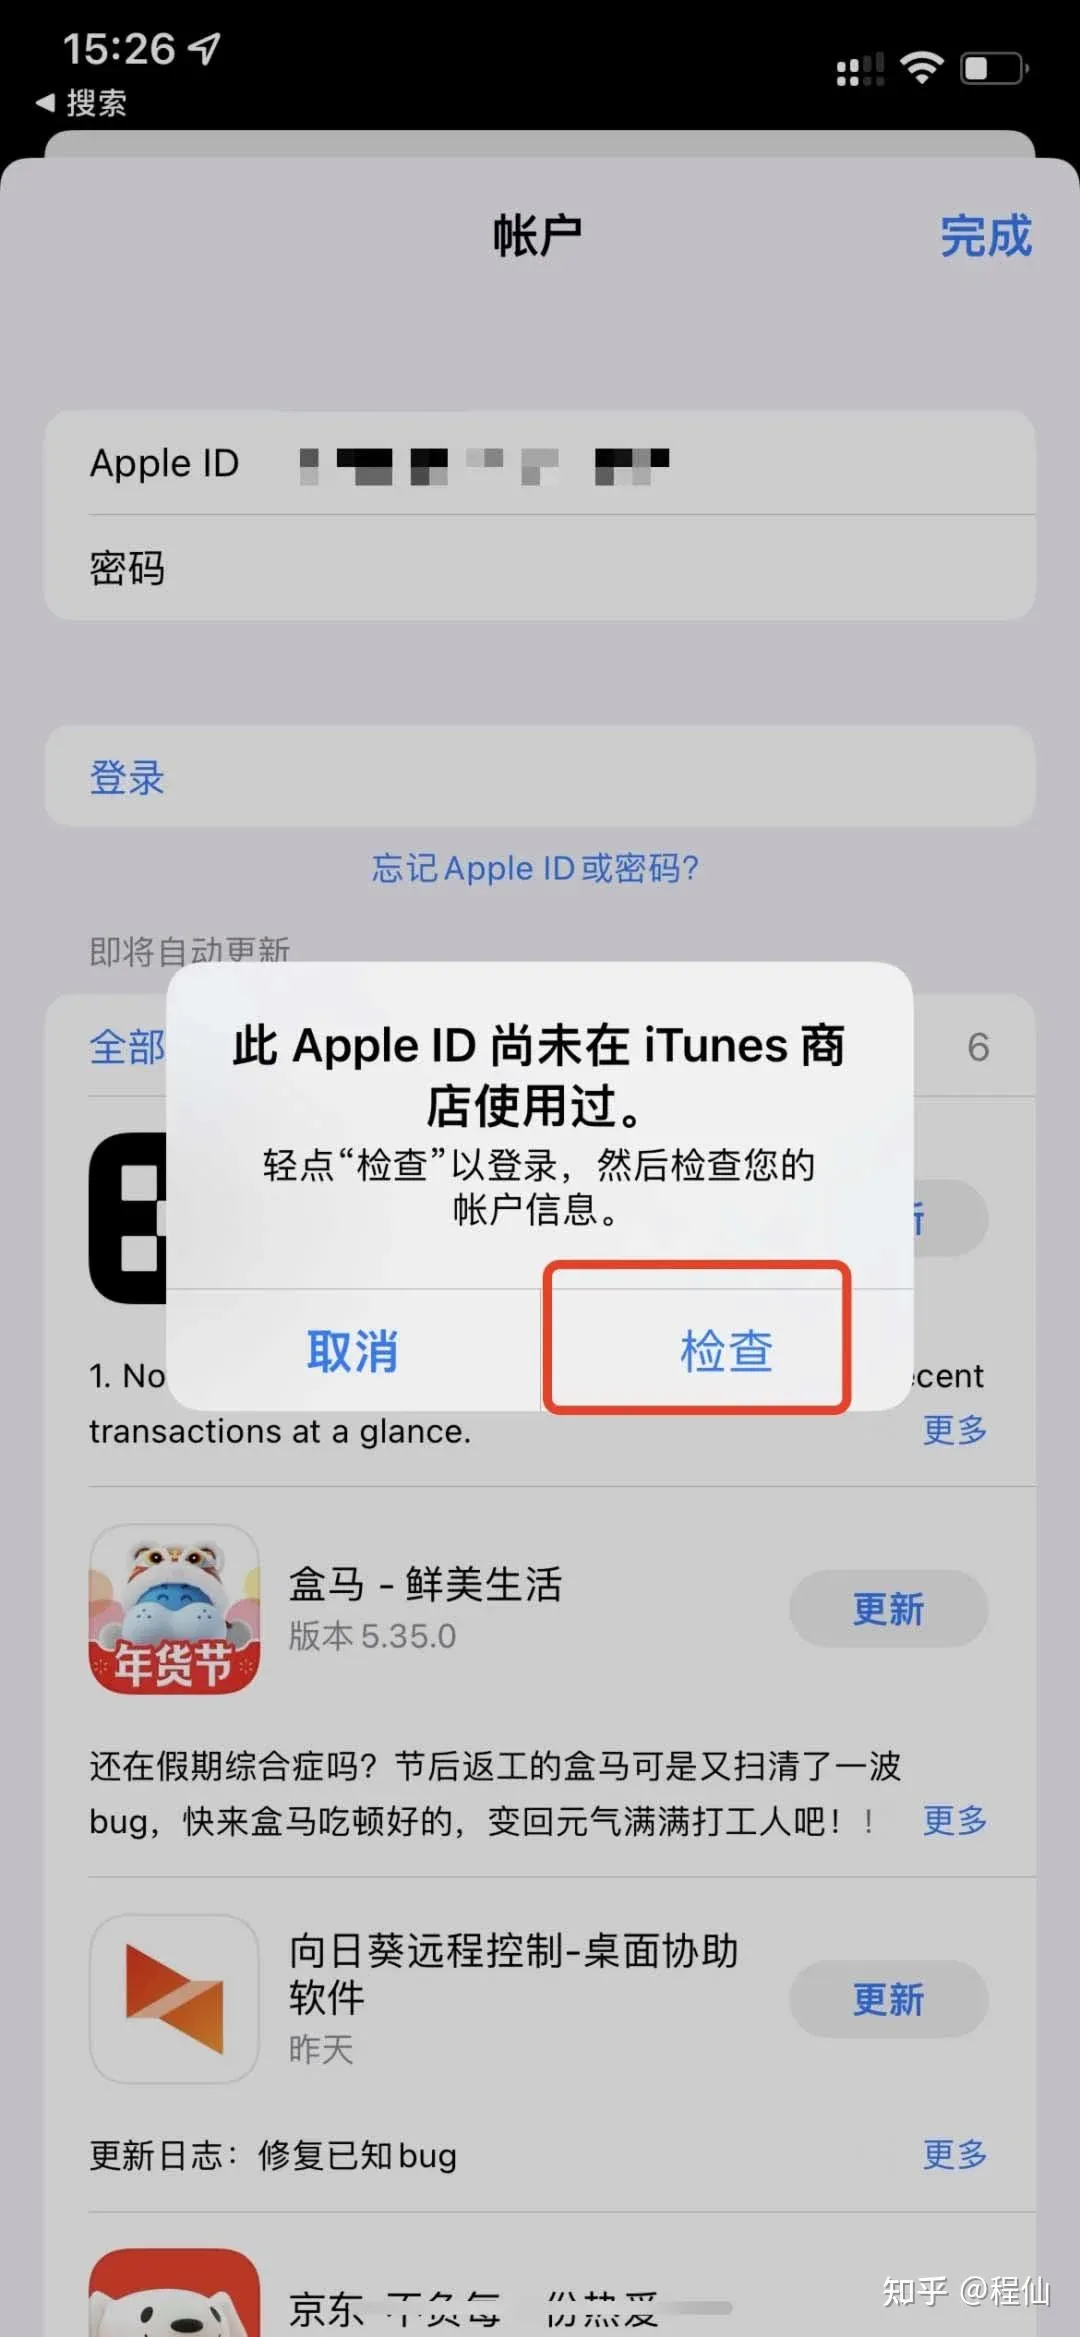
- Open the App Store on your iPhone, tap the profile avatar in the top‑right corner, scroll down and tap Sign Out. Then sign in with the new overseas Apple ID.
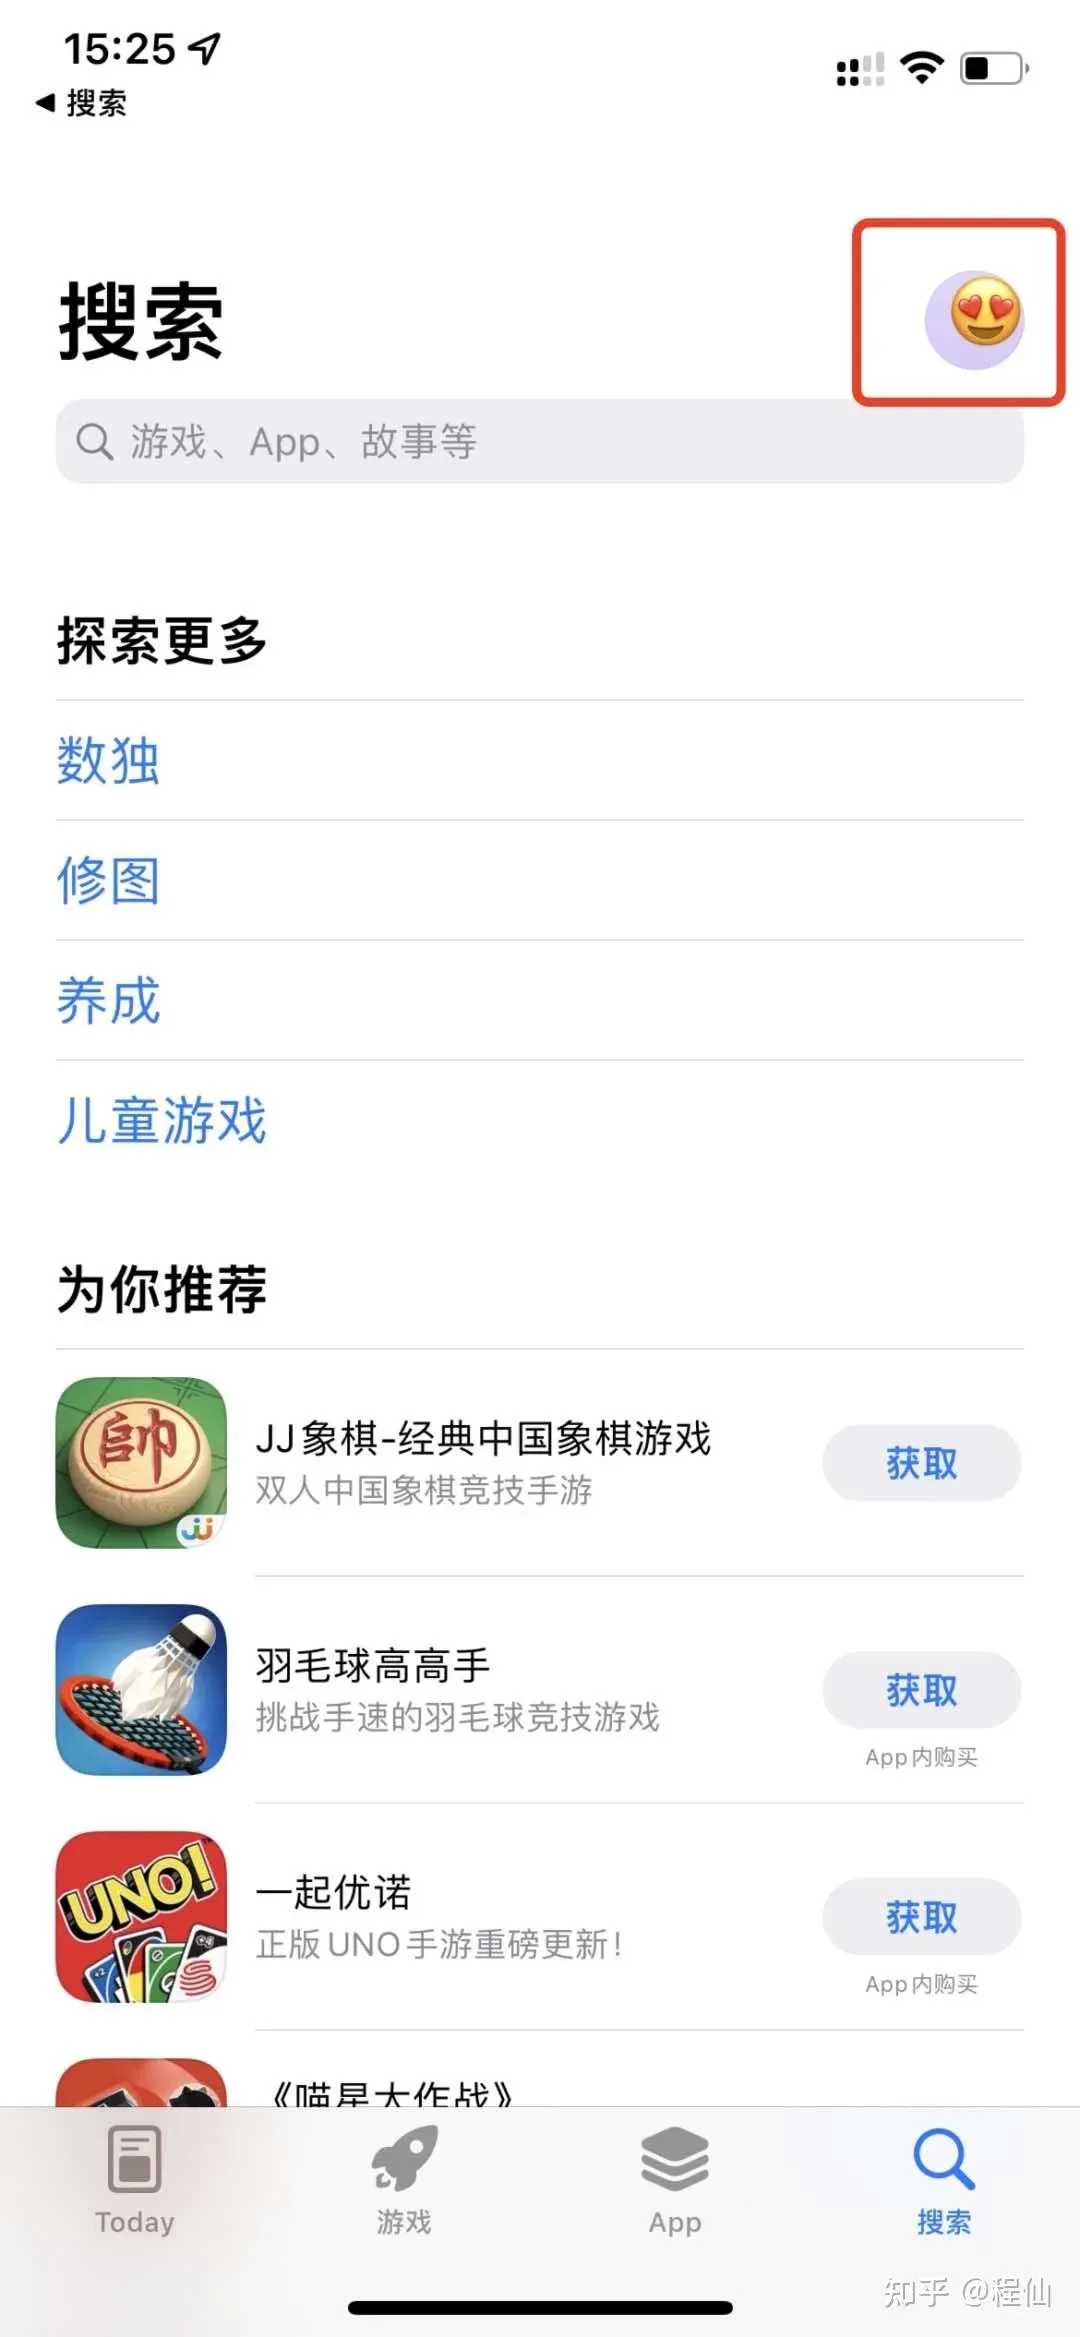
- After logging in, the system will display a “First‑time verification required” banner; tap “Verify.” If the banner does not appear, log out and back in or search for any free app to trigger the prompt.
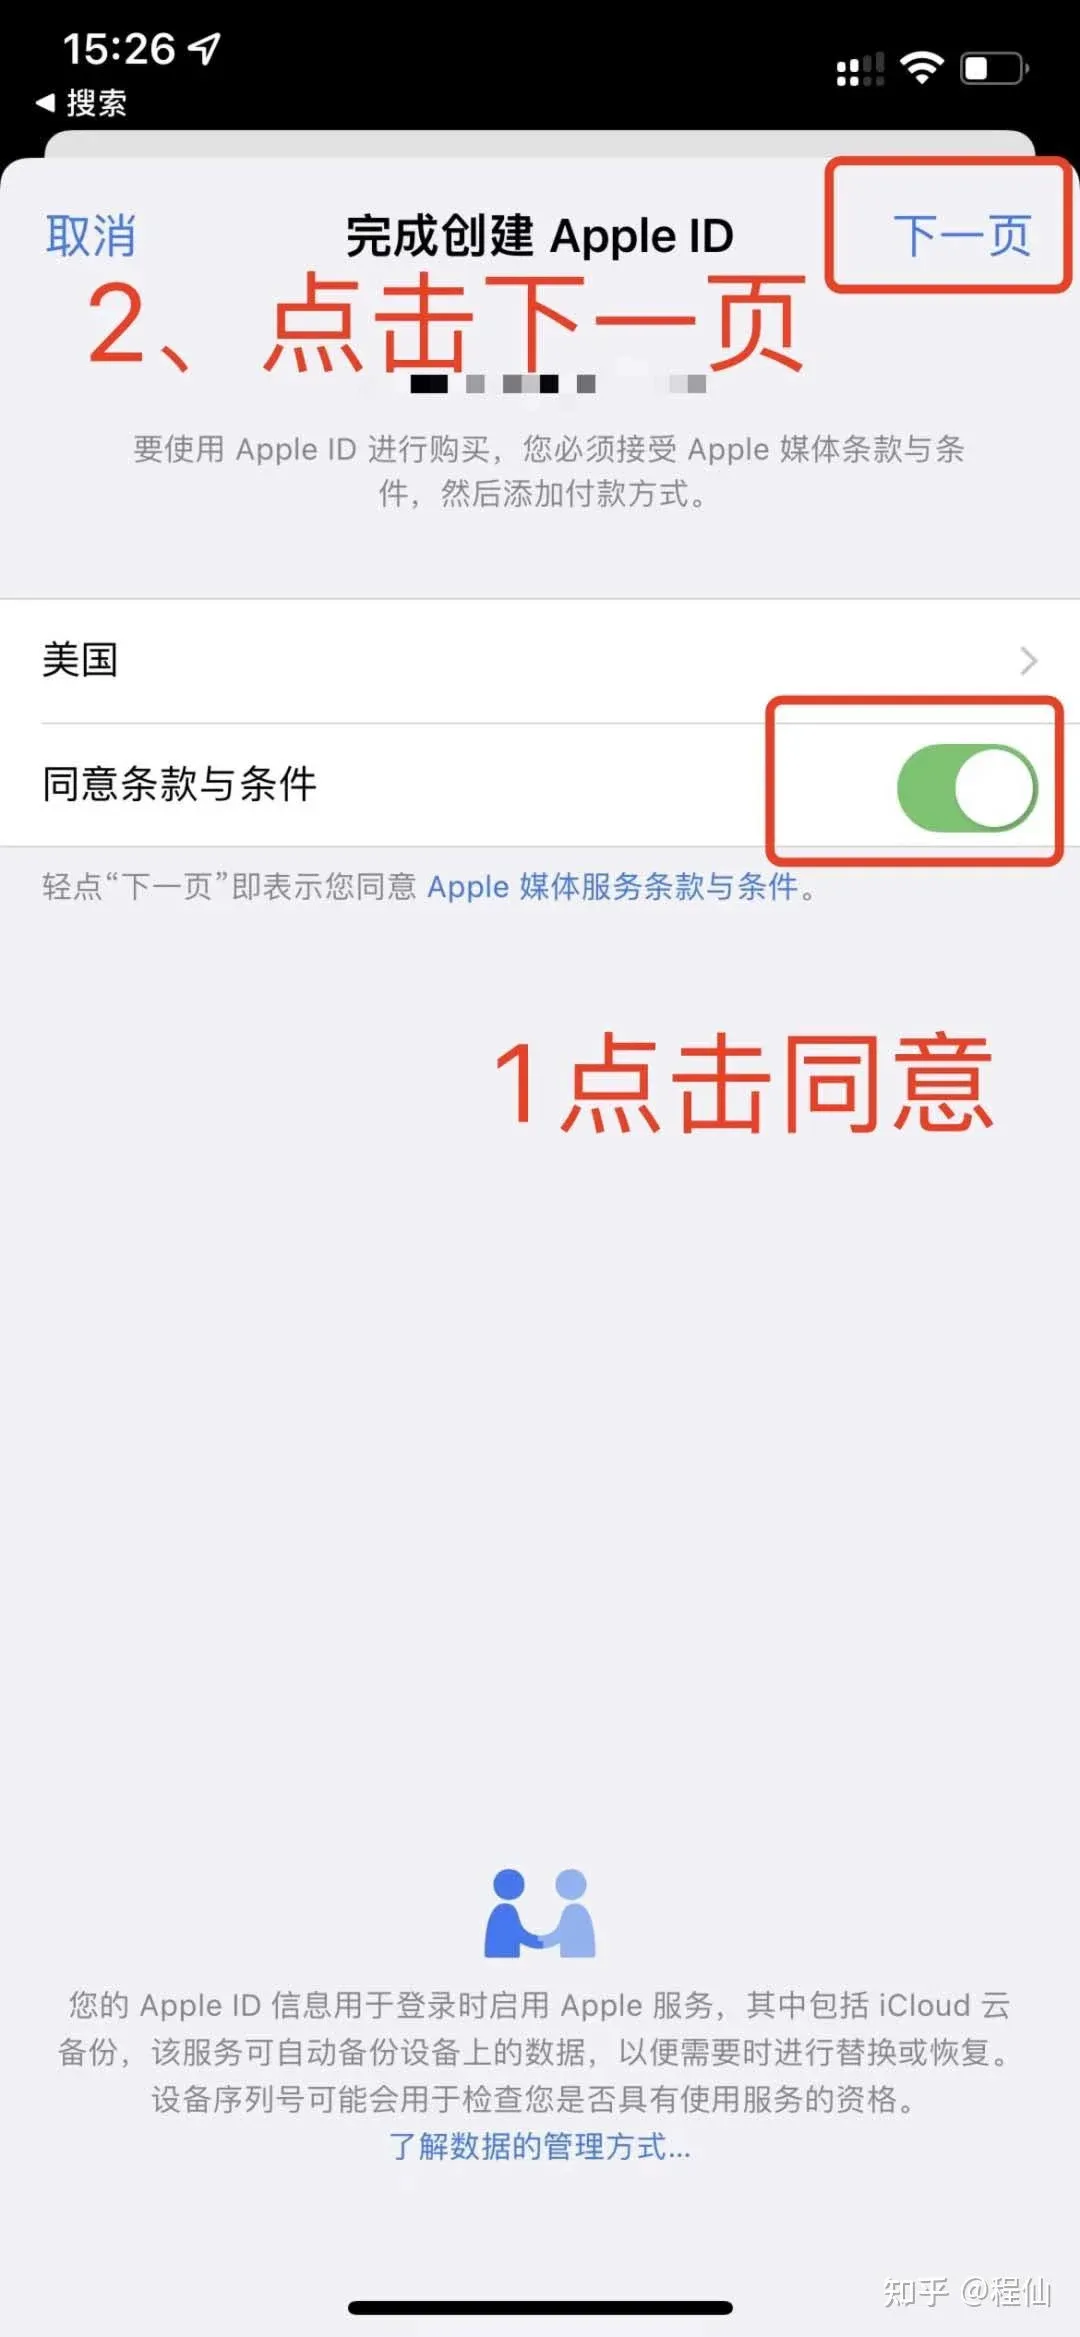
- In the verification flow, tap “Agree,” then keep tapping “Next” while confirming the displayed personal information.
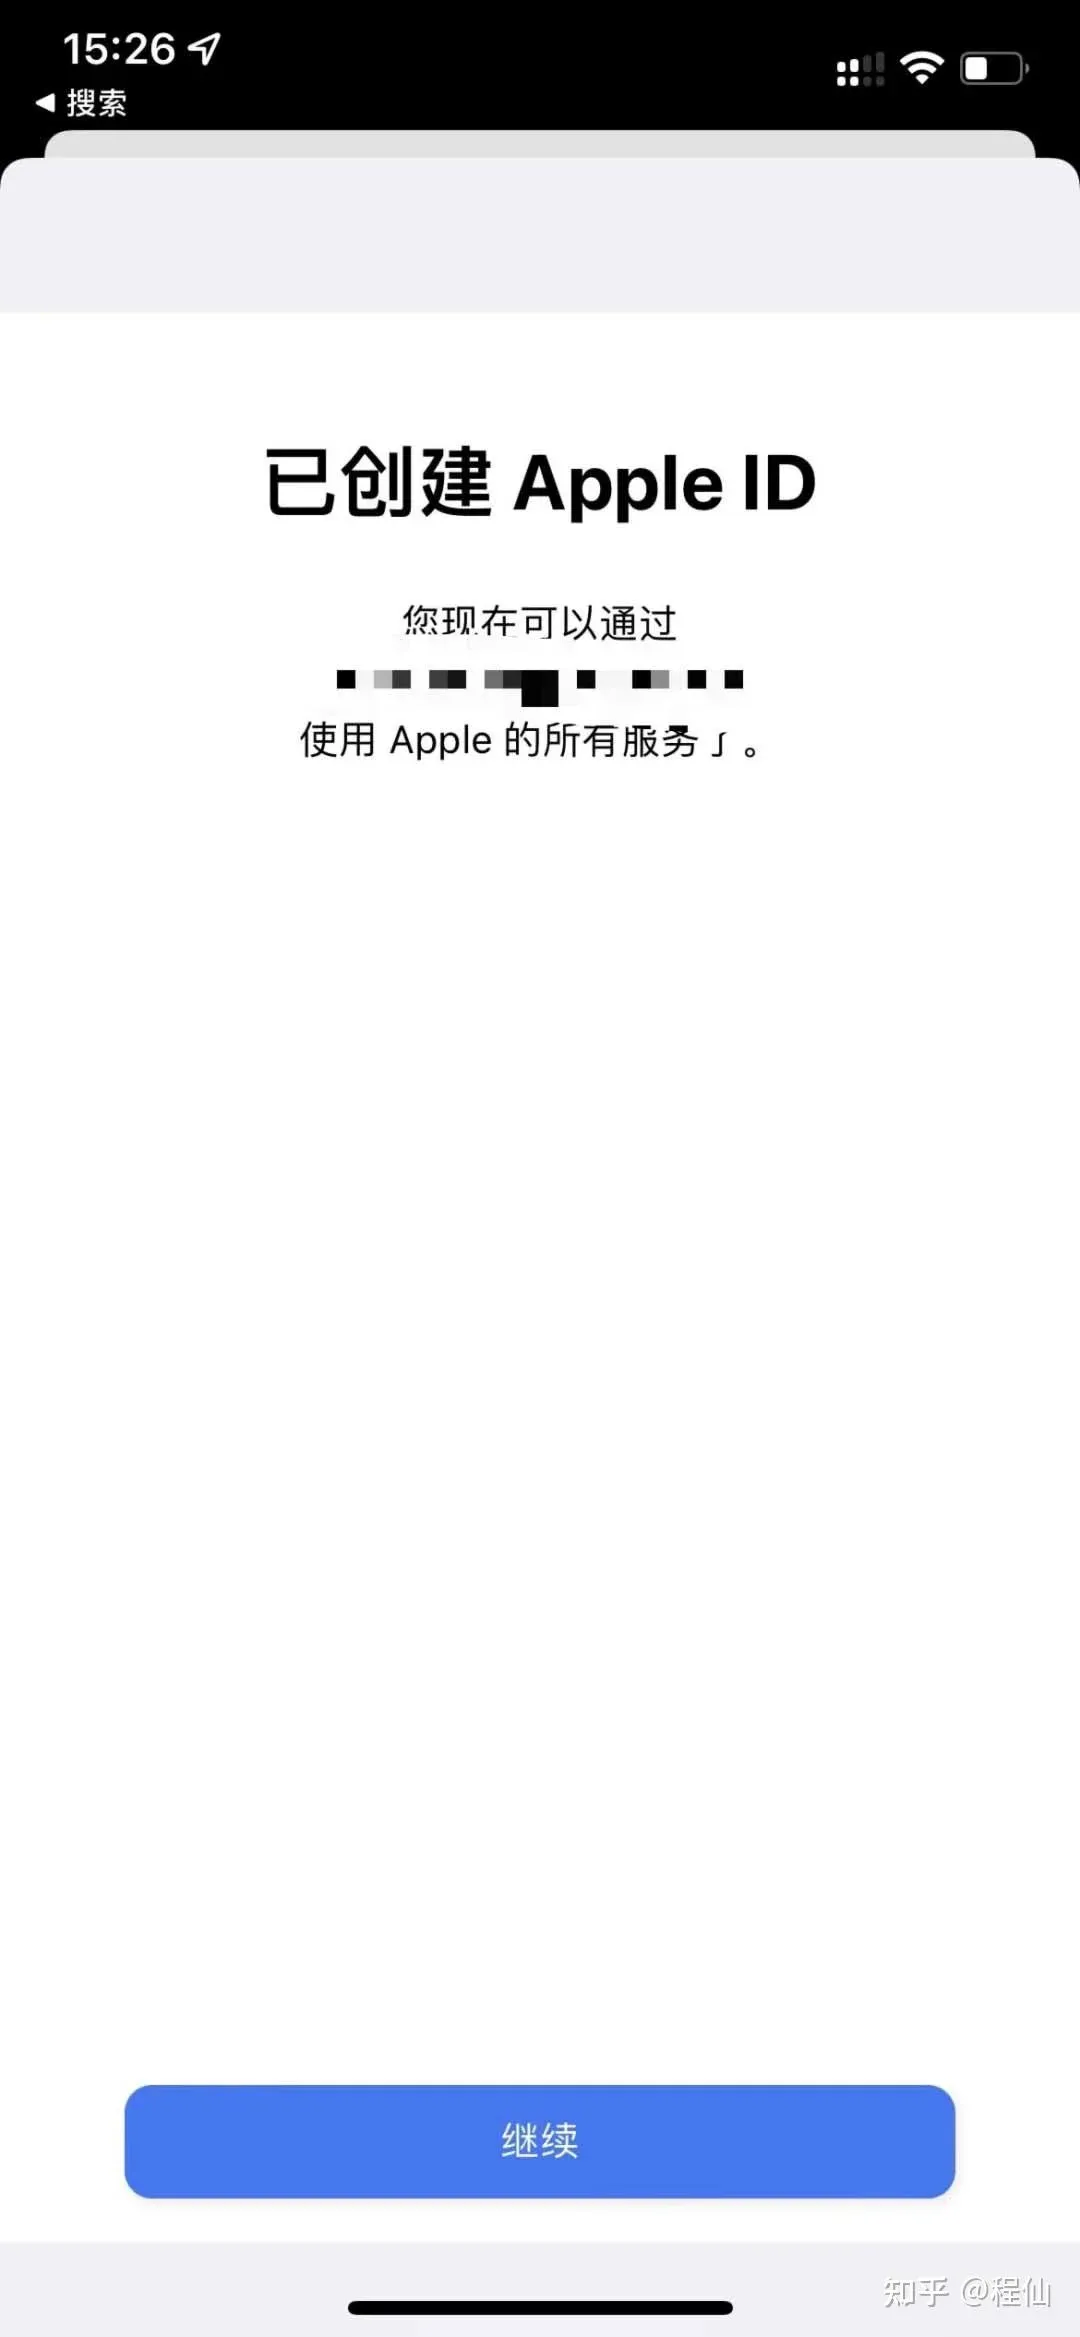
- Once the verification steps are finished, you can download the desired app using this Apple ID.
The registration workflow is relatively straightforward. Mastering the creation of a U.S. or Hong Kong Apple ID will also enable you to obtain apps from other regions in the future.
---
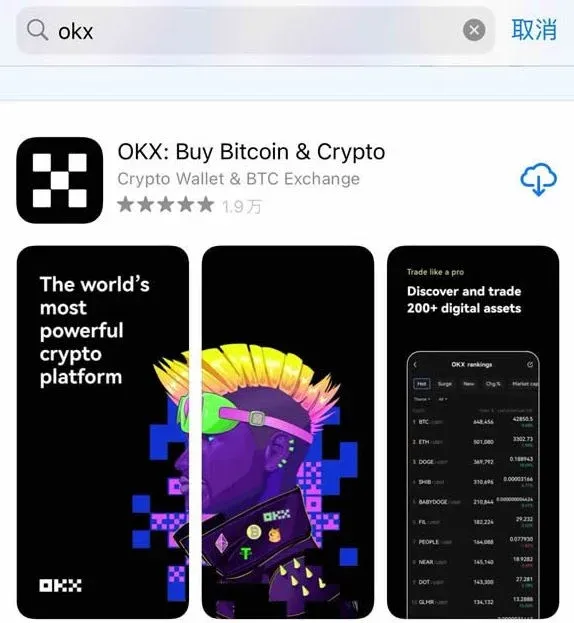
2. Downloading the Exchange App
Getting the OKX (OKEx) Exchange App
- Open the App Store and type “OKX” or “OKEx” into the search bar.
- Locate the official listing in the results and tap “Get” or “Install.” Apple may ask for your Apple ID password or a Touch ID/Face ID confirmation.
- After verification, the app will download and install automatically.
Trusting the Developer Certificate
The first time you launch the OKX app, iOS might display “Untrusted Enterprise Developer.” Go to Settings → General → Device Management (or “Profiles & Device Management”), find the OKX developer profile, and tap “Trust.”
---
Registering and Logging Into an OKX Account
In‑App Registration (Android steps shown; iOS is identical)
- Launch the OKX app and tap “Log In / Register” at the top of the welcome screen. Choose either Phone Number or Email for registration, enter the verification code you receive, and proceed.
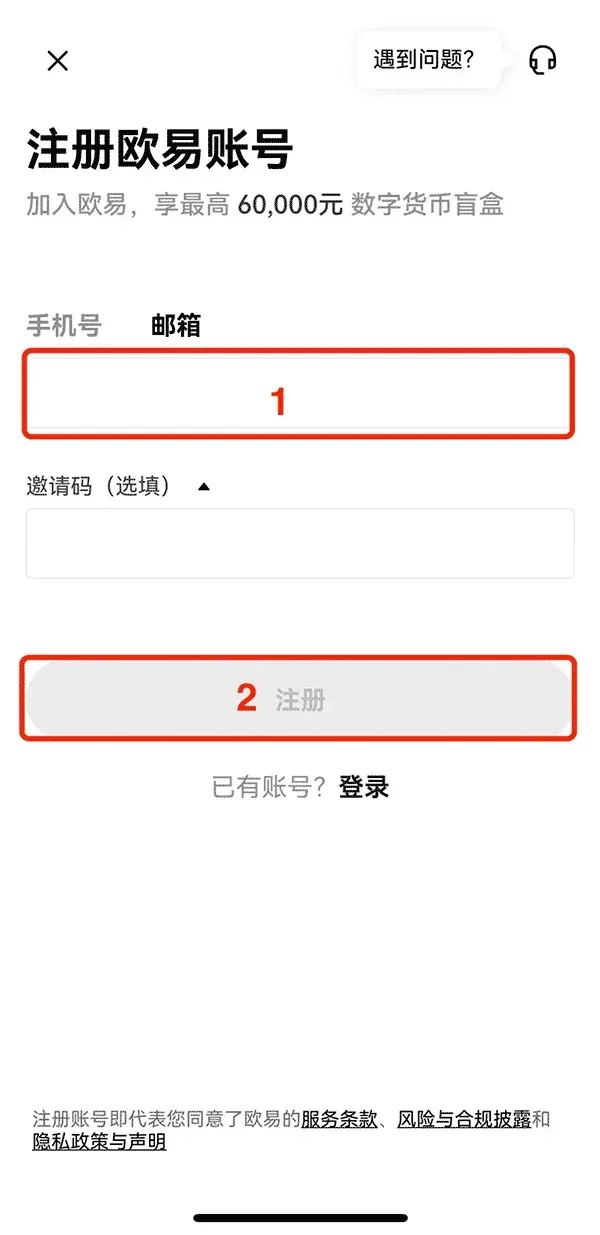
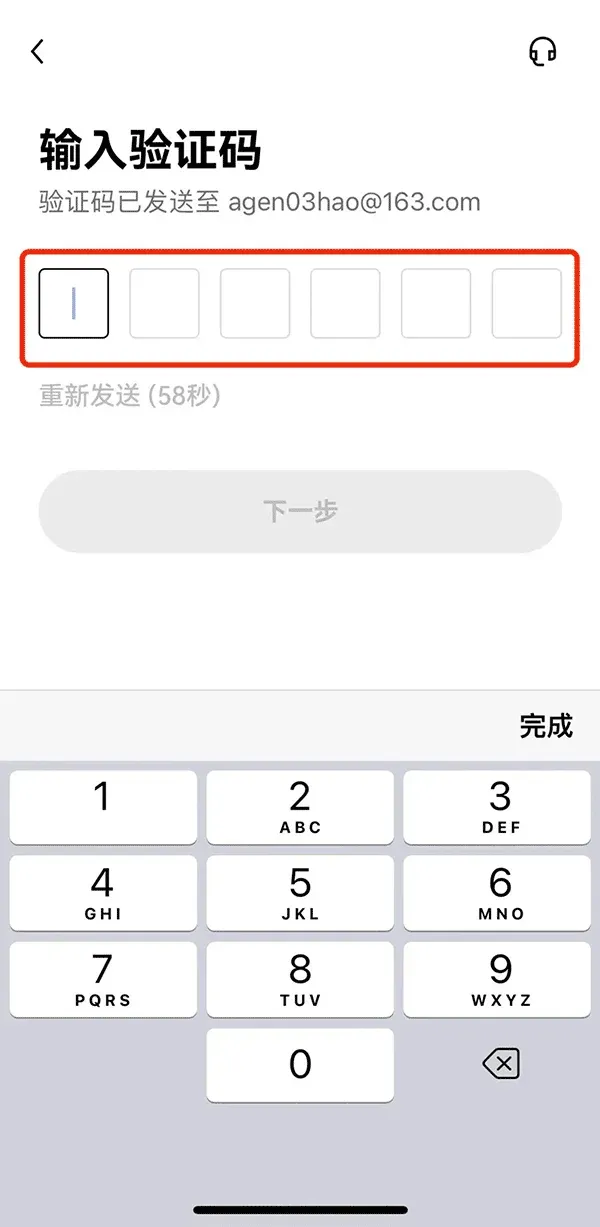
- Choose your Country/Region of residence and confirm the selection.


