
Starting from the three core aspects of fees, withdrawals, and trading, we systematically outline Binance’s usage flow, analyze the platform’s security mechanisms and feature highlights, and provide practical operational tips to help newcomers get started quickly and avoid common pitfalls. Subsequent sections will detail step‑by‑step procedures and are worth reading carefully.
Note for U.S. residents: Use Binance.US rather than the global Binance platform. Cryptocurrency gains may be taxable in your local jurisdiction.
How to Trade and Withdraw on Binance?
In the current digital‑asset market, the total market capitalization is roughly USD 5,655 billion, with a 24‑hour trading volume of about USD 945.3 billion. Bitcoin accounts for 63.5 % of the market cap. Among the top 100 cryptocurrencies worldwide, 31 are on an upward trend while 69 are declining. As investor interest in digital currencies continues to rise, selecting a safe and reliable exchange becomes especially critical. Binance, one of the three major exchanges in China, enjoys a strong reputation among both beginners and seasoned traders thanks to its comprehensive features and user‑friendly experience. Below, we will introduce how to use Binance from three perspectives: fees, withdrawals, and trading.
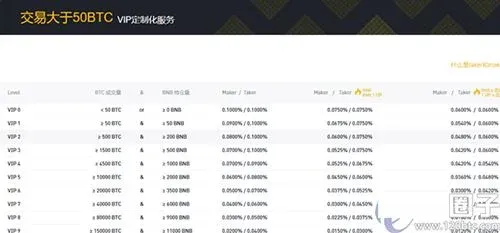
Binance Exchange Fee Overview
Binance’s fees vary across different services, and holding BNB can grant fee‑discount benefits, as detailed below:
- Deposit fee: No fee is charged for deposits on Binance; it is completely free.
- Trading fee:
- The base fee for regular users is 0.1 % of the transaction amount.
- Fee tiers are automatically calculated based on the past 30 days of trading volume and the amount of BNB held on the day. Statistics are compiled at UTC 00:00 each day and the corresponding rates are updated at UTC 01:00.
- If the account holds a sufficient amount of BNB, you can opt to use BNB to offset trading fees, currently receiving a 25 % discount (temporary).
In the “Trading Fee” section of the trading interface, users can toggle the BNB discount on or off. Note that for margin (leveraged) trading, the margin account must also hold BNB to benefit from the discount.
---
Full Binance Withdrawal Process
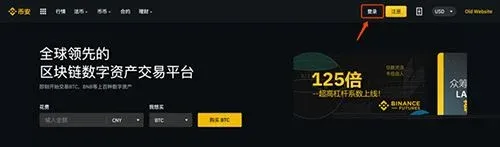
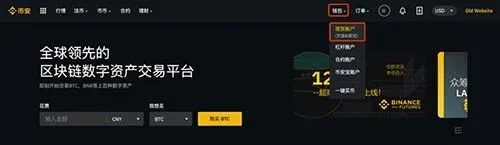
1. Log In and Access the Wallet
After opening the Binance website and completing login, click the 【Wallet】 → 【Spot Wallet】 button at the top‑right corner, then locate the 【Withdraw】 button in the upper‑right area of the page.
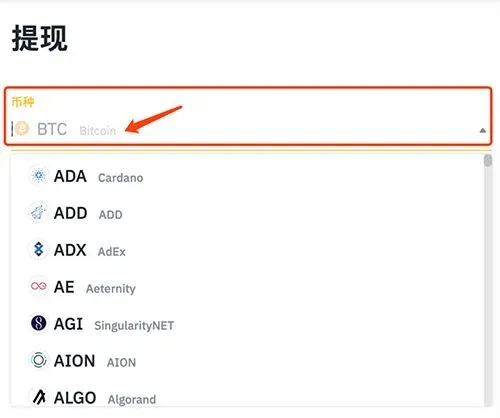
2. Enter Withdrawal Information
In the pop‑up withdrawal window, select the cryptocurrency you wish to withdraw and input the amount. If you are sending to another Binance user, simply fill in the recipient’s deposit address on the right side; the system will automatically recognize it as an internal transfer.
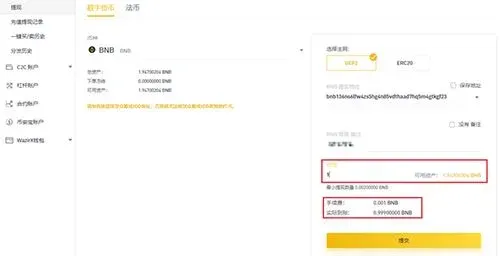
- When the address belongs to a Binance internal account, the “Fee” displayed on the page is only deducted when withdrawing to a non‑Binance address; for Binance‑to‑Binance transfers the fee remains in the sender’s wallet, and the recipient receives the amount shown in the “Actual Received” column.
- The fee‑free and instant‑arrival benefit applies only to internal Binance transfers; be sure the address you provide is a genuine Binance address.
- For assets that require a tag (memo/tag/payment ID), you must fill in the correct tag in the designated field; otherwise the transfer may fail or funds could be lost.
3. Security Verification
After clicking 【Submit】, the system will prompt you to complete security verification:
- If the account has not yet bound any security items, you will be asked to set them up first.
- Users who have already bound security items need to click 【Get Code】 and enter the verification code sent to your phone, email, etc., within 30 minutes.
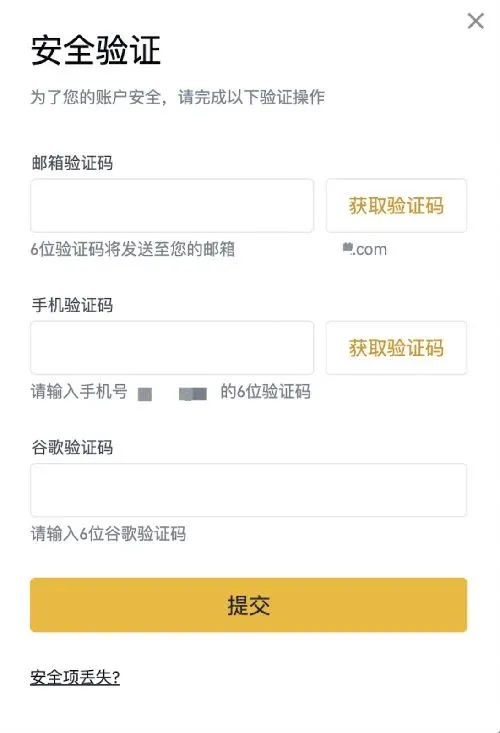
Tip: If the system detects that a required tag for a tagged coin is missing (the “No Memo” box is checked), the withdrawal will be rejected with an appropriate notice. Make sure to fill in the tag before resubmitting.

4. Confirm and Complete the Withdrawal
On the security verification page, double‑check the cryptocurrency, amount, and address once more, then click 【Submit】. If you suspect the request is not made by you, promptly click 【Disable Account】 at the bottom of the email and contact Binance support.

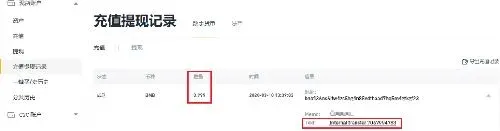
Once the withdrawal succeeds, you can view the corresponding record under 【Wallet】 → 【Deposit & Withdrawal History】. Internal transfers do not generate an external TxID; instead they show 【Internal Transfer】 together with a unique Internal Transfer ID. If you have any questions, you can provide this ID to customer support.
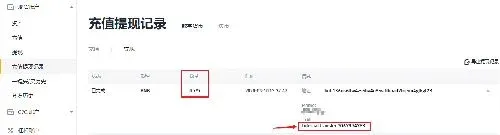

The recipient will also see 【Internal Transfer】 and the same ID in their 【Deposit】 history, with the amount listed under the “Actual Received” column.
---
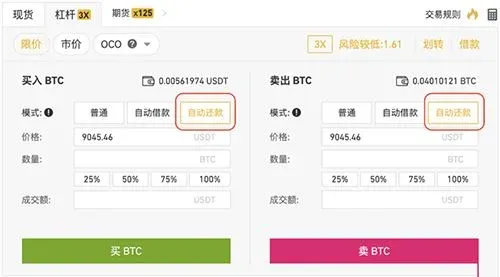
Binance Margin (Leverage) Trading Guide
1. Open a Margin Account
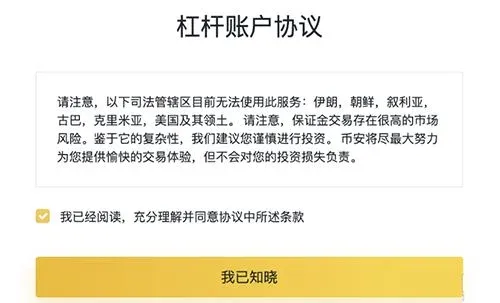
After logging in, navigate to 【Trade】 → 【Margin】 on the trading page and click 【Open Margin Account】. Read and confirm the agreement to complete the activation.
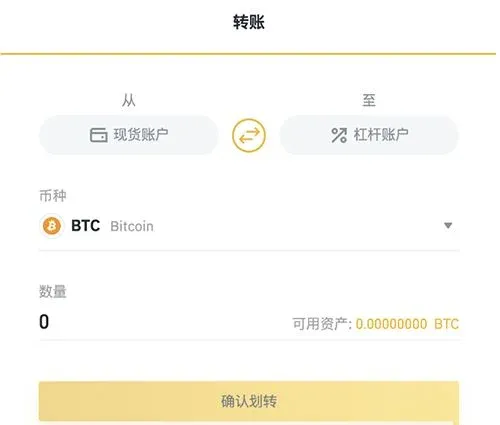
2. Transfer Margin Collateral
Once the margin account is active, you can transfer collateral directly on the same page. Choose Spot Wallet → Margin Wallet, select the cryptocurrency and amount, then confirm.
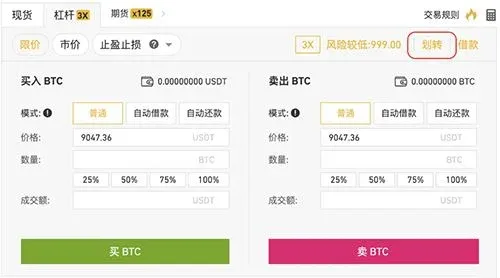
3. Auto‑Borrow / Buy
On the order entry screen, tick 【Auto‑Borrow】, select the desired order type, and you can execute a margin buy or margin sell.
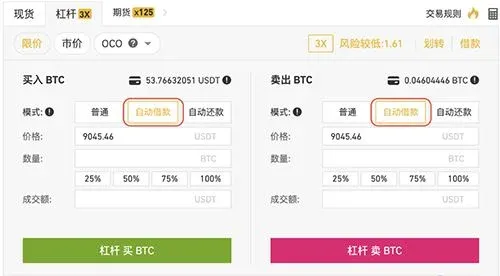
4. Auto‑Repay / Sell
Similarly, choose 【Auto‑Repay】 on the order page, then complete a buy or sell to quickly settle the position and realize profits.
---
Summary
Binance offers free deposits, a flexible fee structure, and a robust security‑verification system, creating a relatively friendly environment for newcomers. Whether you are engaging in margin trading or performing internal or external withdrawals, following the steps outlined above should allow you to complete the processes smoothly. For more Binance usage tips or to download related client applications, stay tuned to future articles from Bitaigen.
---
💡 Register on Binance with referral code B2345 for the maximum trading fee discount. See Binance complete guide.


