
To ensure the safety of assets, investors are advised to first withdraw funds to a personal wallet. However, selecting the wrong network during the withdrawal process is a leading cause of asset loss. When faced with TRC‑20, ERC‑20, Solana, and various L2 protocols, beginners often wonder: Which network should be used for the most cost‑effective and secure USDT withdrawal to a wallet?
Common networks for USDT withdrawals to wallets include TRC‑20, ERC‑20, BEP‑20, Polygon, Solana, and Omni; users can choose the most suitable chain based on fees, arrival speed, and security.
The Bitaigen editorial team reminds that USDT withdrawals involve multiple pathways, with significant differences in cost, speed, and security. This article systematically outlines the characteristics of common networks, selection tips, and methods for handling typical mistakes, helping newcomers withdraw on‑chain efficiently, cheaply, and safely.
Note: Cryptocurrency gains may be taxable in your jurisdiction; consult local tax regulations.

1. Detailed Overview of Common USDT Withdrawal Networks
USDT, as a cross‑chain stablecoin, is issued on many mainstream blockchains. Fees, confirmation times, and typical use‑cases differ across networks. The table below provides a quick visual reference:
| Network | Underlying Chain | Approx. Fee | Confirmation Speed | Ideal Use‑Case | Address Prefix | Remarks |
|---|---|---|---|---|---|---|
| **TRC20** | Tron (TRX) | ≈0.1‑1 TRX (a few cents) | 5‑10 seconds | Small‑value high‑frequency transfers, daily withdrawals | Starts with **T** | Some platforms waive gas fees |
| **ERC20** | Ethereum (ETH) | $5‑$30 | 15‑60 minutes | Large transfers, DeFi interactions | Starts with **0x** | Highest security, richest ecosystem |
| **BEP20** | Binance Smart Chain (BSC) | ≈0.005‑0.01 BNB | 3‑5 minutes | Binance ecosystem, low‑cost transfers | Starts with **0x** | ERC‑20 compatible, faster |
| **OMNI** | Bitcoin (BTC) | ≈0.0005‑0.001 BTC | 30‑60 minutes | Large, priority‑security transfers | Starts with **1/3** | First USDT network, good liquidity |
| **Polygon** | Polygon (MATIC) | ≈0.001 MATIC | 2‑5 minutes | Ethereum scaling, gaming apps | Starts with **0x** | ERC‑20 compatible, lower gas |
| **Solana** | Solana (SOL) | ≈0.00001 SOL | 1‑3 seconds | Ultra‑fast transfers, Web3 apps | Starts with **So1** | Emerging high‑performance network |
2. Which Network Should Be Used for USDT Withdrawal to a Wallet?
The networks most commonly encountered for USDT withdrawals to a wallet are TRC‑20, BEP‑20, ERC‑20, Solana (SPL), and OmniLayer (Bitcoin). The chosen network determines the underlying blockchain protocol, which in turn influences transaction fees, speed, and security.
1. Tron (TRC‑20)
Tron is an open‑source blockchain that uses a PoS consensus mechanism. A single USDT transaction typically costs less than $1, and the network can handle up to 2,000 transactions per second, making it a balanced choice for cost and efficiency.
2. Binance Smart Chain (BEP‑20)
BSC is compatible with Ethereum and can also process around 2,000 transactions per second. Important: without a dedicated bridge, ERC‑20 USDT cannot be sent directly to BSC.
3. Ethereum (ERC‑20)
As the largest smart‑contract platform, ERC‑20 enjoys the richest ecosystem. However, during periods of congestion fees rise sharply and confirmations are slower, so it is best suited for scenarios that require interaction with DeFi protocols.
4. Solana (SPL)
Often dubbed a “fast‑track Ethereum,” Solana can handle roughly 50,000 transactions per second. USDT transfers complete in a few seconds and cost less than $0.01.
5. Bitcoin (OmniLayer)
Omni was the earliest network to host USDT. It offers high security but incurs higher fees and slower speeds, and it is gradually being supplanted by newer chains.
3. USDT Withdrawal Network Selection Guide
1. By Withdrawal Amount
- Small (< 1,000 USDT) – Prefer TRC20 or Polygon; fees are negligible and arrival is near‑instant.
- Medium (1,000‑10,000 USDT) – Consider BEP20 or Solana, balancing cost and speed.
- Large (> 10,000 USDT) – Prioritize ERC20 or OMNI, which provide the highest security for long‑term holding.
2. By Wallet Support
- Verify whether your wallet (e.g., MetaMask, Trust Wallet, TokenPocket) already integrates the target network.
- Some hardware wallets may only support core networks such as ERC20 and TRC20; always confirm before proceeding.
3. By Exchange Support
- Major exchanges (Binance, OKX, Huobi) cover virtually all mainstream networks.
- Smaller exchanges often only provide TRC20 and ERC20; double‑check before initiating a withdrawal.
4. By Intended Use
| Use‑Case | Recommended Network |
|---|---|
| Daily transfers | **TRC20** (lowest fee, fastest) |
| DeFi interaction | **ERC20** (full ecosystem) or **Polygon** (cheaper gas) |
| Binance ecosystem operations | **BEP20** (seamless compatibility) |
| Long‑term storage | **OMNI** or **ERC20** (highest security) |
4. What to Do If You Chose the Wrong Network?
When the wrong network is selected, assets usually end up on an address belonging to a different chain. The remedy depends on the specific path taken:
- Exchange → Exchange
- Log into the receiving exchange, obtain the deposit address for the correct network.
- From the original platform or wallet, resend the assets to that address using the proper network.
- Exchange → Personal Wallet
- If you control the private key/seed phrase of the wallet, import the key into an application that supports the relevant network (e.g., switch MetaMask to BSC) to view and retrieve the funds.
- Exchange/Wallet → Unknown Third‑Party Wallet
- If the counterparty refuses to share their private key or seed phrase, recovery is virtually impossible. Always double‑check the network and address before sending.
5. Correct Withdrawal Procedure (Three‑Step Method)
Step 1: Preparation
- Ensure the wallet has the target USDT network enabled (you can see it on the assets page).
- Copy the USDT receipt address for that network; avoid manual typing.
Step 2: Withdrawal Settings
- In the exchange, select the same network as your wallet.
- Paste the address and verify the first and last 8 characters.
- Enter the withdrawal amount and leave enough native token for the on‑chain fee (e.g., 1 TRX for TRC20, 0.01 ETH for ERC20).
Step 3: Final Check & Execution
- Triple‑check: Network → Address → Amount.
- Perform a small test withdrawal (e.g., 10 USDT); once confirmed, proceed with the larger amount.
- Save the transaction hash for later tracking.
6. Is the Withdrawal Review Process Lengthy?
Most large platforms (Binance, Huobi, OKX, etc.) have automated review processes that typically finish within a few minutes. Review times may extend under the following conditions:
- Very large or unusually frequent withdrawals.
- Account security flags (multiple device logins, suspicious IP addresses).
- System maintenance, holidays, or network congestion causing delayed on‑chain confirmations.
In general, routine small withdrawals are reviewed within a few minutes to ten‑plus minutes, while large withdrawals may require several hours of manual verification.
7. Practical Tips & Pitfall‑Avoidance
- Prioritize TRC20 – Low fees and fast settlement suit the majority of users.
- Use OMNI Sparingly – High fees and slow confirmations; only for specific needs.
- Wallet Readiness – Keep enough native tokens (TRX, ETH, BNB, etc.) on hand to cover transaction fees.
- Choose Reputable Exchanges – Larger platforms have more robust cross‑chain support and lower risk.
- Emergency Plan – Before a large withdrawal, generate USDT addresses for several networks within the same wallet to mitigate the impact of a network‑selection error.
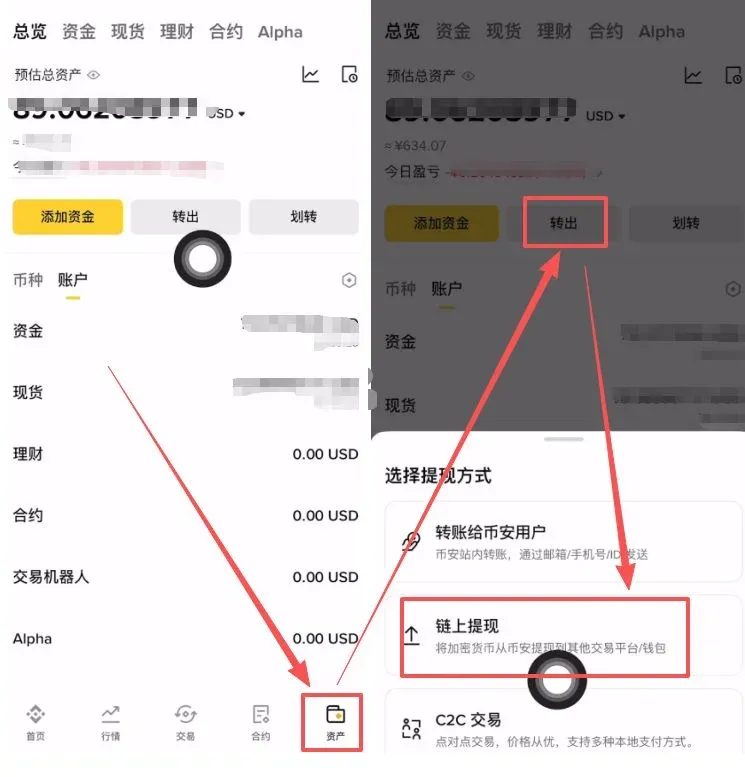
8. Illustrated Step‑by‑Step USDT Withdrawal (On‑Chain) Tutorial
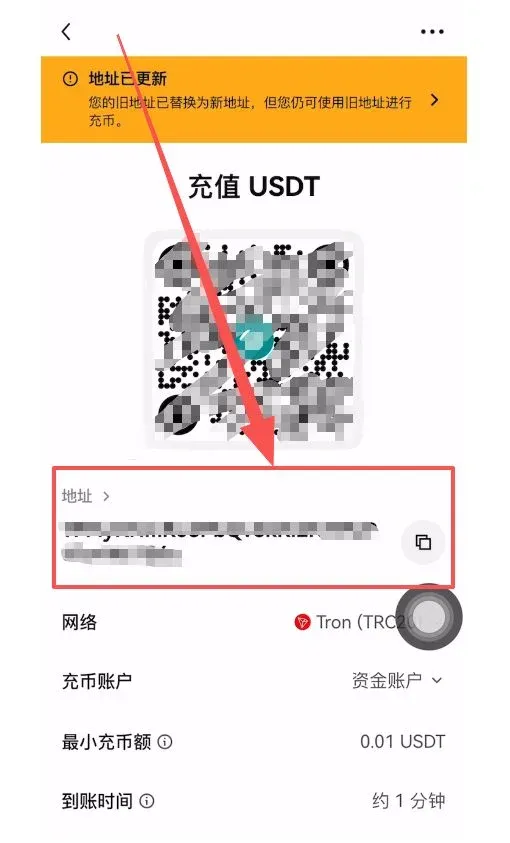
- Open the OKX app (official registration: https://www.okx.com/zh-hans/join/B2345 | official download: https://www.bitaigen.com/binance/download). Tap Assets at the bottom right → Deposit at the top → tap Deposit again.

- Select Network – In the pop‑up, choose TRON‑TRC20 (recommended). The system will prompt “Please select the same network as the recipient.” Estimated arrival times are displayed as ~1 minute, ~7 minutes, ~20 minutes for different networks.
- Obtain Deposit Address – Copy the displayed USDT deposit address. Then open the exchange from which you will send USDT (example shown with Binance).

- Navigate to the Withdrawal Section – Go to Binance (global users: https://accounts.binance.com/register?ref=B2345 – US users should use Binance.US; official download: https://www.bitaigen.com/binance/download). Tap Assets at the bottom right → Withdraw at the top → select On‑Chain Withdrawal.
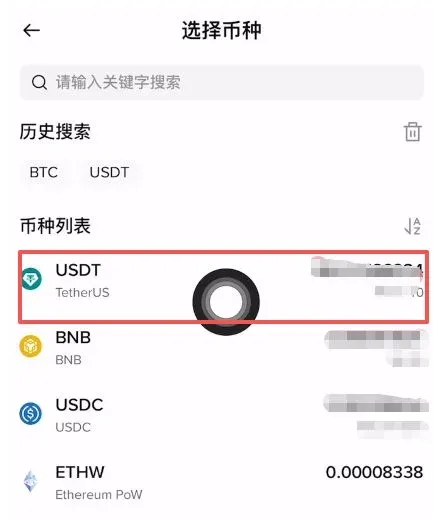
- Enter Withdrawal Details – Choose USDT as the asset, paste the OKX deposit address you copied, select TRON (TRC20) as the network, and input the withdrawal amount (minimum 10 USDT). The system will display the fee and the net amount you will receive.
- Confirm & Submit – Tap Withdraw; the screen will show “Withdrawal in progress.” Return to OKX later to verify receipt.
- Check Deposit Record – In OKX’s Assets page you will see “1 deposit received.” Click to view details and confirm that the net USDT
💡 Register on Binance with referral code B2345 for the maximum trading fee discount. See Binance complete guide.


