
We systematically outline the full‑chain features and operational workflow of Binance Web3 Wallet in this article, helping beginners quickly get started with wallet creation, transfers, and withdrawals while explaining key points of private‑key management and on‑chain interaction. With illustrated step‑by‑step screenshots, you can use a decentralized wallet with confidence; later sections will dive deeper into secure backup methods and common troubleshooting, so it’s worth reading in full.

1. What Is the Binance Web3 Wallet?
The Binance Web3 Wallet can be created directly inside the Binance app, supports token transfers and fiat withdrawals, and the typical workflow includes navigating to the Web3 Wallet page, creating a wallet, backing up the recovery phrase, initiating a transfer by entering the recipient address, and finally withdrawing assets back to the Binance exchange.
Binance Web3 Wallet is a decentralized wallet tool that allows users to manage digital assets on the blockchain without relying on a custodial service. It is tightly integrated with the Binance trading platform and is compatible with multiple major blockchains such as Ethereum and Binance Smart Chain (BSC). Through this wallet, users can perform storage, trading, sending, and withdrawing operations across supported chains.
2. Core Functions of the Web3 Wallet
- Private‑Key Management – The Web3 Wallet generates and stores the user’s private key, which is the sole credential for accessing assets and must be kept confidential at all times.
- Asset Interaction – Supports storing, sending, and receiving cryptocurrencies, interacting with DApps, participating in DeFi projects, and executing other on‑chain actions.
- Identity Management – Allows the creation of on‑chain identities, helping users establish a digital identity on the blockchain and complete secure verification.
In short, every application built on blockchain technology belongs to the Web 3.0 ecosystem, and transactions or payments within these applications rely on a Web3 Wallet. As users place increasing emphasis on DeFi participation and personal sovereignty, more exchanges are launching their own wallets, such as Binance Web3 Wallet and OKX Web3 Wallet.
3. Creating a Binance Web3 Wallet
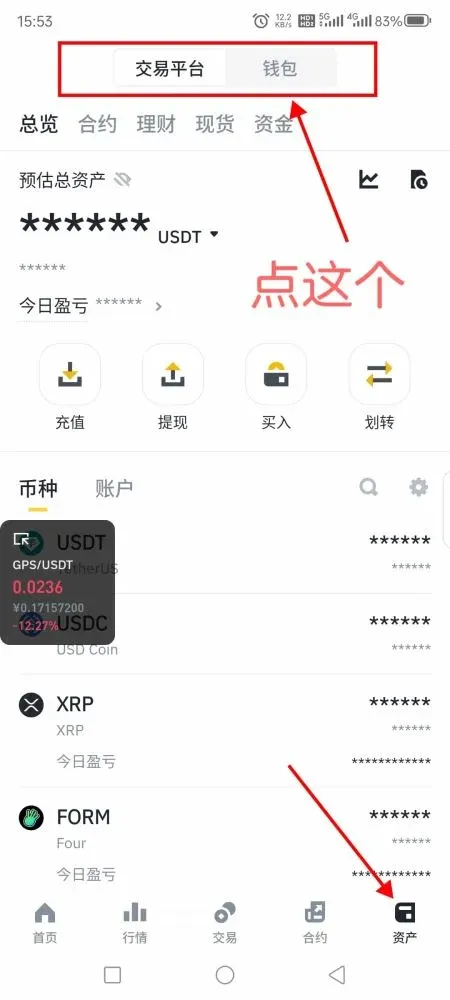
1. Open the Web3 Wallet Page
Log in to the Binance app, tap the bottom‑menu [Assets], then select the top‑right [Wallet] button, and finally enter the [Web3 Wallet] page to launch the wallet interface.
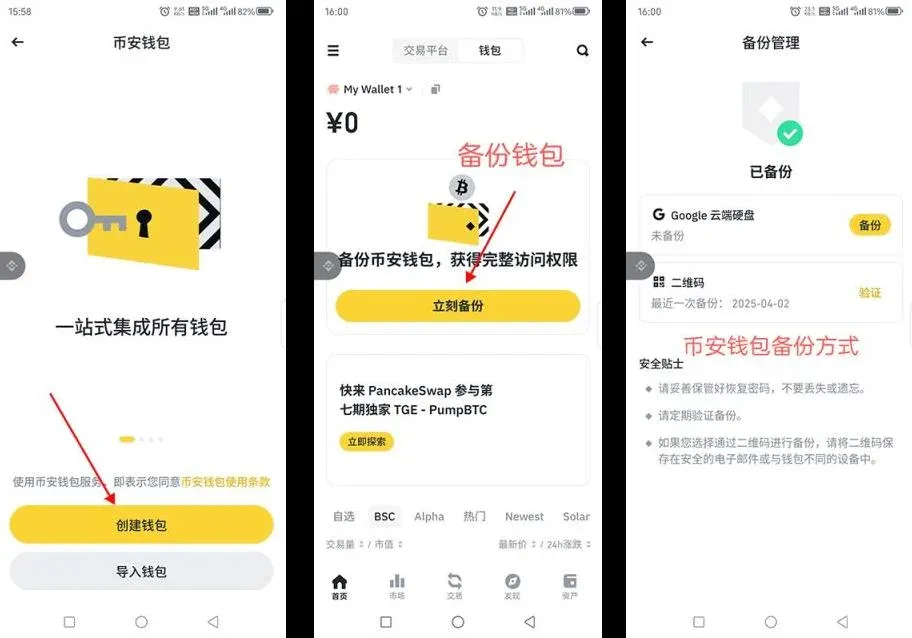
2. Create a New Wallet
On the Web3 Wallet home screen, tap [Create Wallet]. The system will prompt you to choose a verification method; you may set a wallet password or use biometric authentication (e.g., fingerprint) to confirm. The password must meet the required complexity rules.
3. Back Up the Wallet
The recovery phrase consists of 12 words. You can also back it up as a QR code or store it in Google Drive. For security, we recommend manually writing the phrase on a piece of paper and keeping it in a safe location; losing the recovery phrase means permanent loss of access to the assets.
4. How to Perform a Transfer?
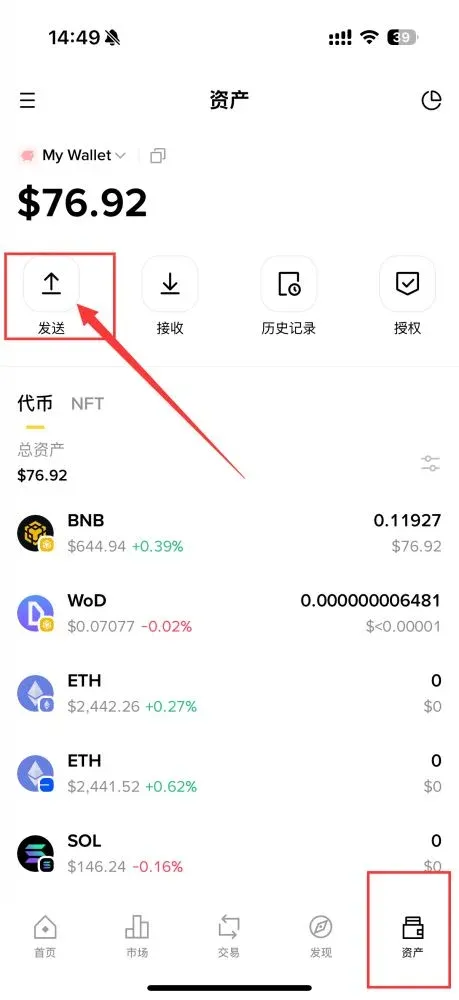
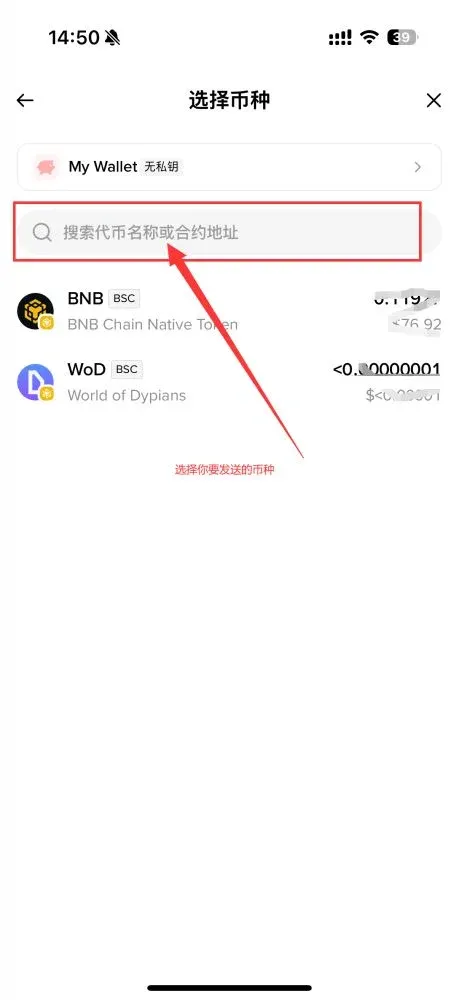
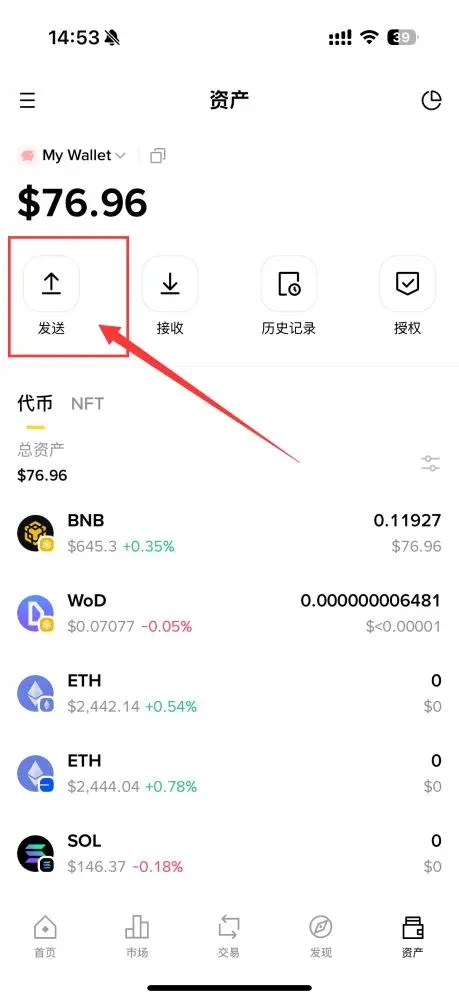
- Inside the Web3 Wallet, go to the [Assets] tab and tap the [Send] button.
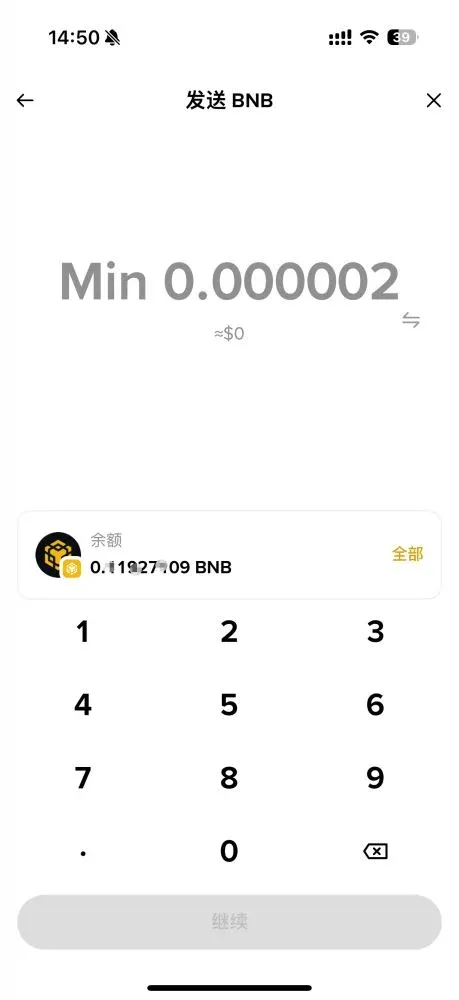
- Choose the token you wish to send and enter the amount. Make sure the wallet holds enough native coin to cover the Gas fee (the on‑chain transaction fee).
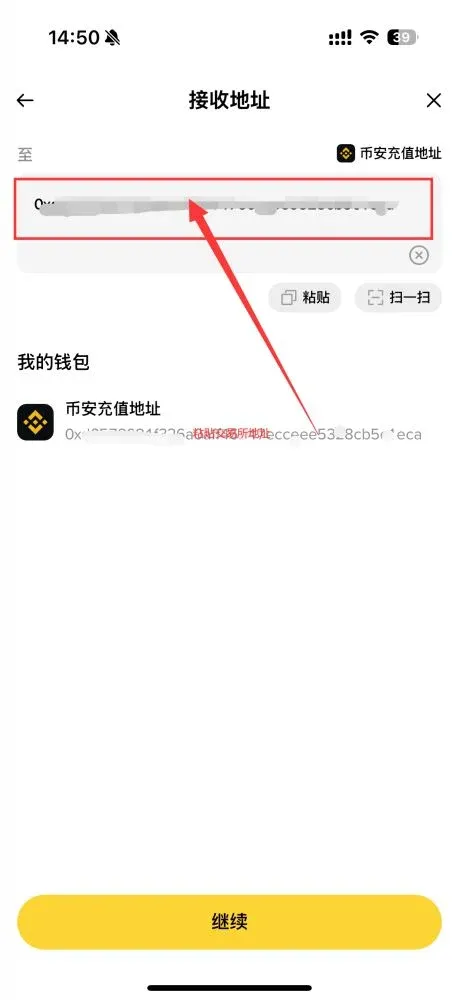
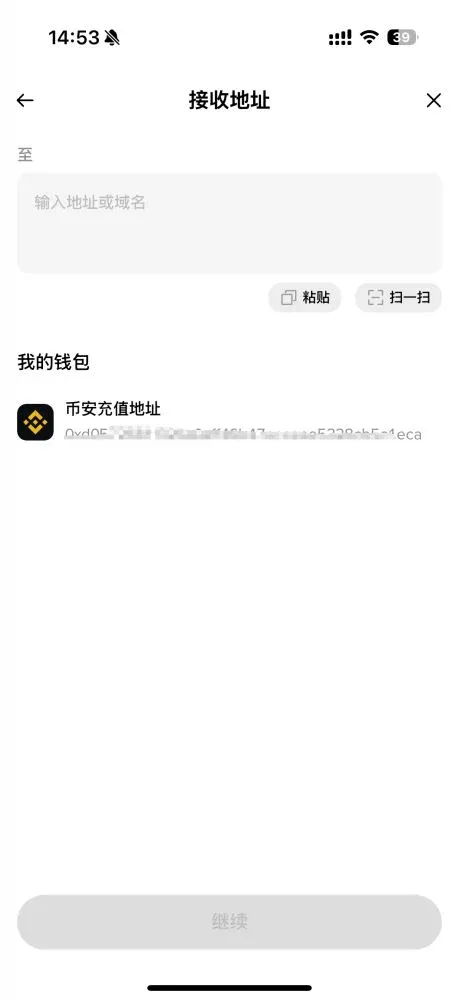
- Paste the recipient’s address and tap [Continue].
Gas‑Fee Explanation – Gas fees and confirmation speeds differ across blockchains. For example, an Ethereum transfer requires the wallet to hold enough ETH to pay the gas cost.
Important Considerations
- Double‑check the recipient address; sending to an incorrect address makes the funds unrecoverable.
- If the system flags the address as a high‑risk scam, proceed with extra caution or abort the transaction.
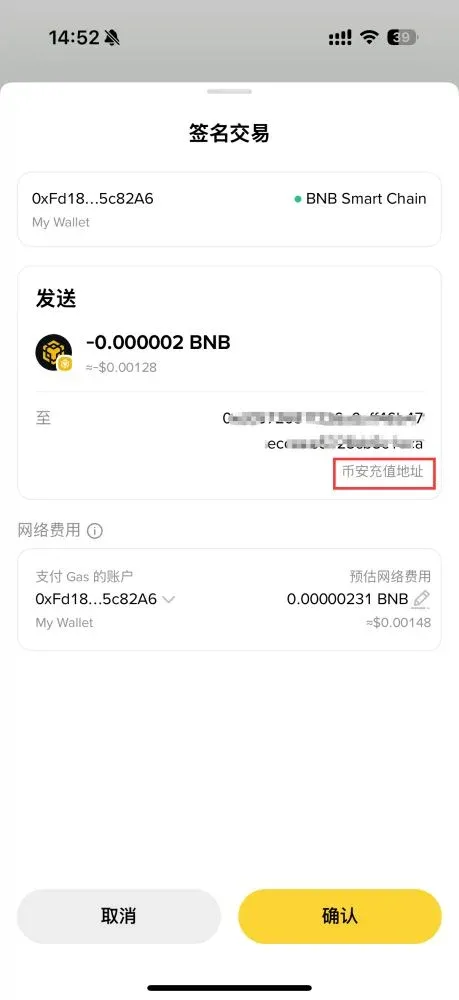
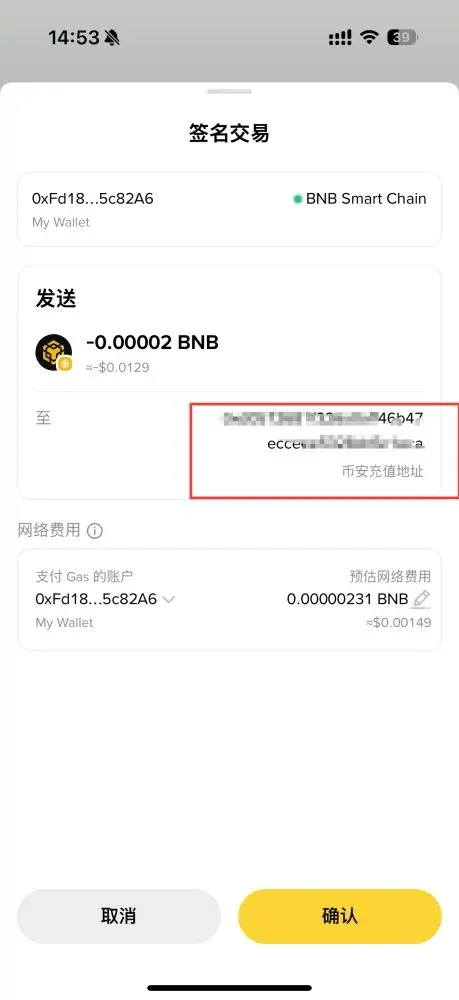
- Review the amount, Gas fee, and recipient address, then tap [Confirm].
- After submission, wait for the blockchain network to confirm the transaction. Confirmation time depends on the chain type and current network congestion—typically ranging from a few minutes to several hours. You can track the transaction hash on a block explorer for status updates.
5. Withdrawing to the Binance Exchange
The Binance Web3 Wallet is seamlessly linked to the Binance exchange, enabling fast asset repatriation to your spot wallet. Follow these steps:
- In the Web3 Wallet, tap [Send].
- Choose the token you want to withdraw and enter the desired amount.
- For the destination address, select “Binance Deposit Address.” Verify that the official Binance logo appears, confirming you are sending to the correct platform.
- Set the miner fee (the default is usually sufficient); increase it if you need faster confirmation.
- Confirm the details and wait for the on‑chain transfer to complete. The assets will appear in your Binance spot wallet. If the funds do not arrive after a reasonable period, double‑check the address and contact Binance support.
Note for U.S. users: Use Binance.US for all deposit and withdrawal operations instead of the global Binance platform.
Fiat considerations: When converting crypto to fiat, you can withdraw in USD via SEPA or SWIFT, depending on your bank’s capabilities.
Tax reminder: Crypto gains may be taxable in your jurisdiction. Keep records of all transfers and withdrawals for potential tax reporting.
6. In‑Depth Look at the Binance Web3 Wallet
1. Security Management
Binance Web3 Wallet employs multi‑party computation (MPC) technology, splitting three key shares and storing them in separate locations to enhance security. Users must still safeguard their recovery phrase and private key, regularly rotate the wallet password, and enable two‑factor authentication (2FA) where possible.
2. Fee Structure
Both transfers and withdrawals incur Gas fees or platform fees, which vary with network congestion and transaction size. To reduce costs, consider executing transactions during periods of lower on‑chain activity (e.g., weekends) or adjusting the Gas‑price priority manually.
3. Supported Chains and Tokens
The wallet currently supports multiple major blockchains and hundreds of tokens. However, not every chain or token is universally supported across all exchanges or wallet interfaces; always verify the compatibility list before initiating a cross‑chain transfer to avoid sending assets to an unsupported network.
4. Best‑Practice Security Tips
- Recovery‑Phrase Safety – Never store the phrase digitally; keep a handwritten copy in a secure, fire‑proof location.
- Phishing Prevention – Be wary of unsolicited messages claiming to be from “customer support” or third‑party DApps.
- Transfer Verification – Review the address and amount carefully for every transaction.
- Network Selection – Ensure the selected blockchain matches the token’s native chain before confirming a transfer.
- Authorization Management – Periodically review DApp permissions granted through the wallet and revoke any that are no longer needed.
Summary
The Binance Web3 Wallet provides a convenient entry point for managing digital assets, covering wallet creation, token transfers, and withdrawals across supported blockchains. This guide has methodically described how to download, set up, back up, send, and withdraw funds, helping both newcomers and experienced users improve efficiency and security in asset management. Always remember the principle: “If you don’t control the private key, you don’t control the coins.” Keep your recovery phrase secure, grant permissions judiciously, and perform regular backups to ensure the safety of your holdings.
The above constitutes the complete tutorial “Binance Web3 Wallet Usage Guide: Detailed Steps for Creation | Transfer | Withdrawal.” For additional tutorials, follow Bitaigen (比特根) for more articles!
Related Reading
- On-Chain Token Staking Safety: Risks, Research & Private Key Management
- Crypto Custody Explained: Key Management, Multi‑Sig & MPC
- Binance Web3 Wallet: Why Assets Won’t Trade/Transfer & Fixes
💡 Register on Binance with referral code B2345 for the maximum trading fee discount. See Binance complete guide.


