 Bitaigen Research
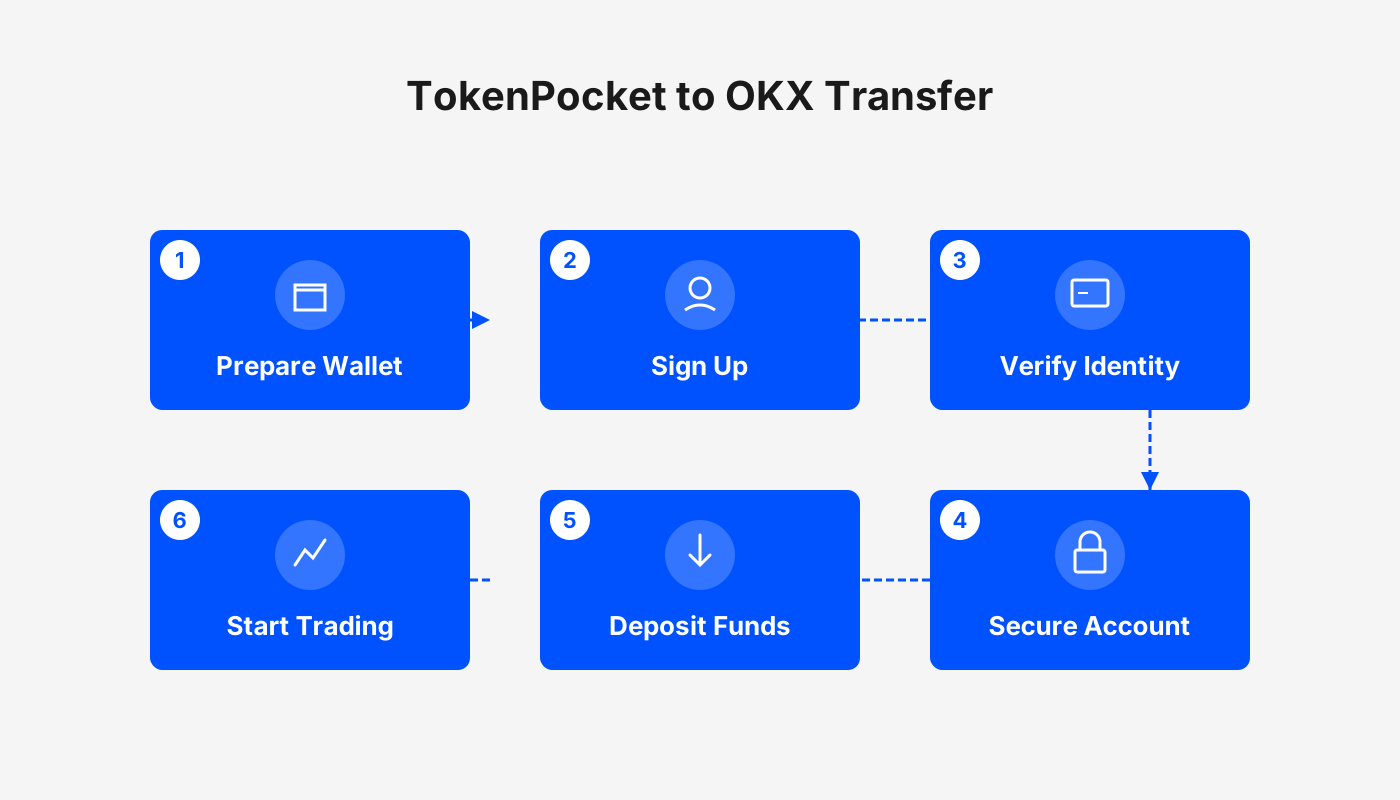
 TokenPocket Wallet Transfer to OKX (OKEx):
First switch to the USDT‑compatible TRC20 or ERC‑20 network within TokenPocket, copy the deposit address supplied by OKX, paste it into the recipient field, enter the transfer amount and confirm that the miner fee is sufficient, then input your password to finalize the transfer.
The Bitaigen editorial team points out that this article systematically outlines the entire process for moving assets from TokenPocket to OKX, covering network selection, address copying, fee configuration, and common‑issue troubleshooting. The goal is to help beginners avoid mistakes and improve efficiency. The step‑by‑step demonstration and practical tips that follow are worth a careful read.
TokenPocket Download, Creation & Import Transfer Tutorial
- How does TokenPocket receive funds?
- TokenPocket wallet transfer to an exchange: how to send to OKX? Cancel, accelerate, and FAQ on transfers
- How to create and import a Jovay Mainnet wallet in TokenPocket (mobile and extension versions)
- How to create and import a Monad wallet in TokenPocket (mobile and extension versions)
- How to download the TokenPocket (TP) wallet? What to do if an iPhone can’t open it? How to migrate data?
- How to set up a multi‑signature wallet in TokenPocket? Import and transfer guide for multi‑sig wallets
- The most comprehensive TokenPocket usage guide: creating, importing, multi‑sig wallets, hardware‑wallet linking
- What is the TokenPocket wallet? How to create and use a TP wallet?
Step‑by‑Step “Nanny‑Level” Guide for Sending USDT from TP Wallet to OKX (OKEx)
- OKX (formerly OKEx) exchange referral code: B2345
- OKX official website (global market version) – US users should access Binance.US for any Binance‑related services, not the global Binance platform.
- OKX mobile app download (global version) – the app supports USD deposits via SEPA or SWIFT, depending on the user’s jurisdiction.
- Register with the referral code to enjoy a permanent 20 % fee discount on trading fees.
1. OKX Side – Obtain a TRC20 Deposit Address
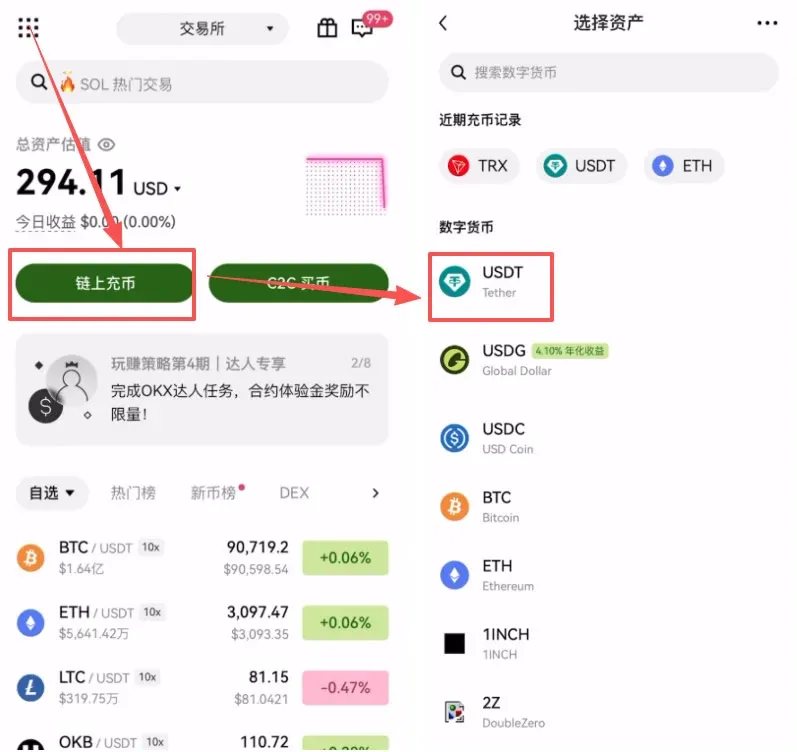
- Launch the OKX app and tap [On‑Chain Deposit] on the home screen.
- From the list of supported coins, select USDT.
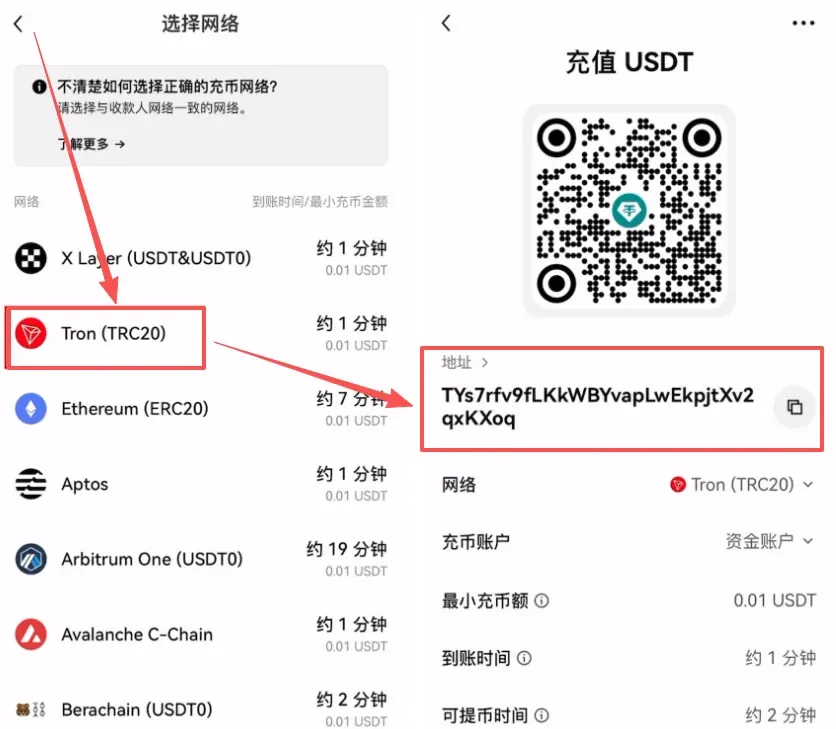
- On the network‑selection page, choose USDT‑TRC20 (Tron).
- The interface will display a unique deposit address; tap [Copy] and store it safely for later use.
Definition: TRC20 is the token standard on the Tron network; it offers the lowest transaction fees among major chains.
2. TokenPocket Side – Setting Up a TRC20 Transfer
- Return to TokenPocket and make sure you are inside the Tron wallet.
- In the asset list, tap USDT → Transfer.
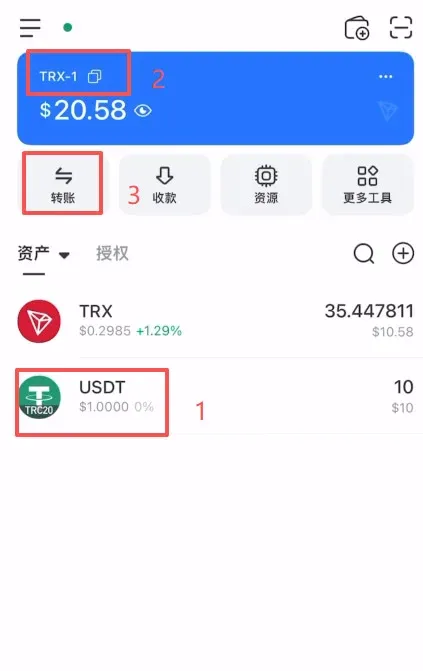
3. Core of a TRC20 Transfer – Miner Fee & Confirmation
- TRX serves as the gas (miner) fee for the Tron chain; you must hold a small amount of TRX to complete the transaction.
- Paste the OKX address you copied earlier into the Recipient Address field, input the amount you wish to send (you may choose “All”), verify the network fee, then tap [Confirm].
- Enter your wallet password; the transfer will be processed and the funds will appear on OKX shortly thereafter.
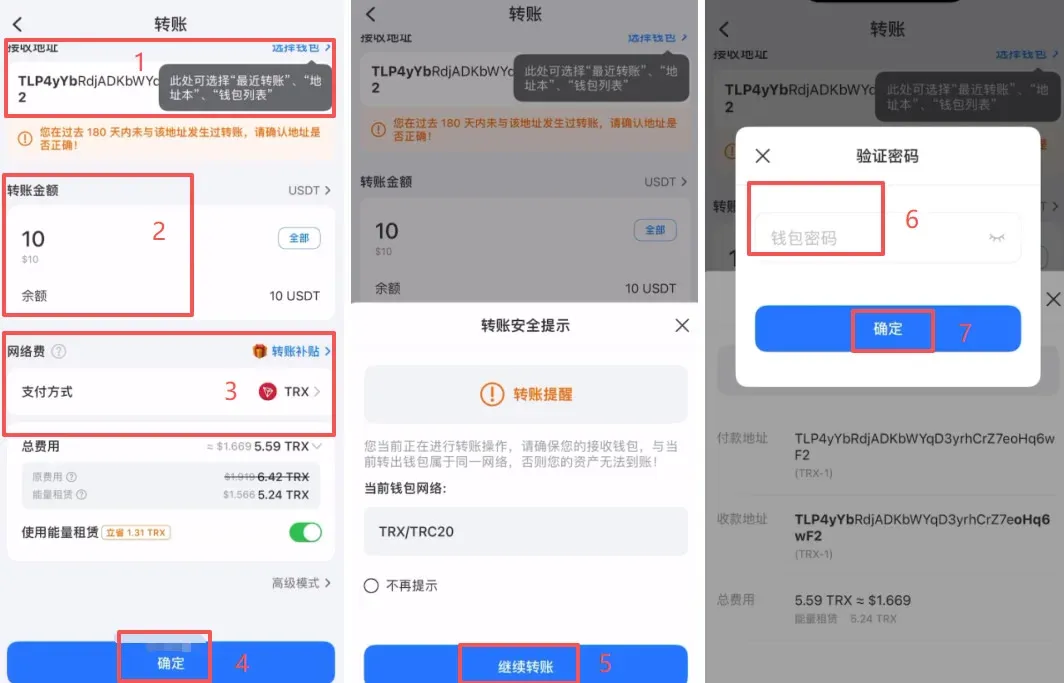
4. ERC20 Transfer Demo – Switching Networks & Getting the Address
- In TokenPocket’s list, switch to the ETH (Ethereum) wallet, select USDT → Transfer.
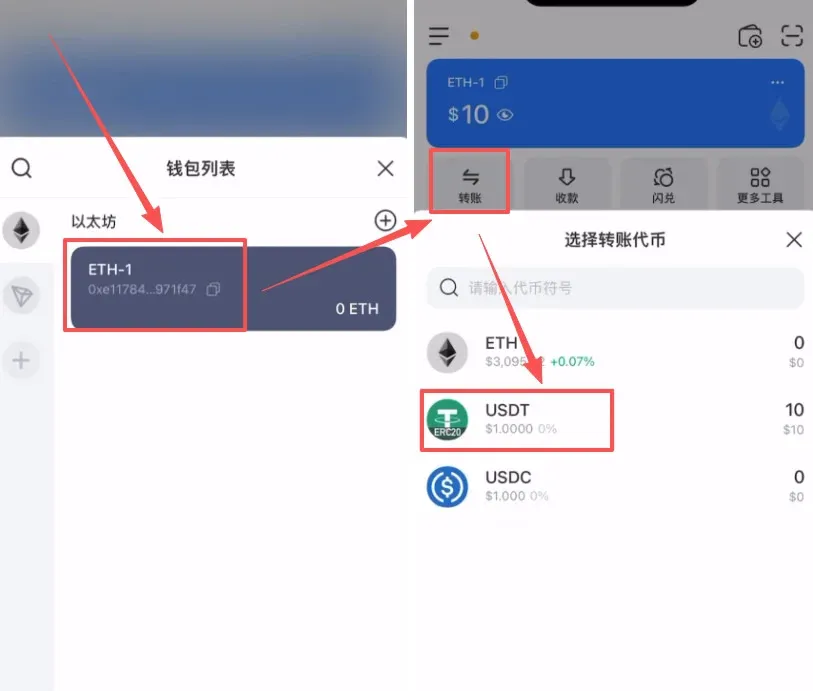
- Go back to OKX, re‑enter the deposit page and this time choose USDT‑ERC20 (Ethereum) as the network.
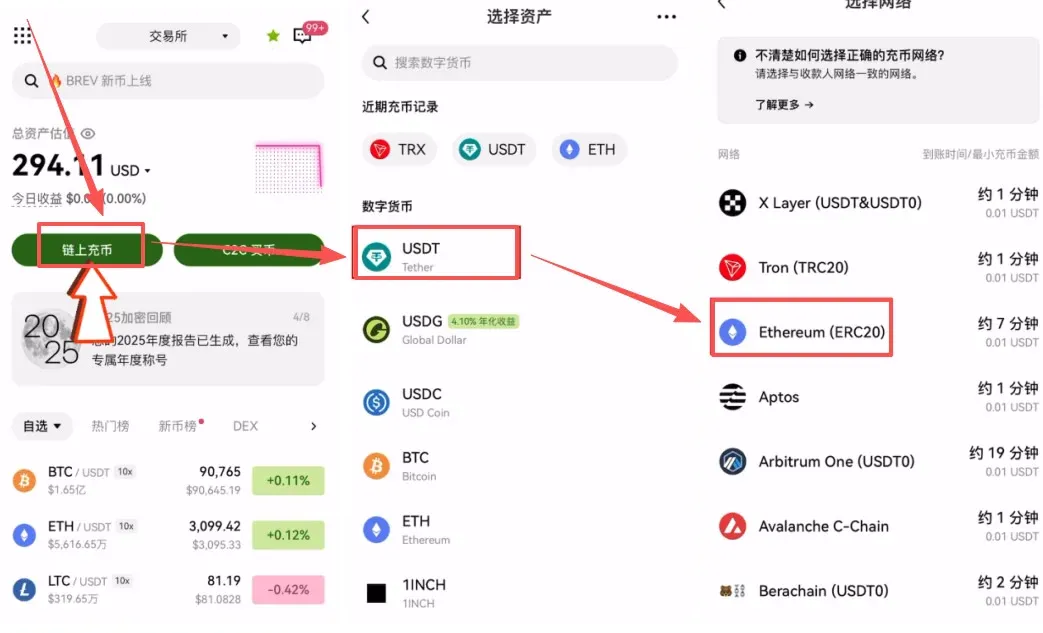
- The platform will generate an Ethereum‑based deposit address; tap [Copy].
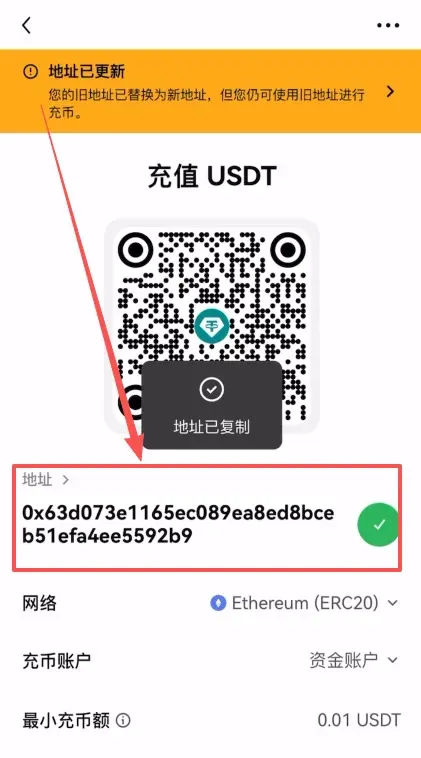
5. Core of an ERC20 Transfer – ETH Gas Fee Prompt
- ERC20 transfers consume ETH as the gas fee. Make sure your ETH balance is sufficient; otherwise the transaction will be rejected.
- Paste the copied ERC20 address, enter the desired amount, double‑check all details, then tap [Confirm] and provide your password to complete the transfer.
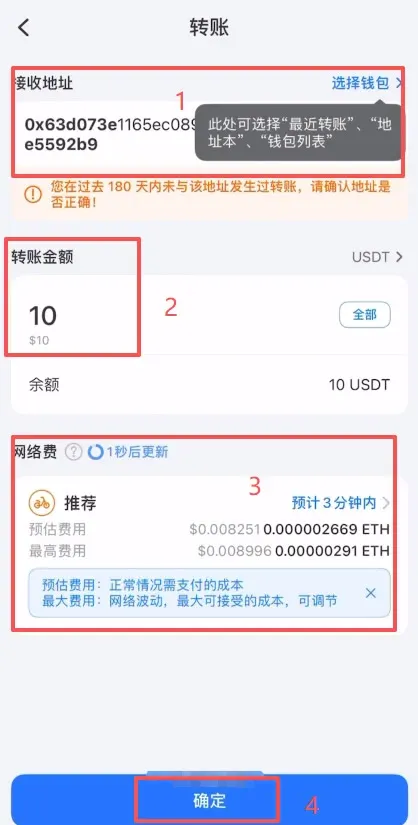
How to Transfer to a Wallet / Exchange
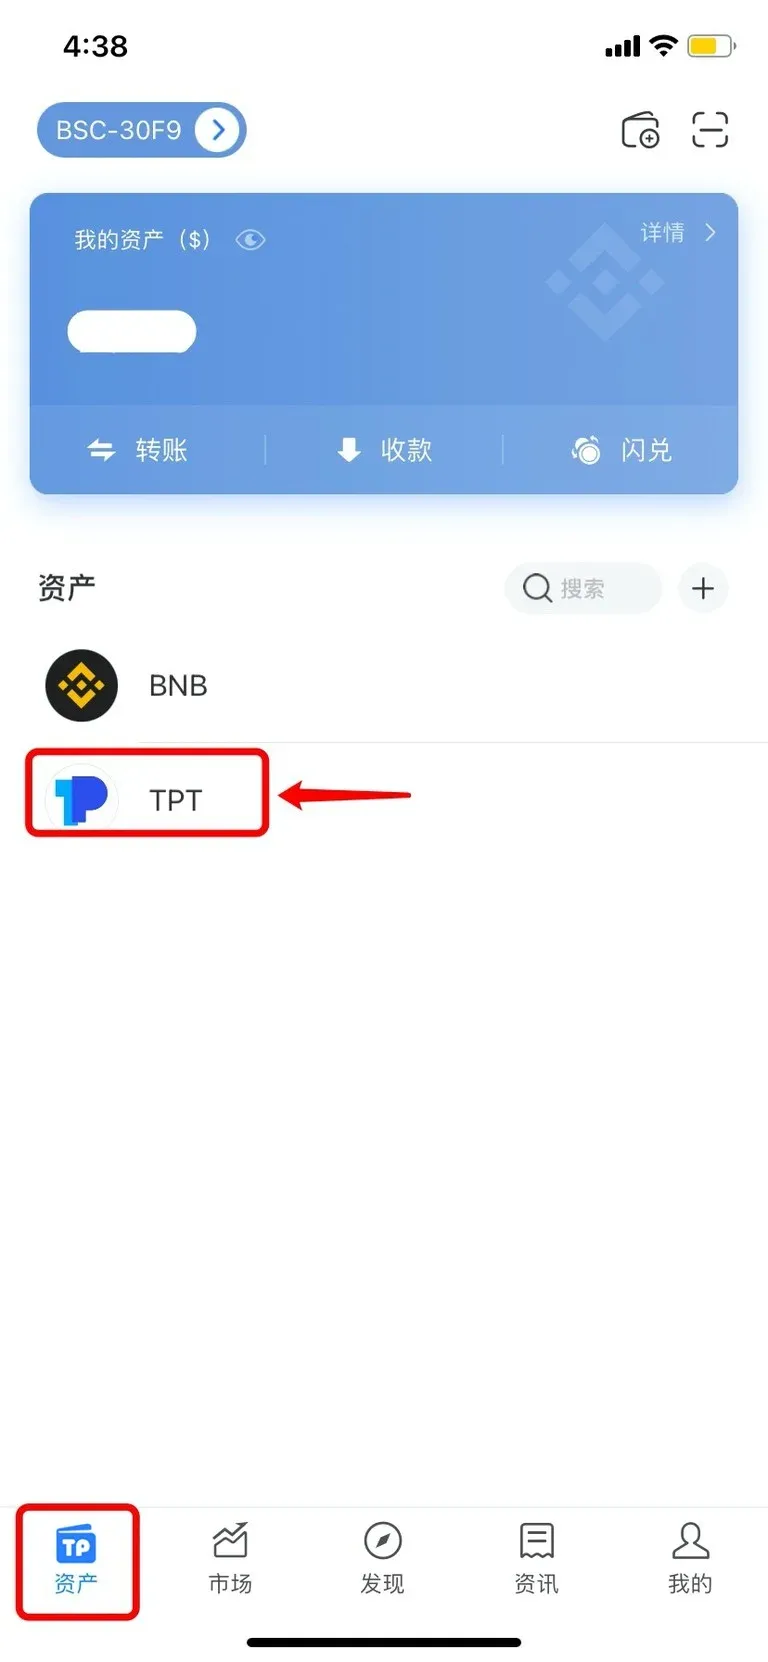
- Open TokenPocket, go to the [Assets] tab, and pick the token you wish to withdraw (example: TPT on the BSC chain).
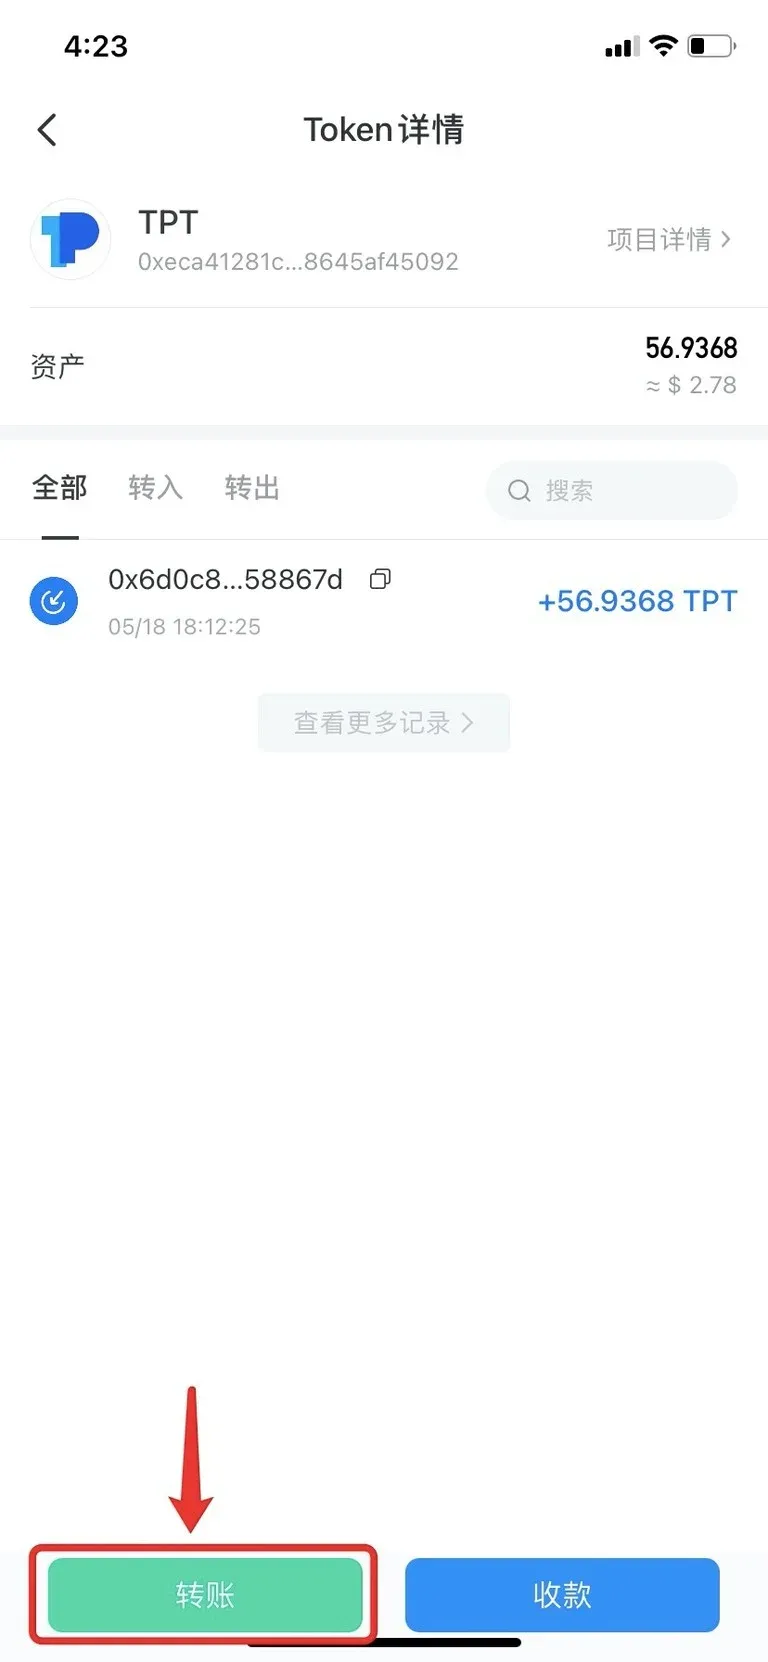
- Tap the [Transfer] button at the bottom of the screen.
- Choose the transfer method (example: Direct Transfer).
Tip:
- Address‑book transfer lets you pick from previously saved addresses.
- QR‑code transfer allows you to scan a QR code for quick entry.
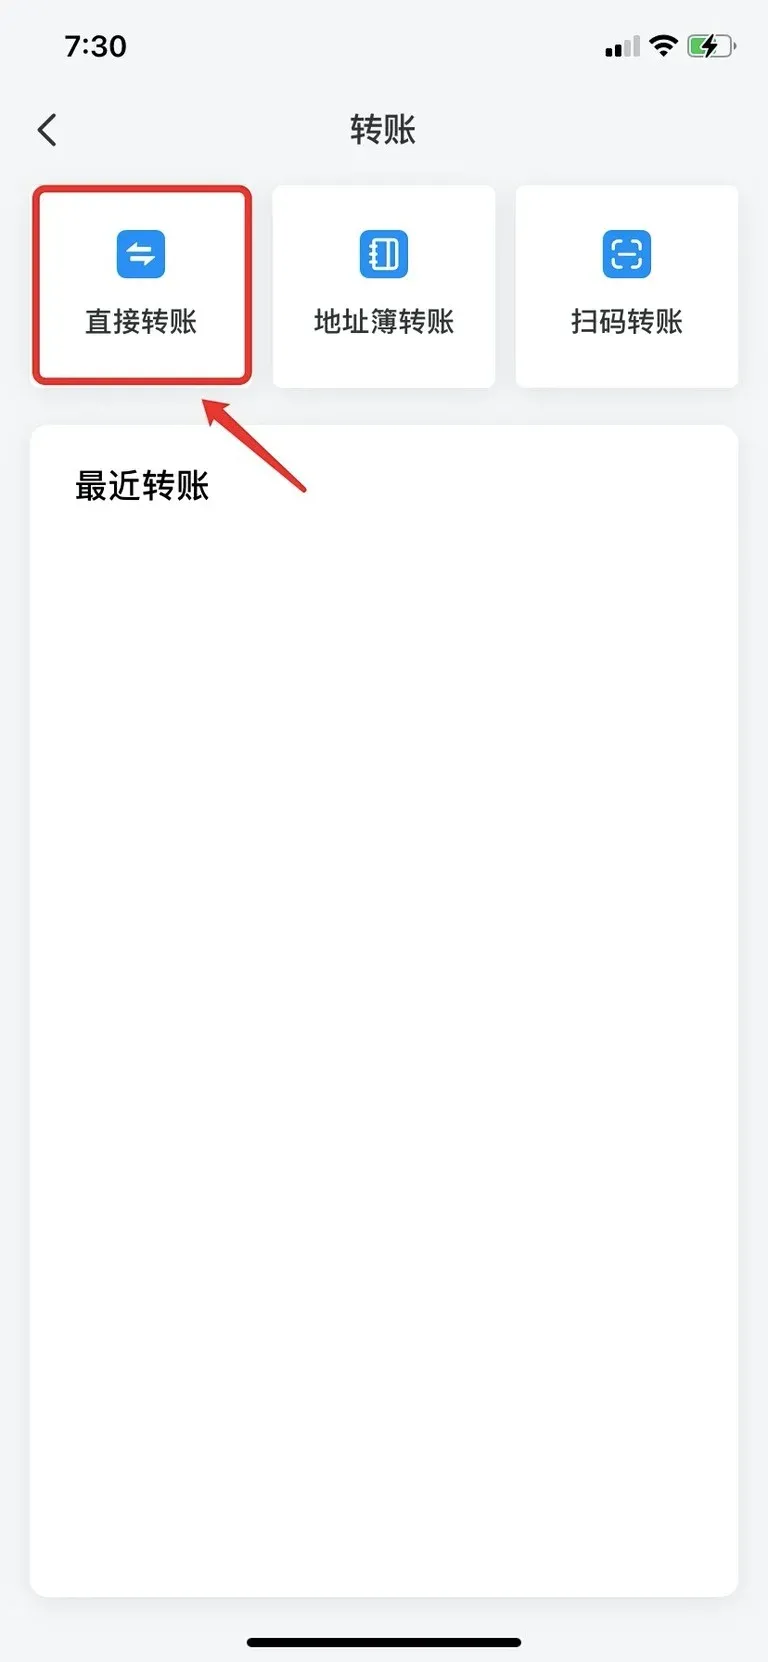
- Fill in the Recipient Account and Transfer Amount, select an appropriate miner fee, then press [Confirm].
Important:
- When sending to a centralized wallet (e.g., an exchange), if the destination chain requires a Memo or Tag, be sure to include it.
- Miner fees can be manually adjusted via gas price and gas limit fields.
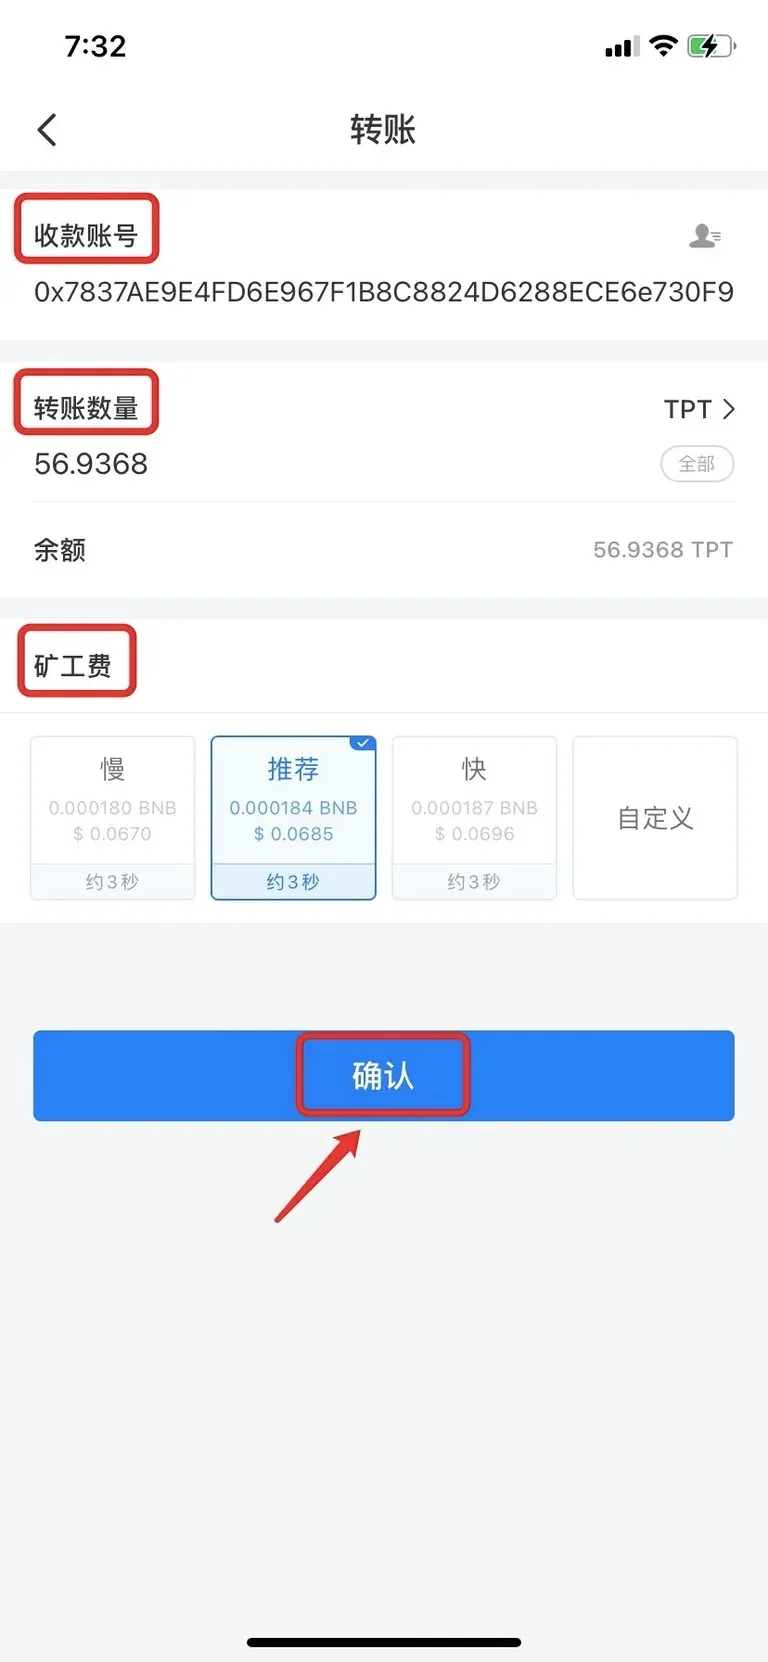
- After verifying all details, tap [Confirm Payment].
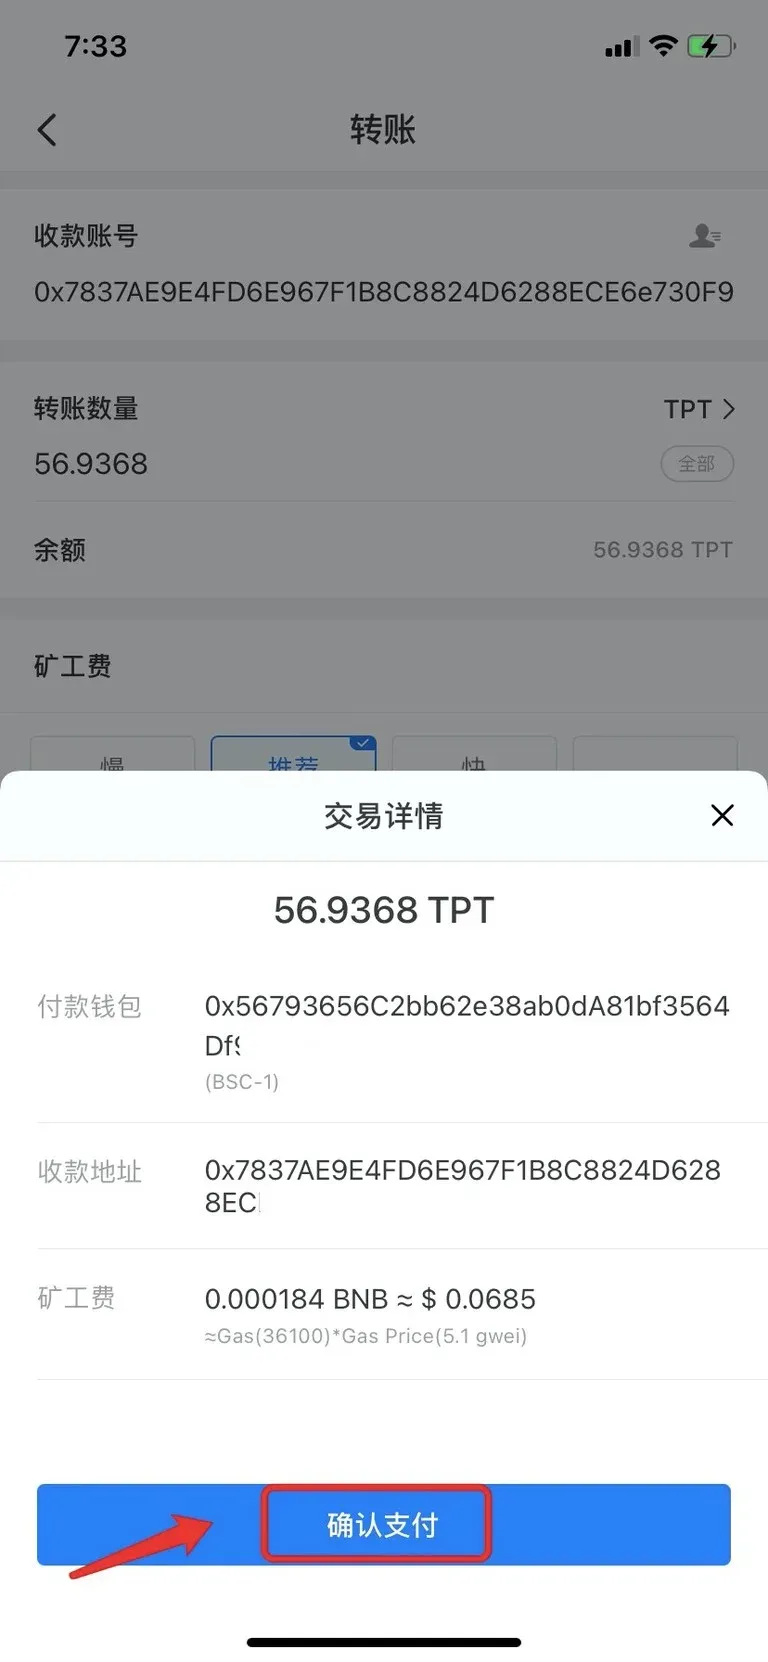
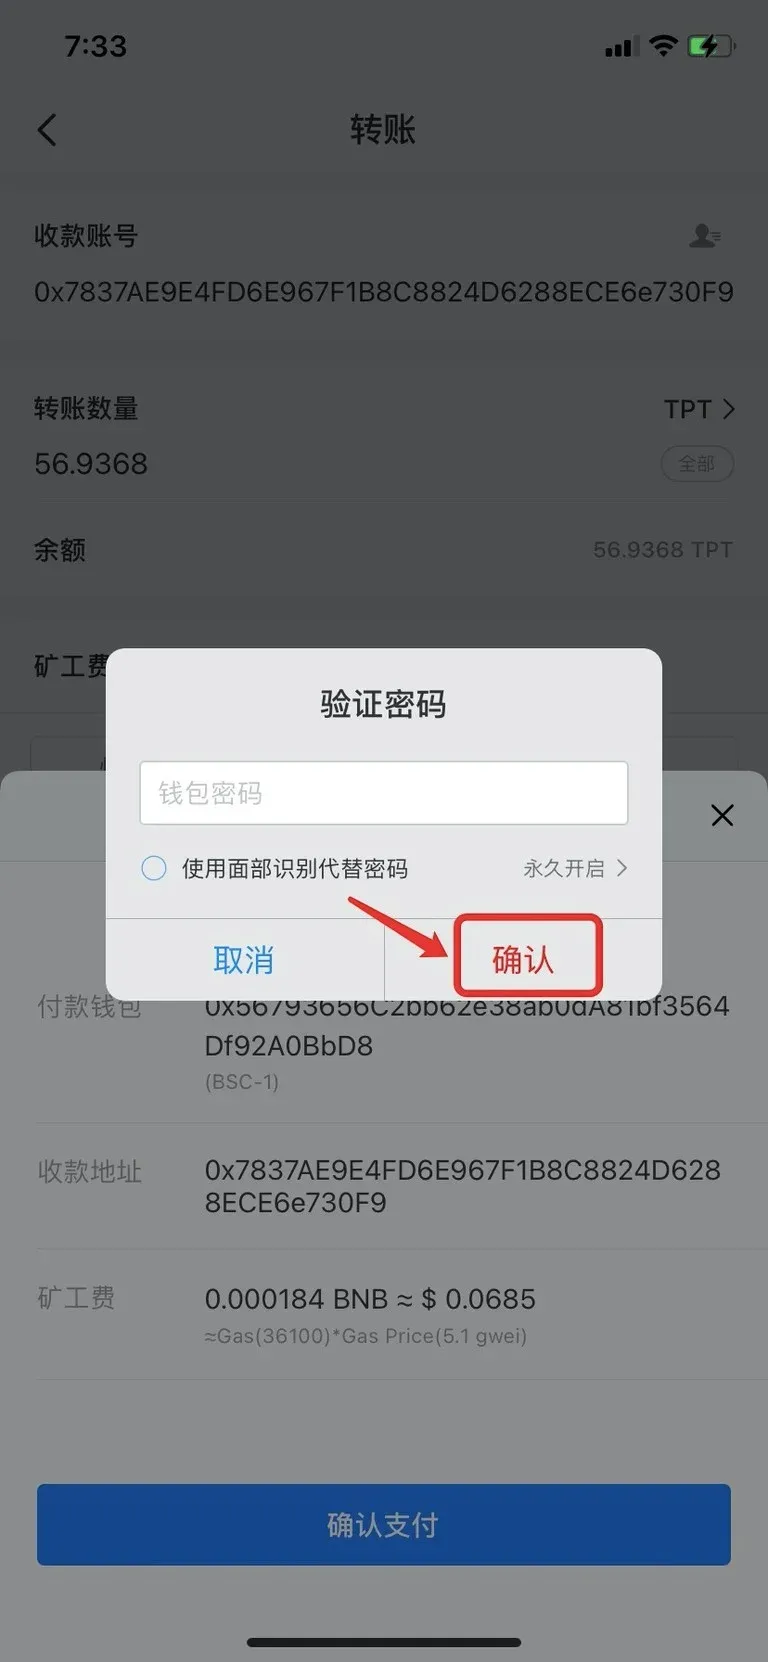
- Enter your wallet password and tap [Confirm] to finish the transaction.
Safety Checklist Before Sending
- Verify that the receiving address’s platform actually supports the token you are sending.
- Ensure your wallet holds enough miner fee (e.g., BNB for BSC, TRX for Tron).
- Confirm that the blockchain you are using matches the destination address’s network (e.g., a BNB‑BSC address must be used on the BSC network).
How to Cancel a Pending Transfer
- Locate the pending transaction inside TokenPocket and tap [Cancel Transaction] (example shown for an ETH transfer).
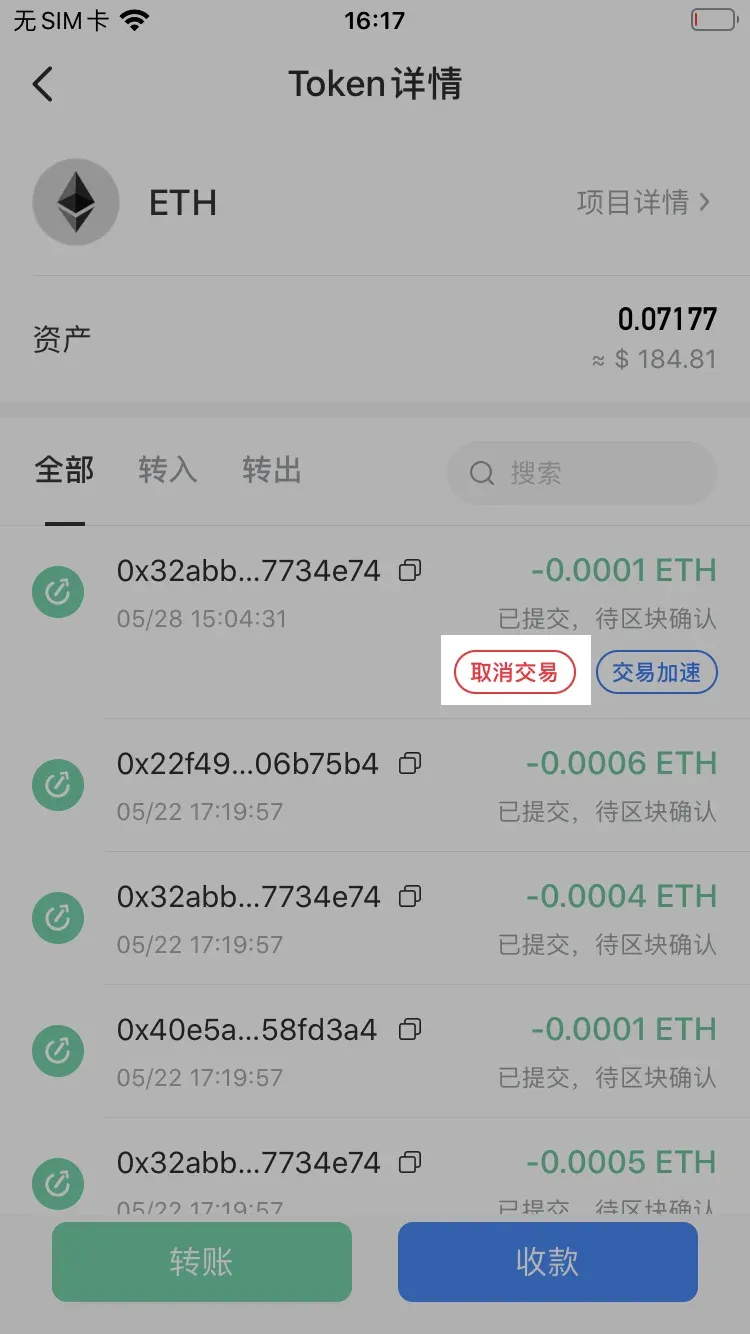
Note: Cancellation is only possible while the transaction is still unconfirmed on the blockchain.
- On the cancellation page, review the details and tap [Confirm].
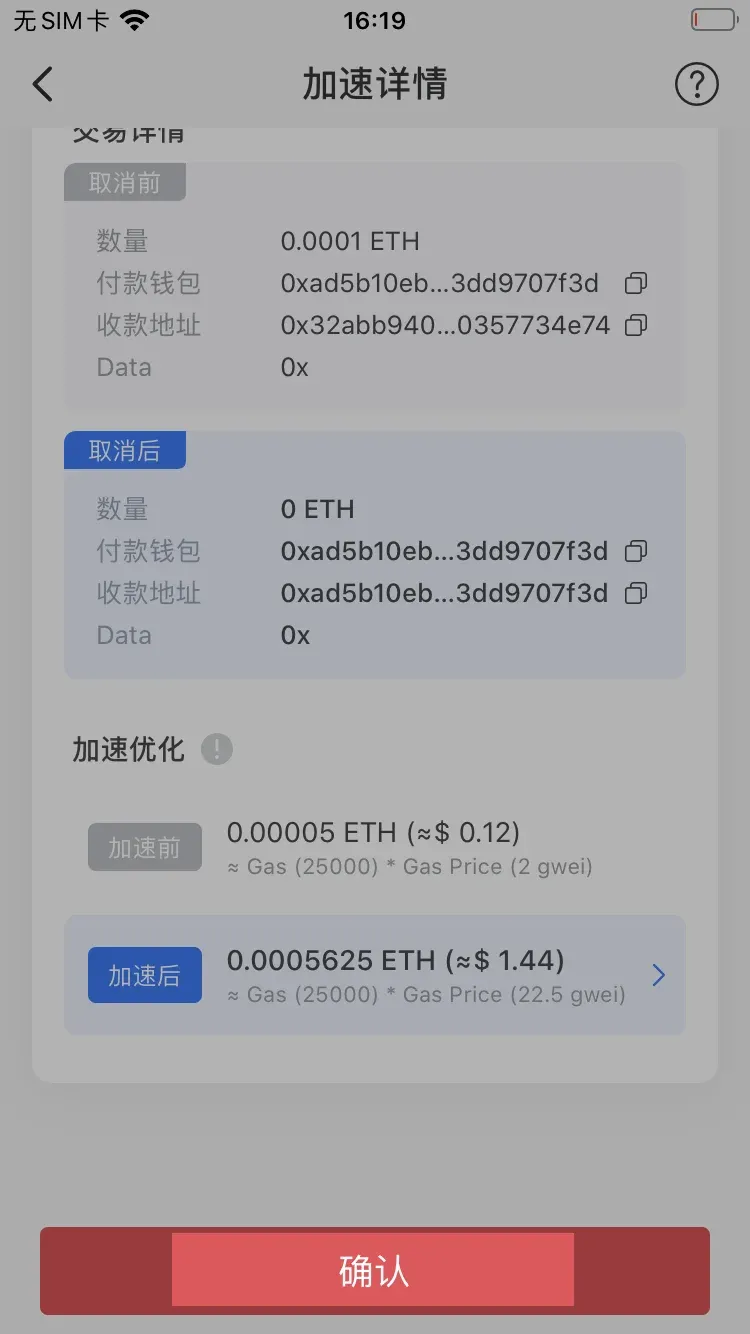
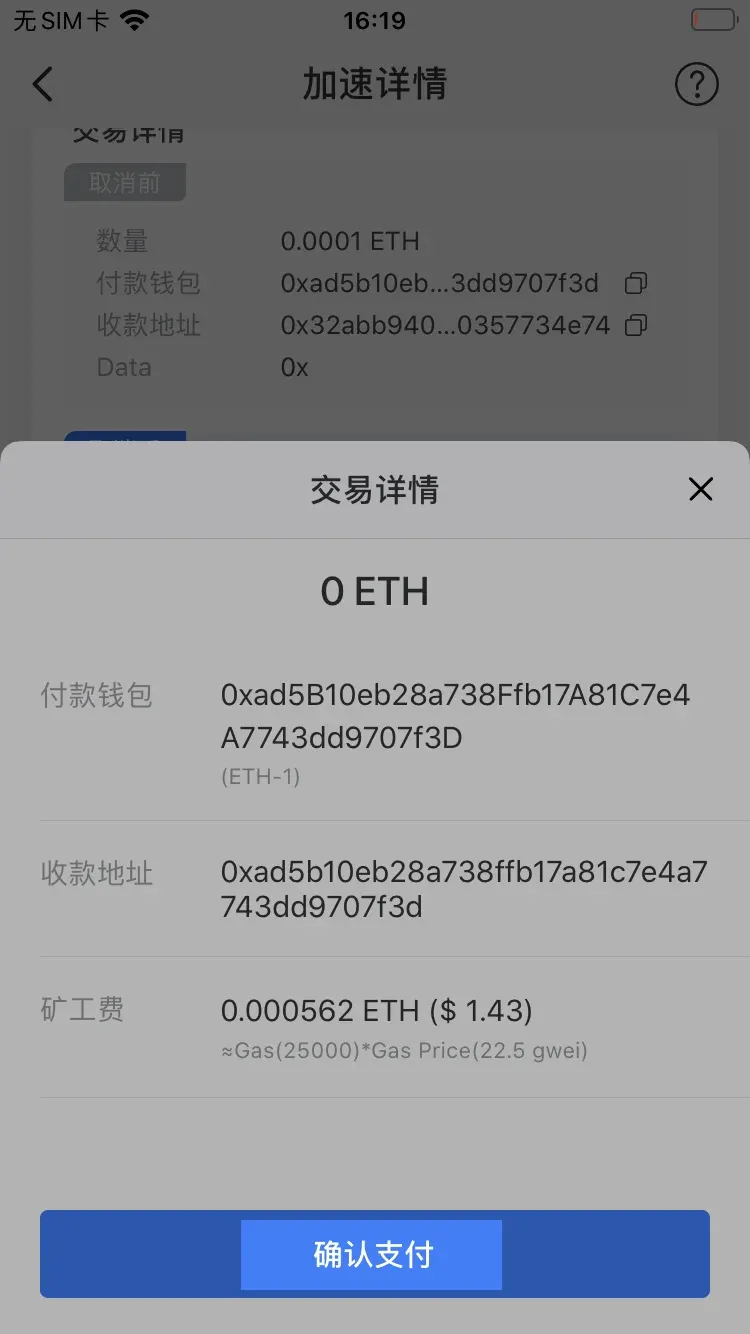
- After confirming, press [Confirm Payment].
The cancellation works by broadcasting a new transaction of the same amount back to your own address, effectively overwriting the original one. A small miner fee is still required.
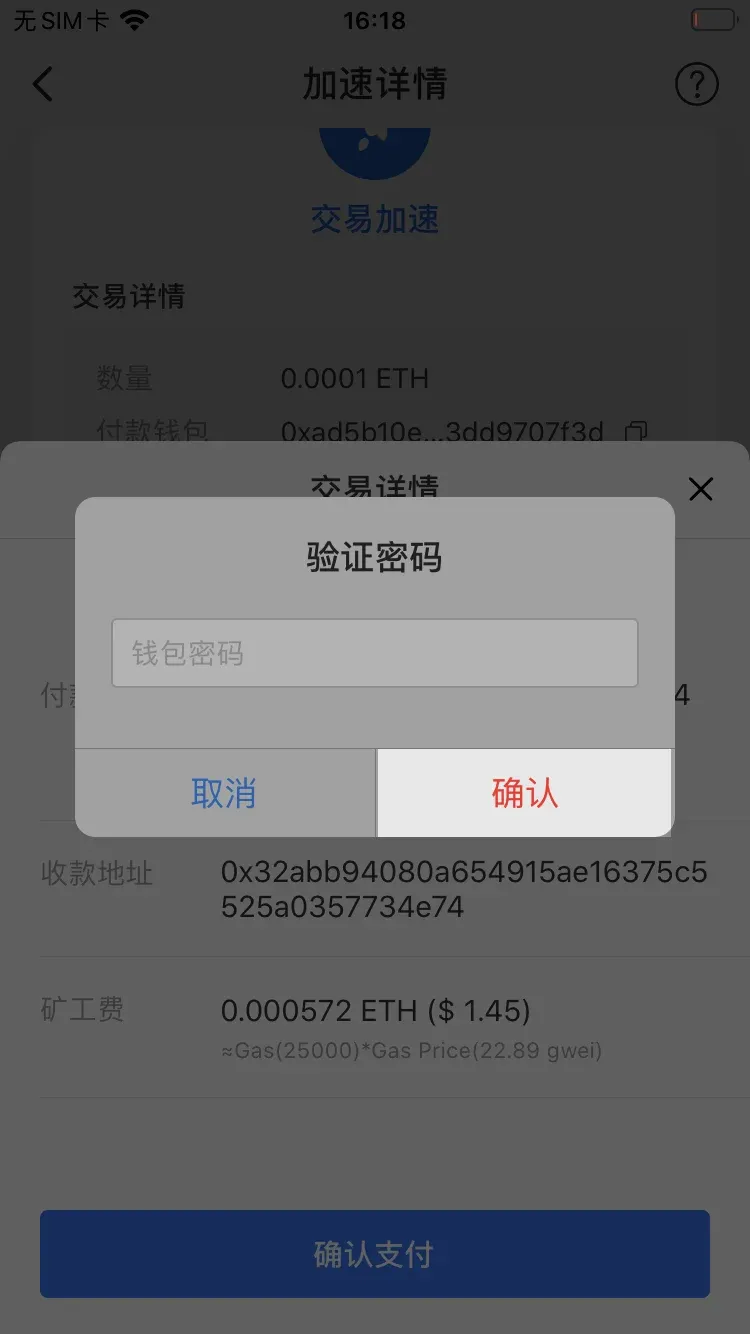
- Enter your password to complete the cancellation.
How to Accelerate a Stuck Transaction
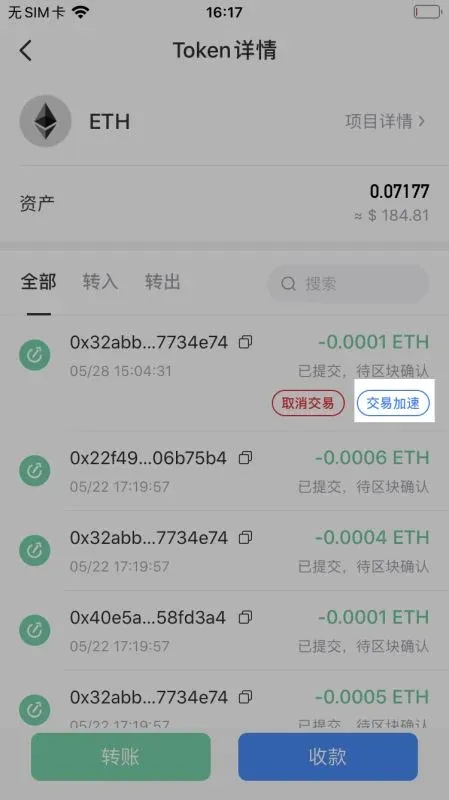
- Select the transaction you wish to speed up and tap [Accelerate Transaction] (example shown for an ETH transfer).
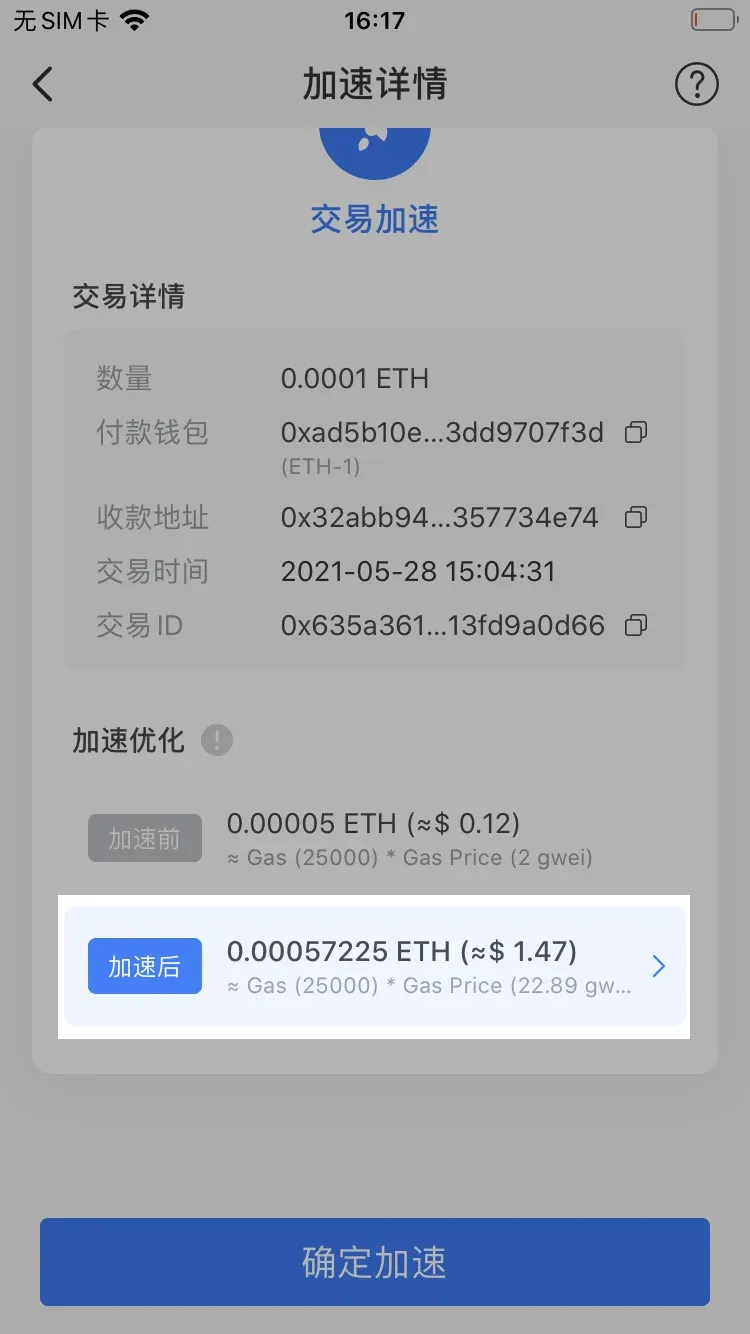
- In the [After Acceleration] field, customize the miner fee.
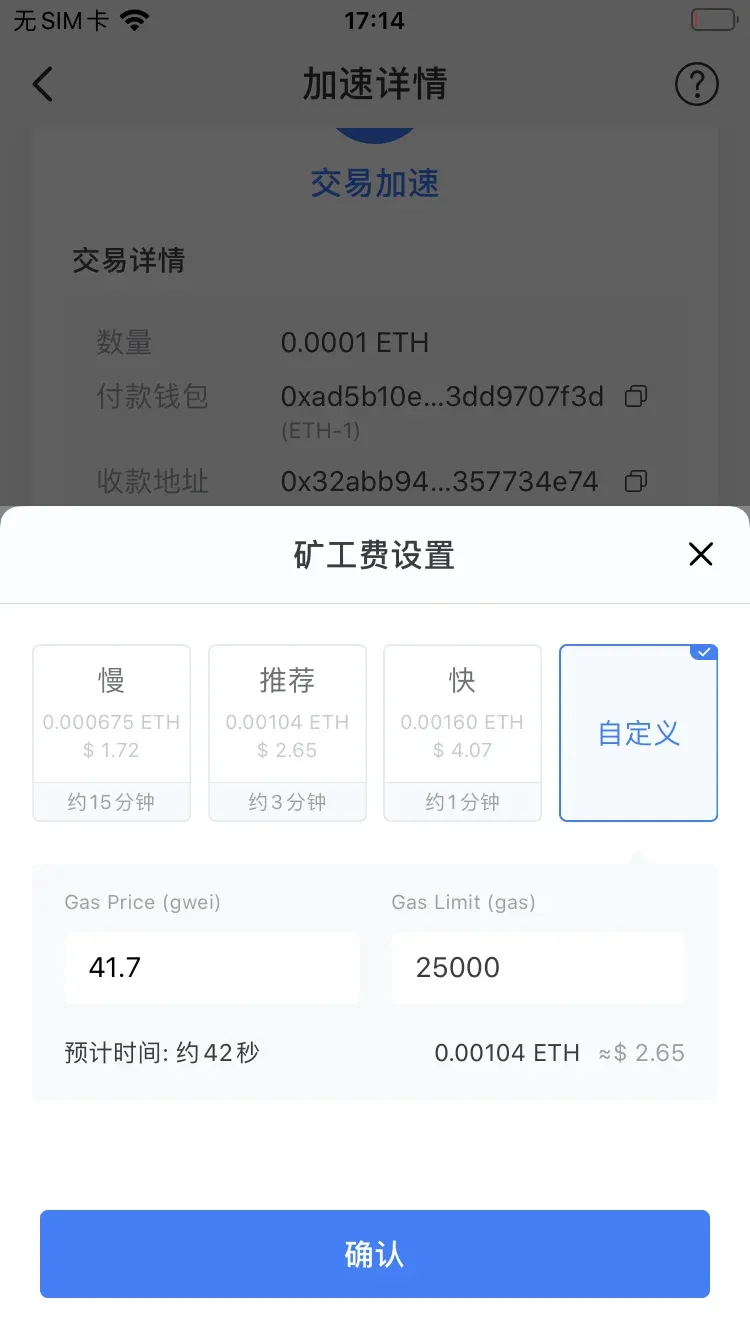
- You may pick a preset fee tier or tap [Custom] to set a specific Gas price and Gas limit, then hit [Confirm].
Tip: Higher miner fees increase the likelihood that miners will prioritize your transaction.
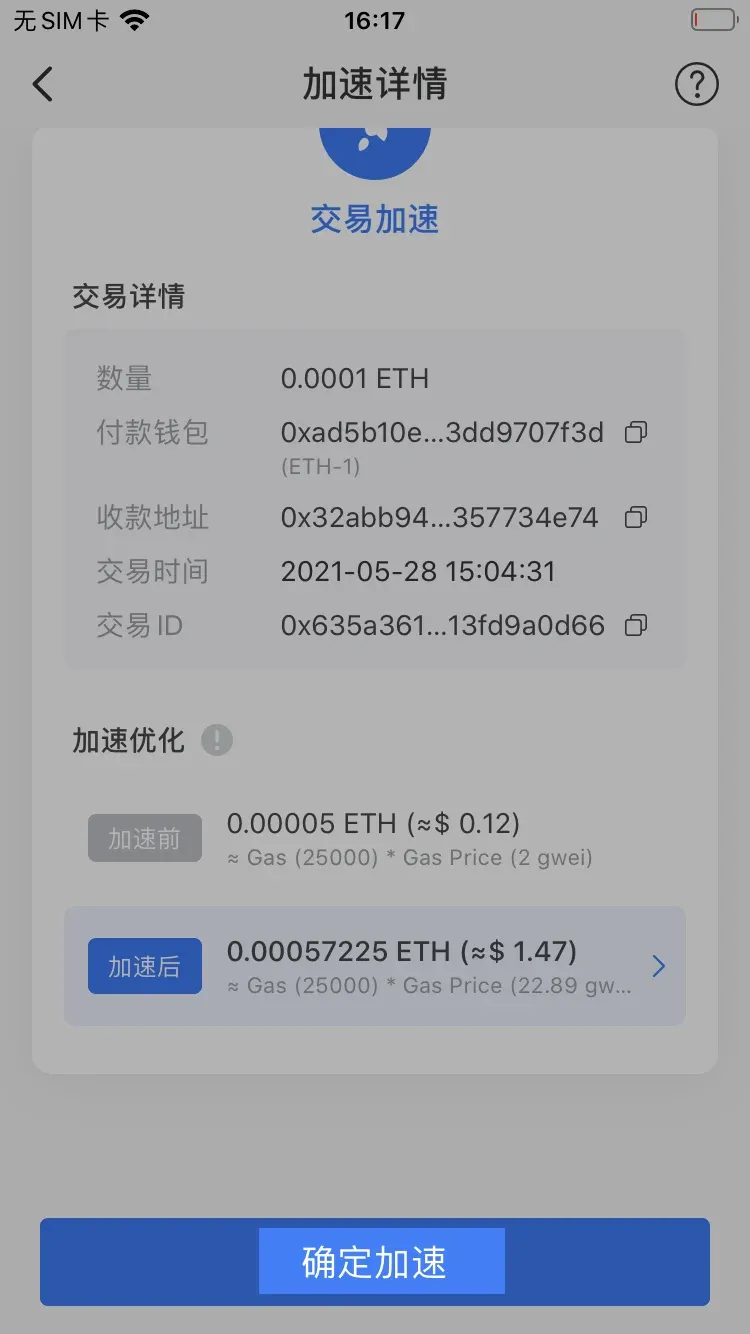
- After configuring the new fee, tap [Confirm Acceleration].
- Verify the information and press [Confirm Payment].
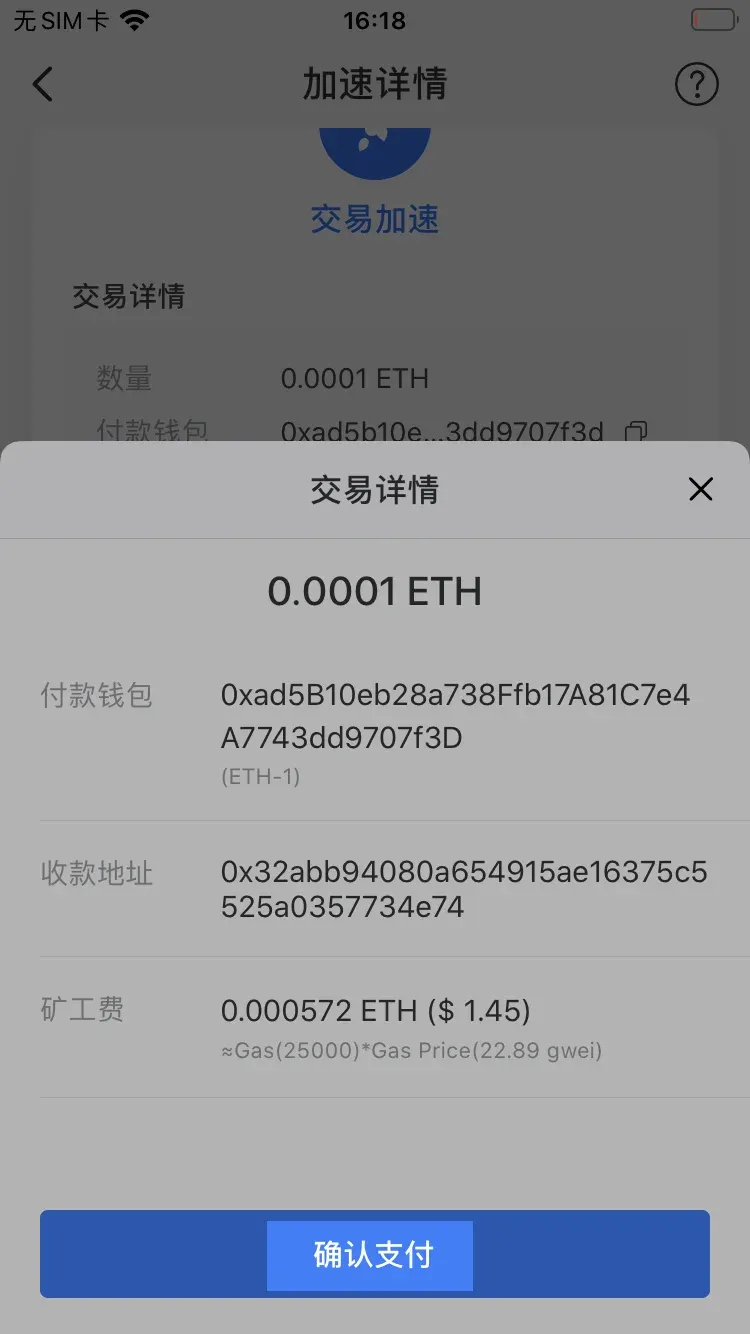
- Input your password to finalise the acceleration.
Adding a Memo When Initiating a Transfer
- On the [Assets] page, select the native coin you intend to send (example: BNB).
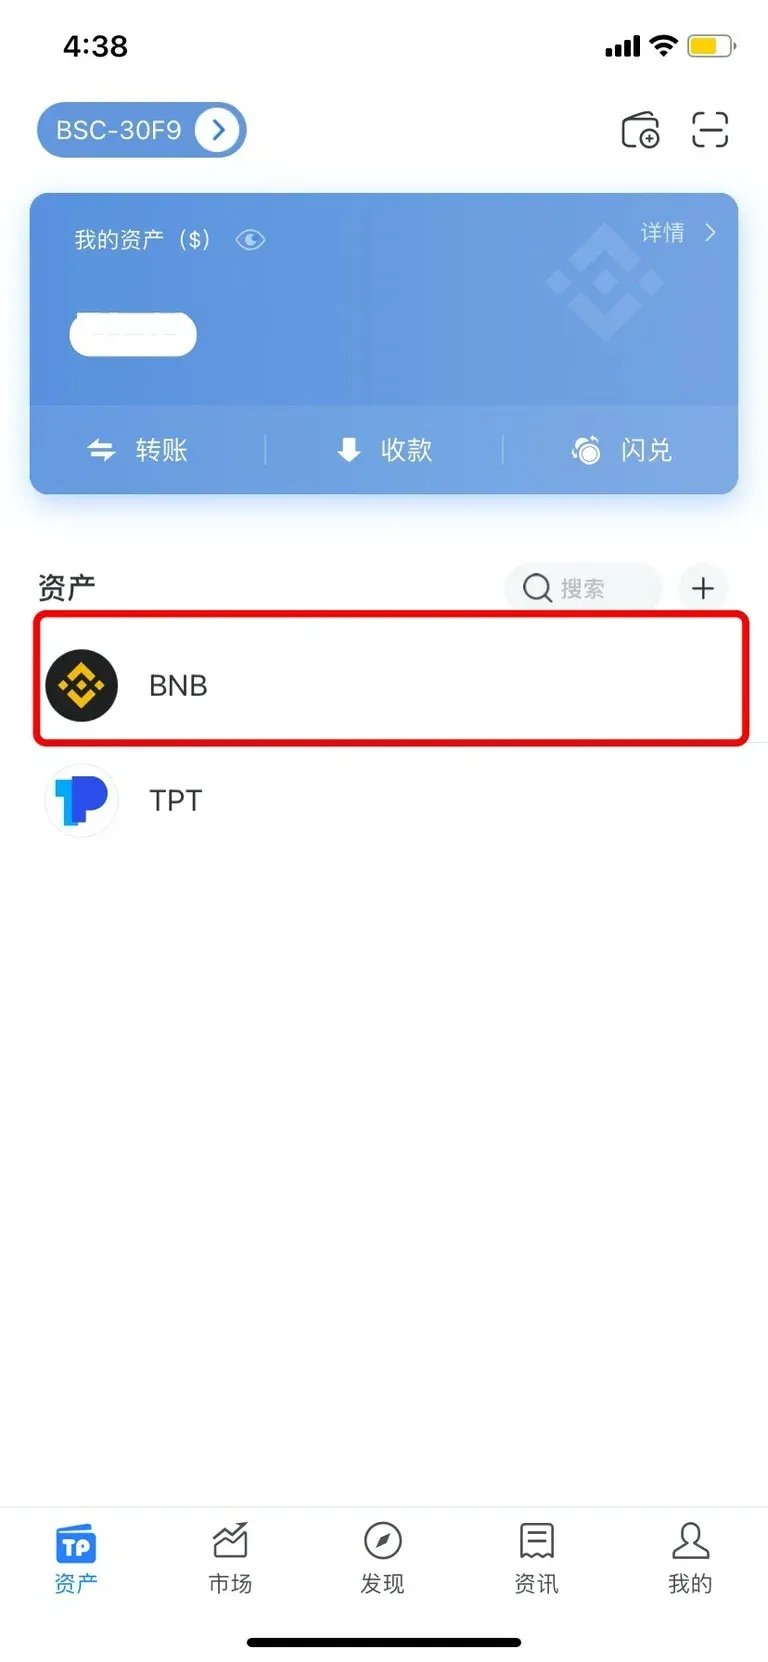
Explanation: Native coins such as ETH, BNB, HT, as well as tokens on EOS and IOST, support a Memo field.
- Tap [Transfer] → Direct Transfer.
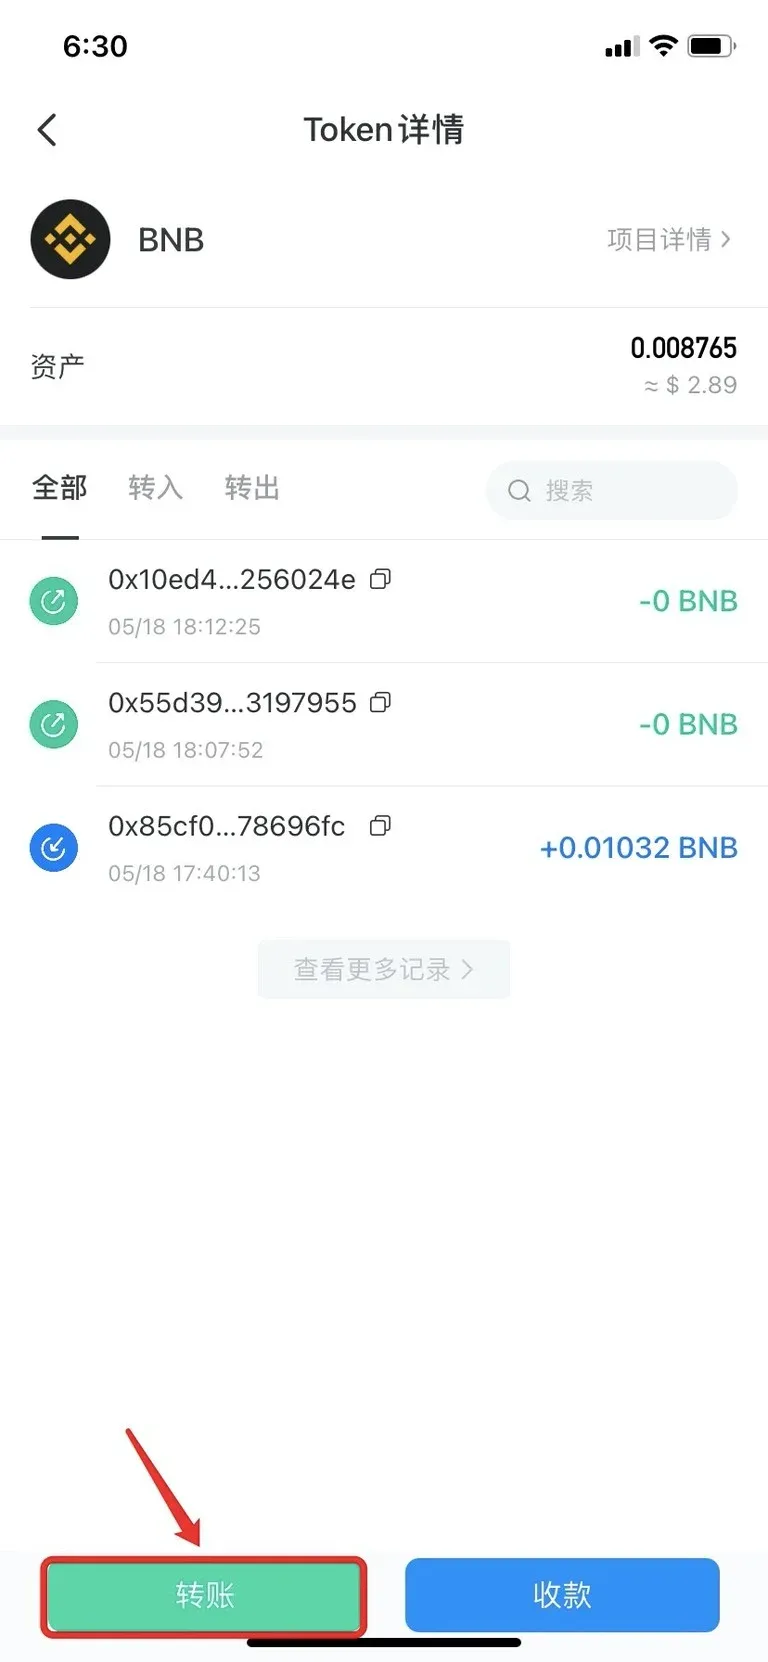
- Fill in the recipient account and amount, choose a miner fee, then tap the [Advanced Settings] button in the lower‑right corner.
- In the pop‑
Related Reading
- OKX Copy‑Trading Feature Review: How One Click Mirrors Pro Strategies
- OKX Square 2.0 Copy Trading Guide for Beginners
- OKX Copy‑Trading Review: Workflow, Benefits, Risks & Fees
💡 Register on Binance with referral code B2345 for the maximum trading fee discount. See Binance complete guide.