 Bitaigen Research
 Many newcomers to the crypto space are still unfamiliar with MetaMask (the “fox” wallet). Below is a complete beginner’s guide that walks you through everything from the browser extension to the mobile app, helping you get started quickly.
In this guide we have organized the full installation and basic‑operation flow of MetaMask—from the desktop browser extension to the mobile version—for users who are just beginning. It covers wallet management and DApp interaction essentials, and later sections contain handy tricks for you to explore, so it’s worth a careful read.
MetaMask “Fox”
MetaMask is a plug‑in style crypto wallet that works with mainstream browsers such as Chrome and Firefox, and it also offers iOS and Android mobile apps. All private keys are stored locally by the user and never uploaded to a server, giving it a relatively high level of security. At the same time, MetaMask is well‑compatible with Ethereum smart contracts and a large number of DApps, making it popular among developers and experienced users alike. This tutorial demonstrates how to install MetaMask on a computer browser and on a phone, and introduces the basic workflow.
1. Installation on Chrome
1.1 Add the Extension
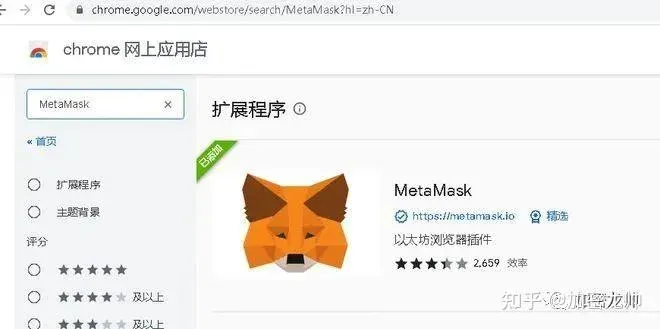
- Open the Chrome Web Store (https://chrome.google.com/webstore/category/extensions?hl=zh-CN).
- Type “MetaMask” into the search box, click “Add to Chrome”, and confirm. The extension will install automatically.
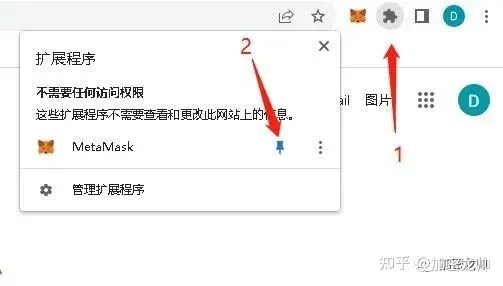
After a successful installation, a MetaMask icon appears in the upper‑right corner of the browser. Click it to open the plug‑in interface quickly.
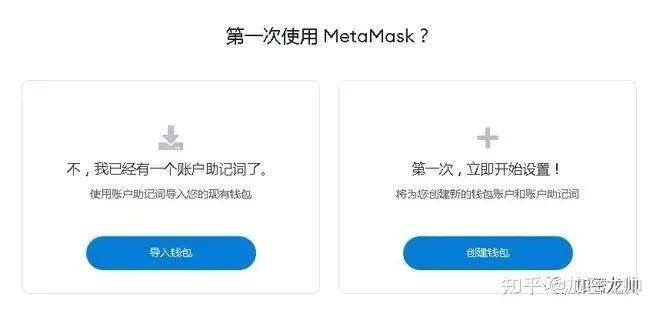
1.2 Create or Import a Wallet
- Import an existing wallet: Click the “Import Wallet” button on the left, paste your seed phrase and fill in the fields in order.
- Create a new wallet: For first‑time users, select “Create a Wallet”, read and accept the terms of use, and the system will generate a 12‑ (or 24‑) word seed phrase. Store this phrase securely. Then set a login password (used for local unlocking on this browser).
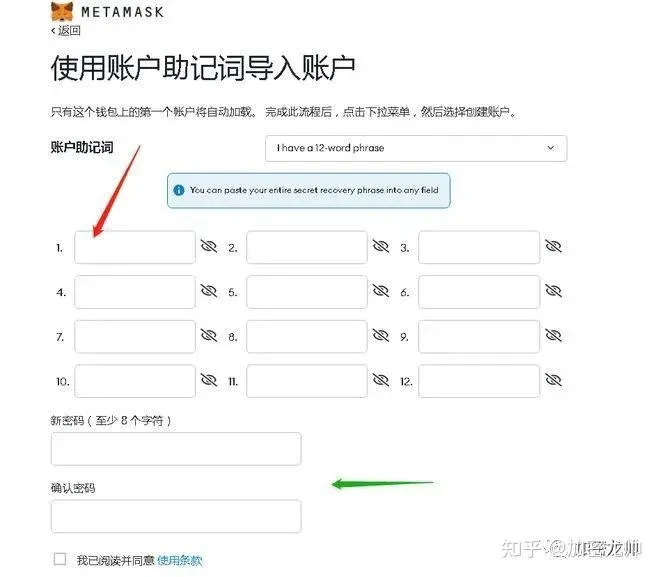
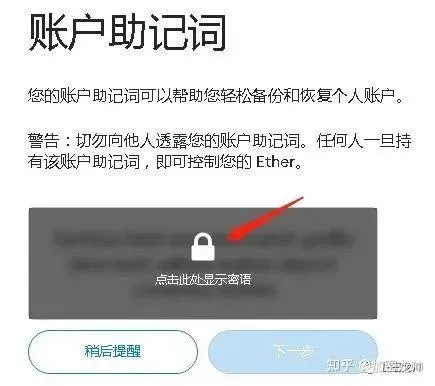
When creating a new wallet, the system will prompt you to reveal the seed phrase. Be sure to record it in a safe environment and keep an offline backup.
1.3 View Address and Add Tokens
After opening the extension, the address displayed at the top is your receiving address. Below it, the “Add Token” input box lets you paste a token contract address to add a custom token to the list.
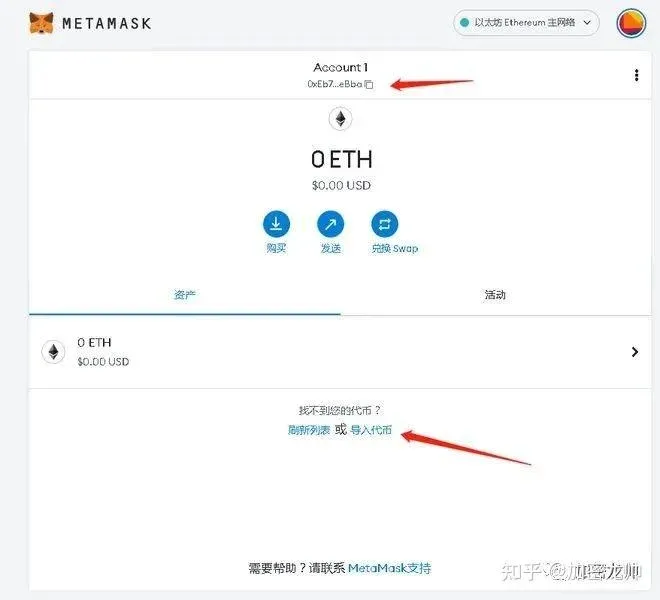
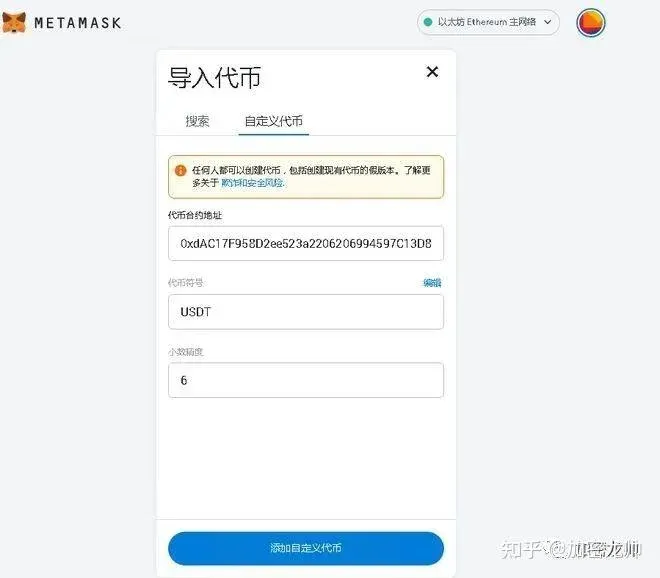
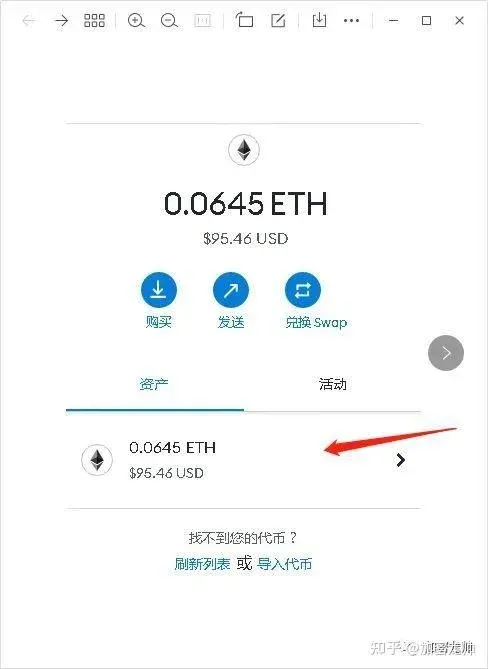
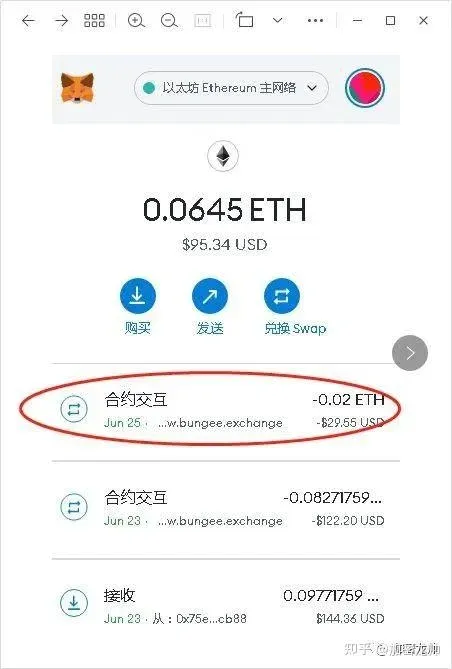
1.4 Transaction Lookup
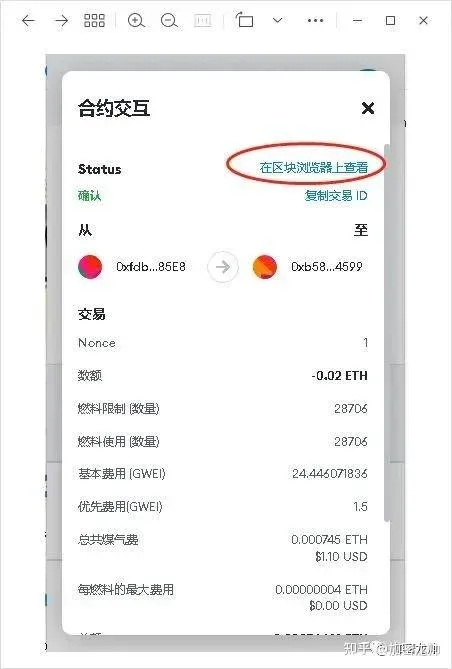
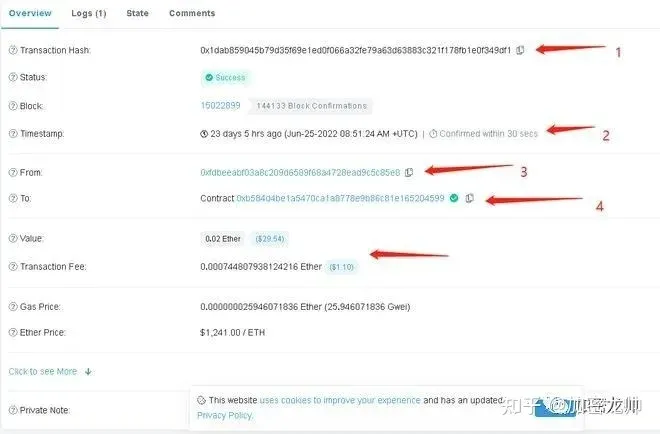
Click Send to make a token transfer. After the transfer is completed, you can click the corresponding entry in Activity to view details. The blockchain explorer will display:
- Transaction hash (TxHash)
- Transfer time
- Sender address
- Token contract address
- Transfer amount
1.5 Add a Cross‑Chain Network
- Click the network dropdown in the upper‑right corner and select Custom RPC.
- Fill in the RPC URL, Chain ID, Symbol (e.g., BSC, USDT) and other required fields, then save.
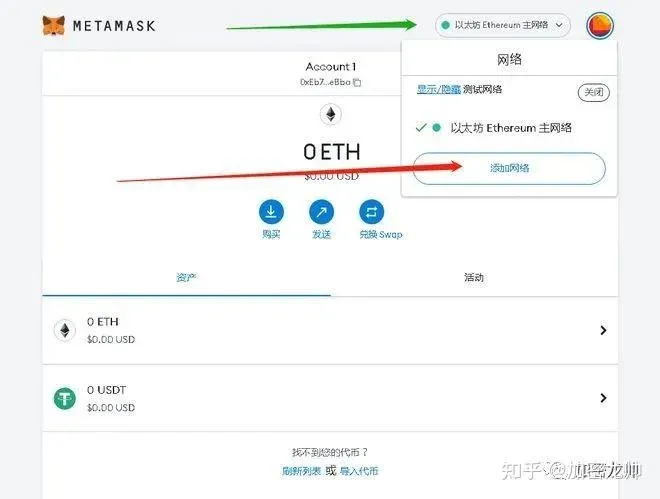
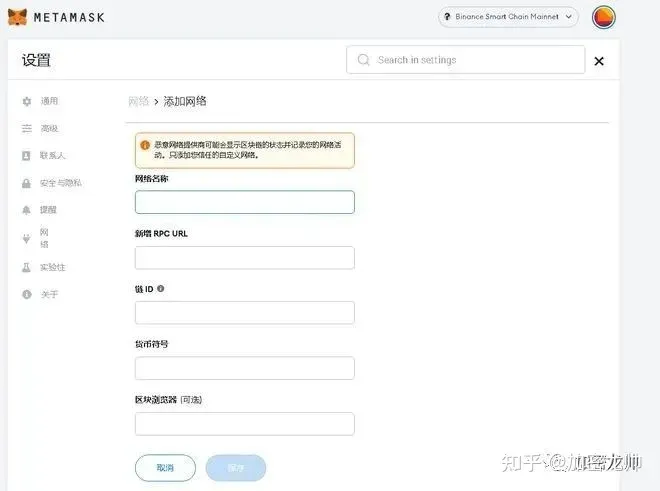
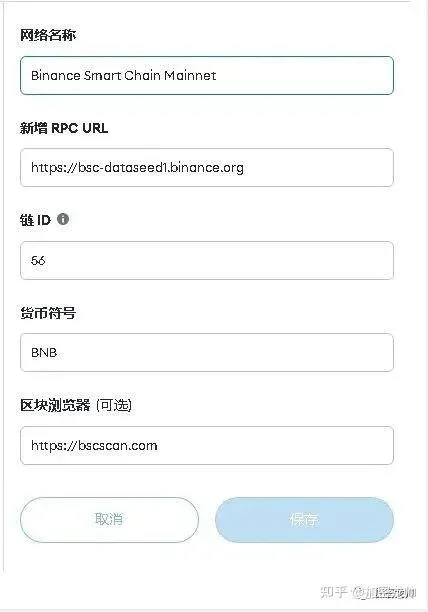
We recommend using Chainlist (http://chainlist.org/zh) for one‑click import of popular networks:
- Open Chainlist and click Connect Wallet in the upper‑right corner.
- Choose the target network from the list and click Add to MetaMask.
- Confirm the prompt and the network is added.
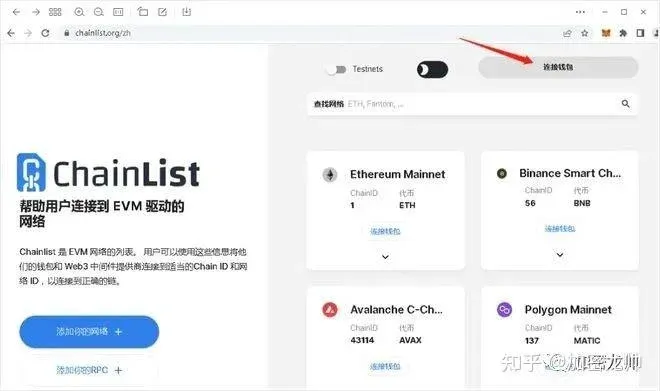
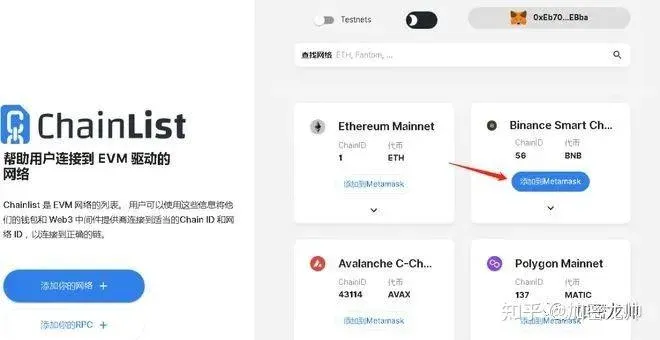
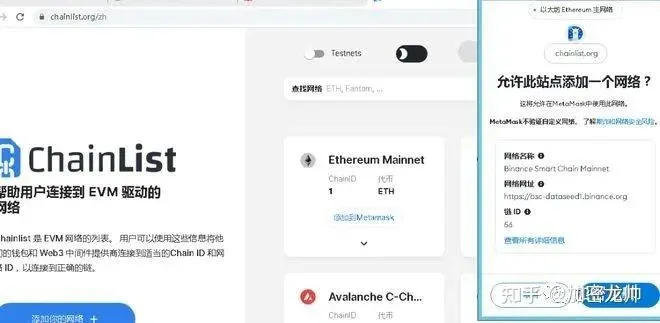
After adding, you can switch networks and use the same address across multiple chains.
1.6 Managing Multiple Accounts
Click the avatar in the upper‑right corner of the plug‑in to Create or Import additional accounts. The first account is tied to the seed phrase; any subsequently created accounts only store a private key. You can view the seed phrase of the primary account under Settings → Security & Privacy.
2. Mobile Version (iOS Example)
2.1 Install
Search for “MetaMask” in the App Store, download and install it using an overseas Apple ID. Once opened, the flow mirrors the desktop version: set a local password, then choose Create a Wallet or Import Seed Phrase.
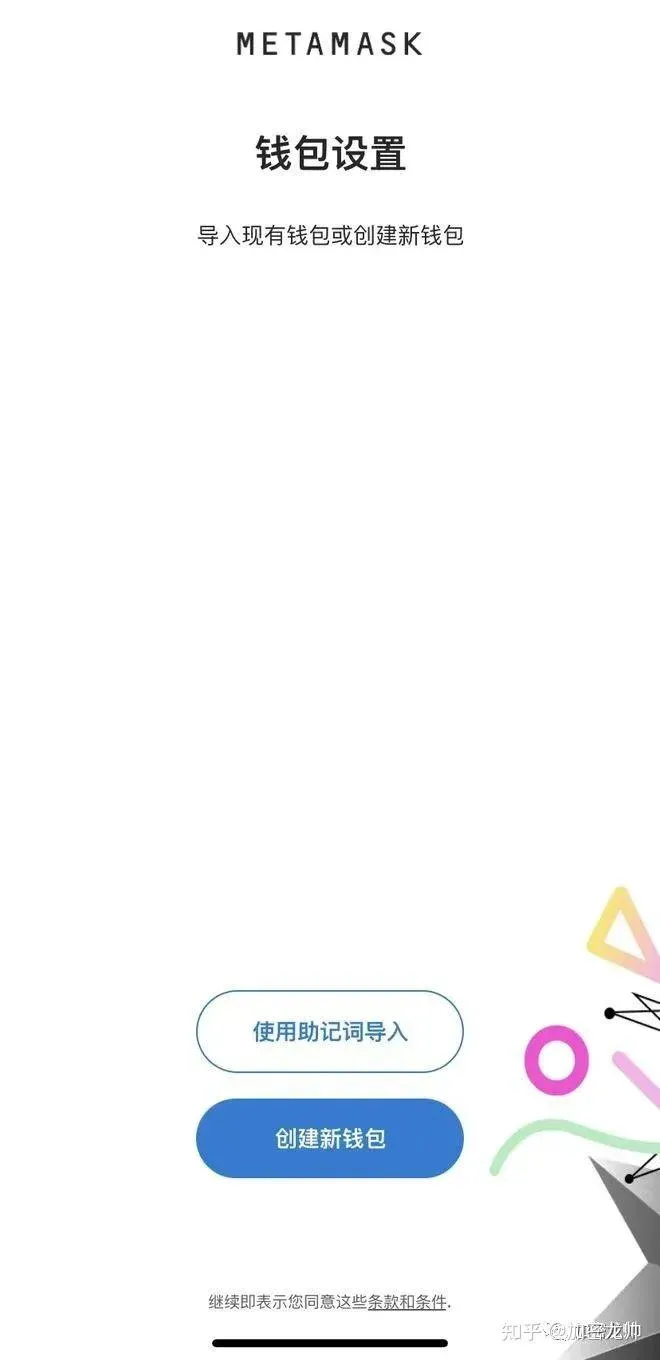
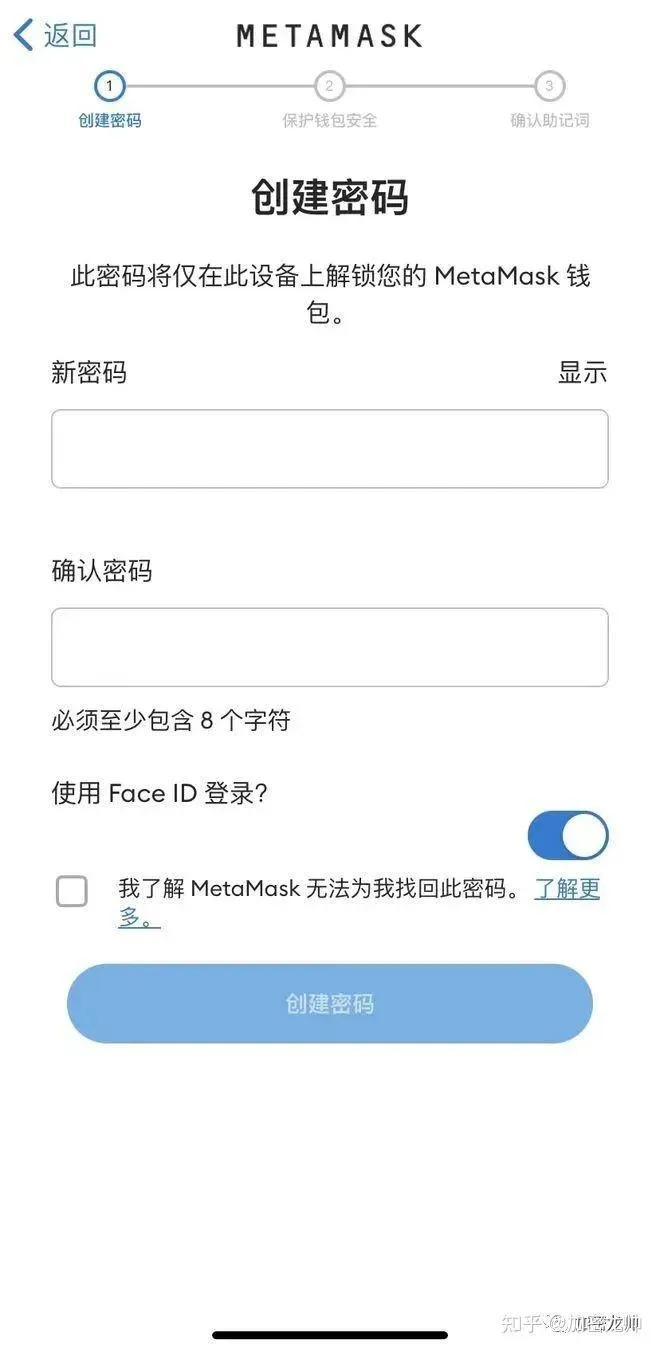
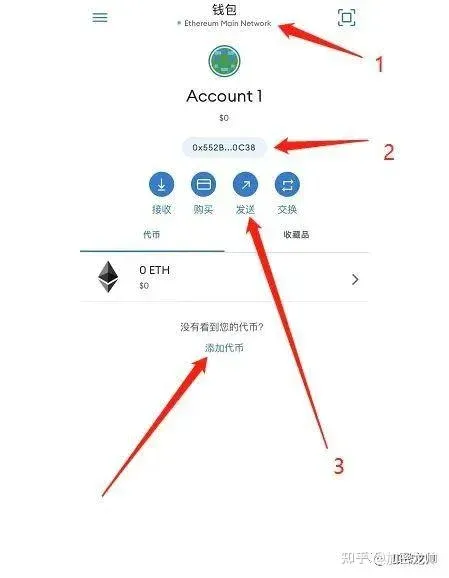
Once you reach the main interface, the primary functional blocks are:
- Network switcher
- Wallet address
- Send entry point
- Add token
2.2 Import Multiple Accounts
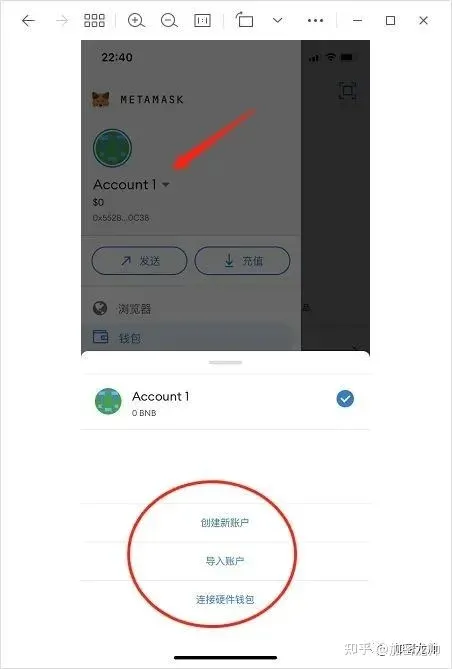
Tap the avatar on the main screen to Add a Wallet, supporting seed‑phrase import or creation of a new account, enabling multi‑wallet management.
2.3 Access DApps
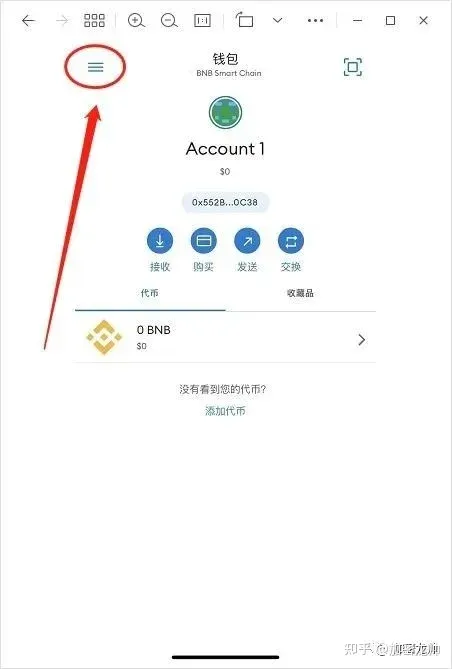
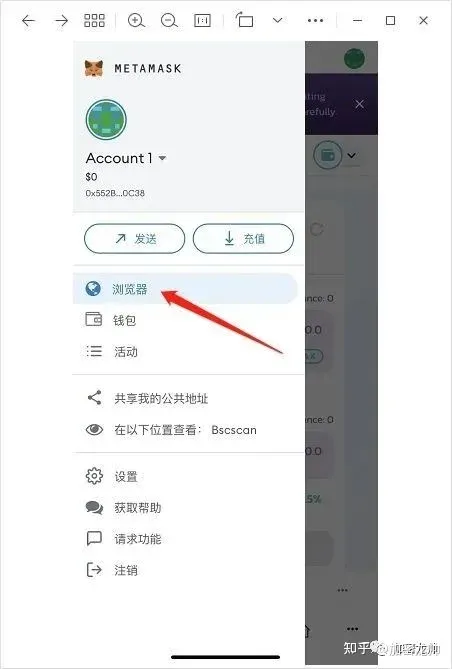
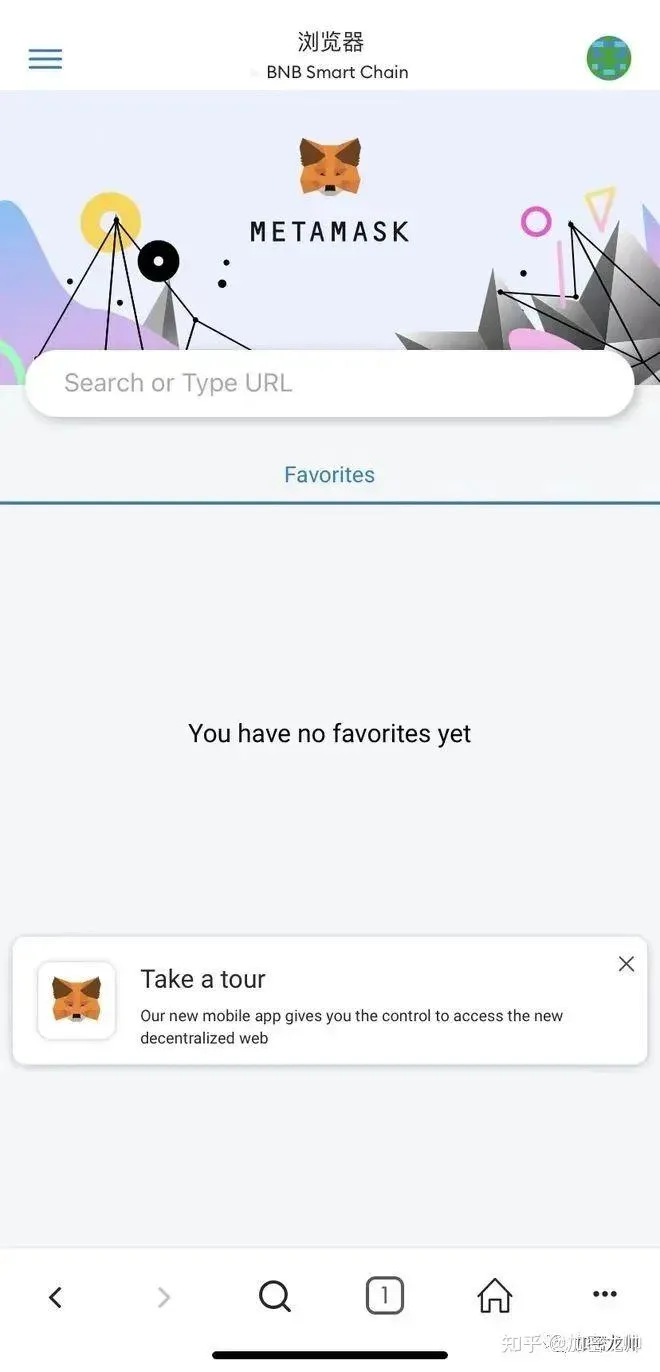
- Tap the menu in the top‑left corner → Browser.
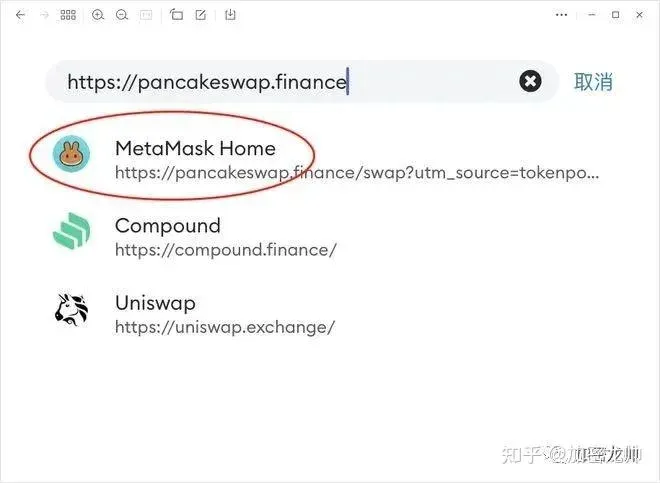
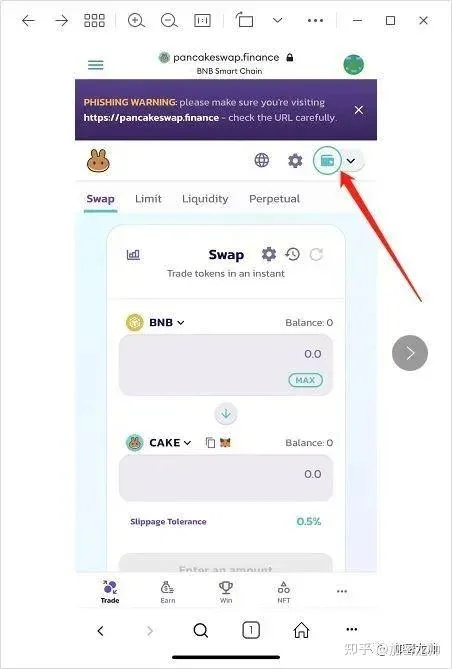
- Enter a DApp URL in the address bar, e.g., PancakeSwap (`pancakeswap.finance`). After the page loads, click Connect Wallet.
2.4 Add a Cross‑Chain Network
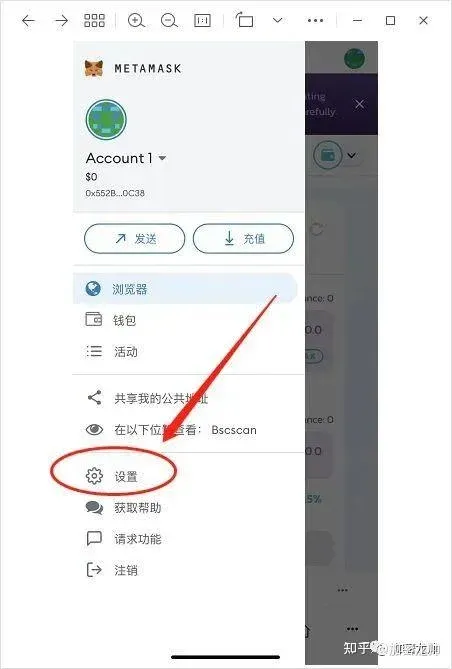
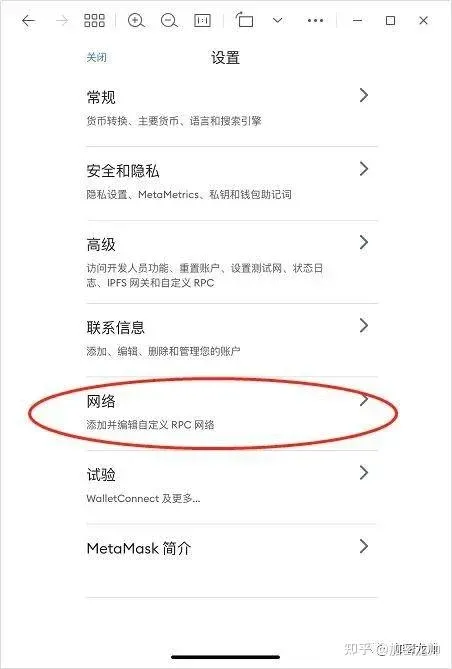
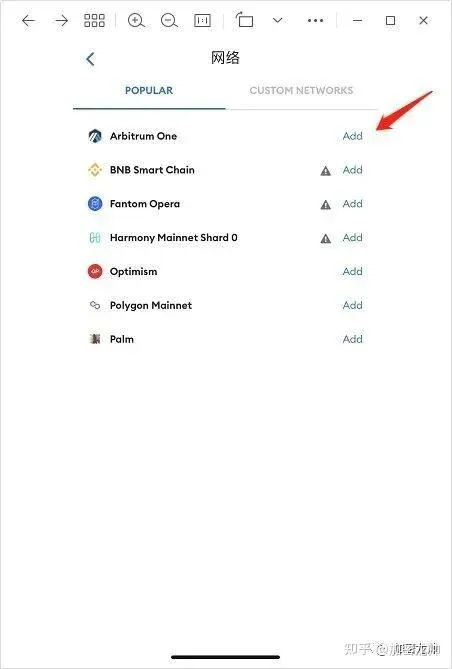
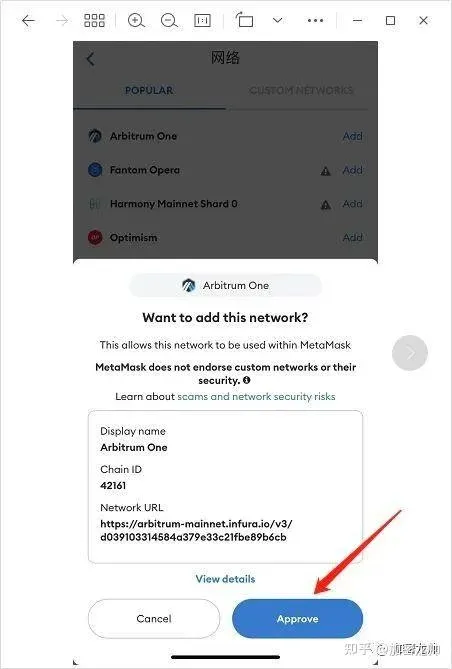
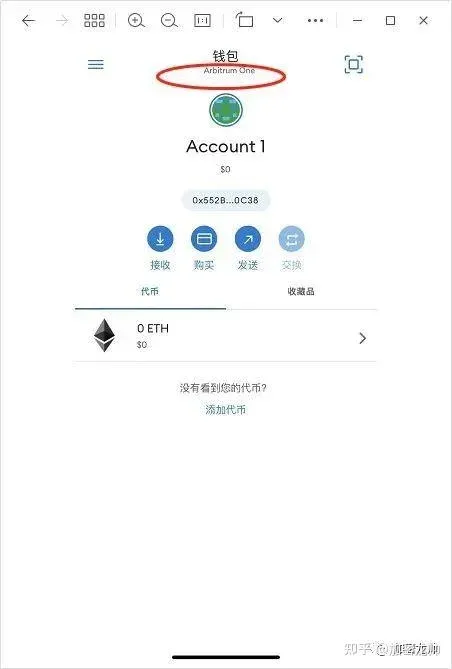
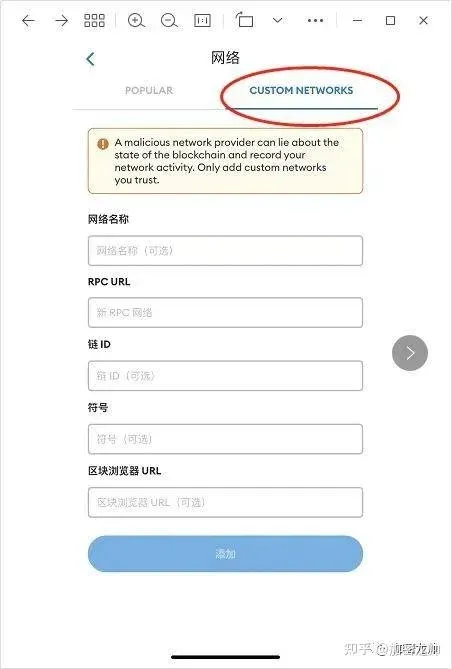
Navigate via the top‑left menu → Settings → Networks, then tap Add Network. The newer UI lists popular networks with an Add button; simply click Add to approve. If the desired network is not listed, switch to the custom tab and manually enter the RPC details before saving.
Summary
This article covered the essential steps for installing MetaMask on Chrome, Firefox, iOS, and Android, creating wallets, managing tokens, checking transactions, adding cross‑chain networks, and handling multiple accounts. Once you have mastered these basics, you can safely use MetaMask to interact with a wide range of DApps and DeFi projects worldwide.
Note: Crypto gains may be taxable in your local jurisdiction; consult a tax professional for guidance.
If you have any questions, feel free to leave a comment below for discussion.
Related Reading
- MetaMask Wallet Guide: Registration, Installation & Basic Use
- MetaMask Wallet Security: 5,000 ETH Theft Rumor & Probe
- MetaMask Wallet Guide: Secure Ethereum, DeFi & NFT Management
💡 Register on Binance with referral code B2345 for the maximum trading fee discount. See Binance complete guide.